badattitude77
Mitglieder
-
Benutzer seit
-
Letzter Besuch
Alle erstellten Inhalte von badattitude77
-
 Thank you Neo
 -
The game says there is a new update available. Just like last time, I'm getting a message that it's not compatible with the version of Windows I'm running when I click on it. Can you supply a link like you did last time for the update please Neo? Thank you.
-
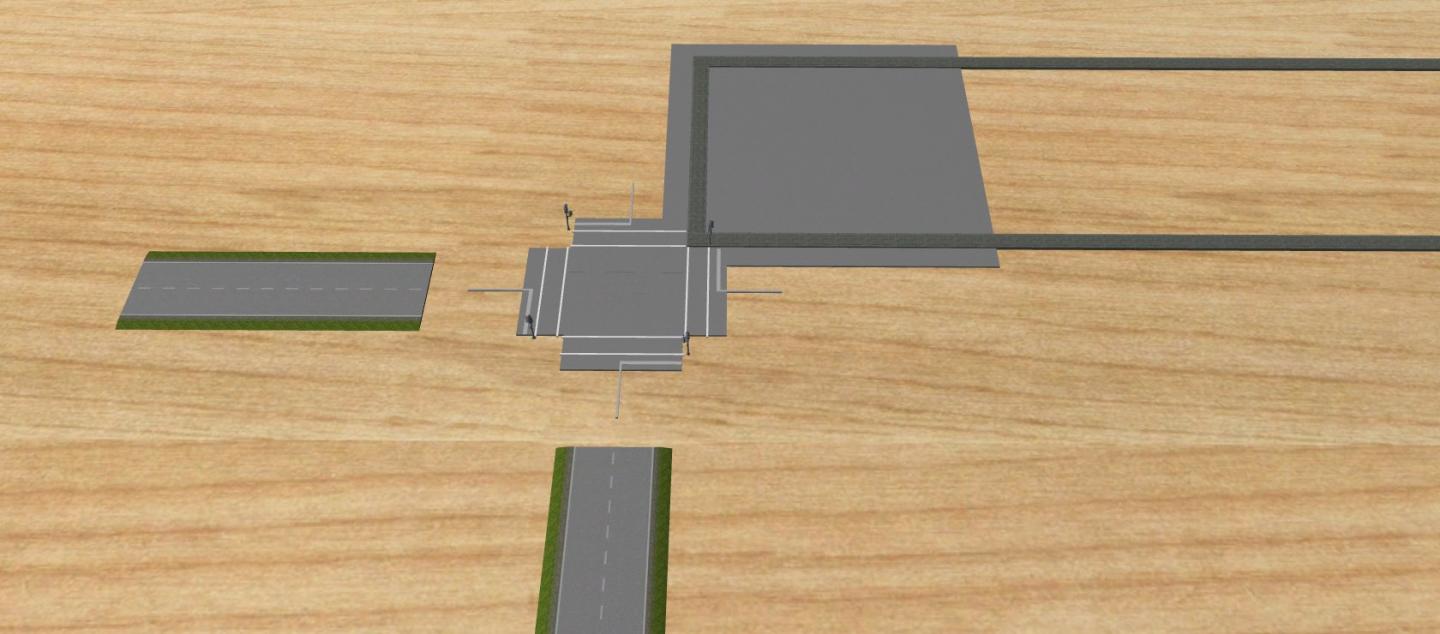
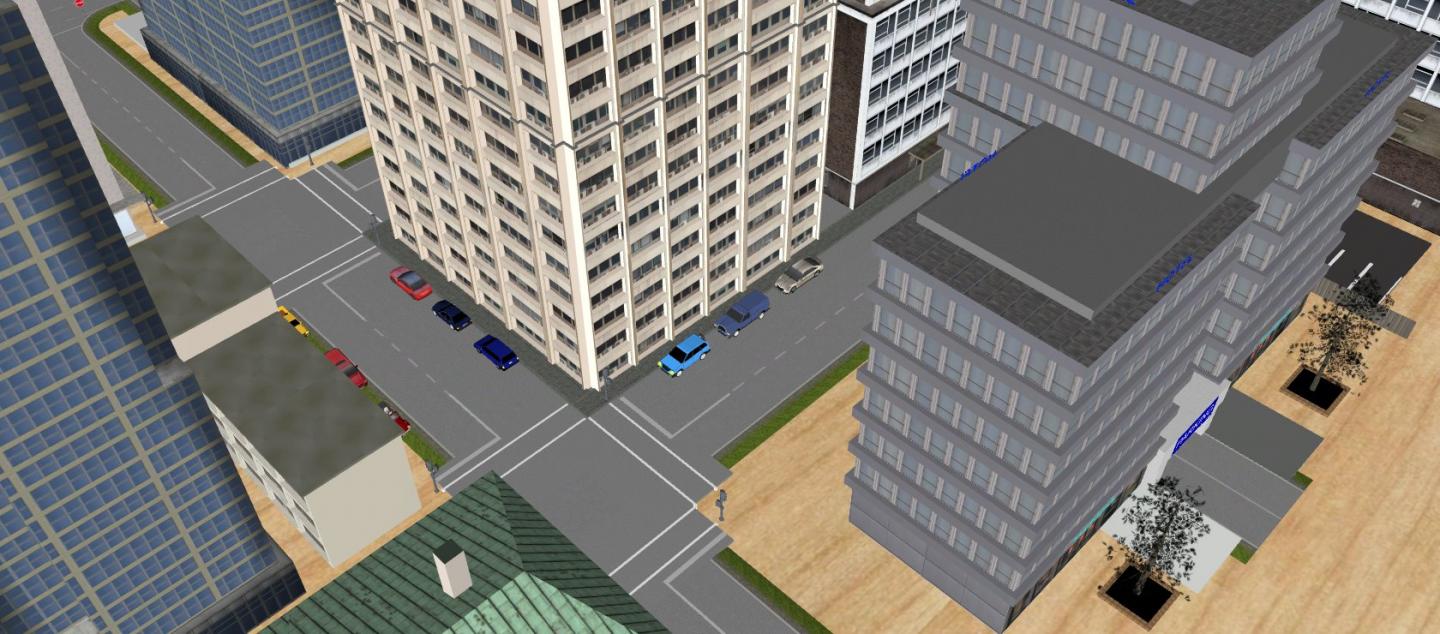
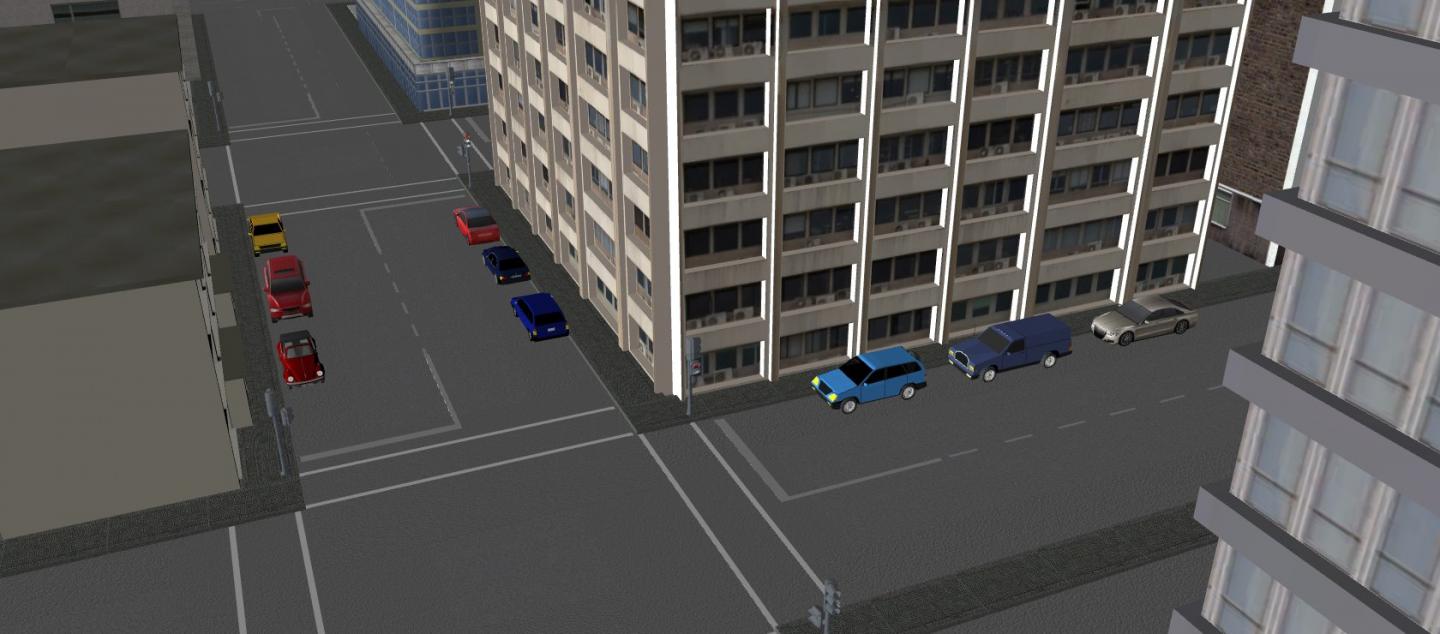
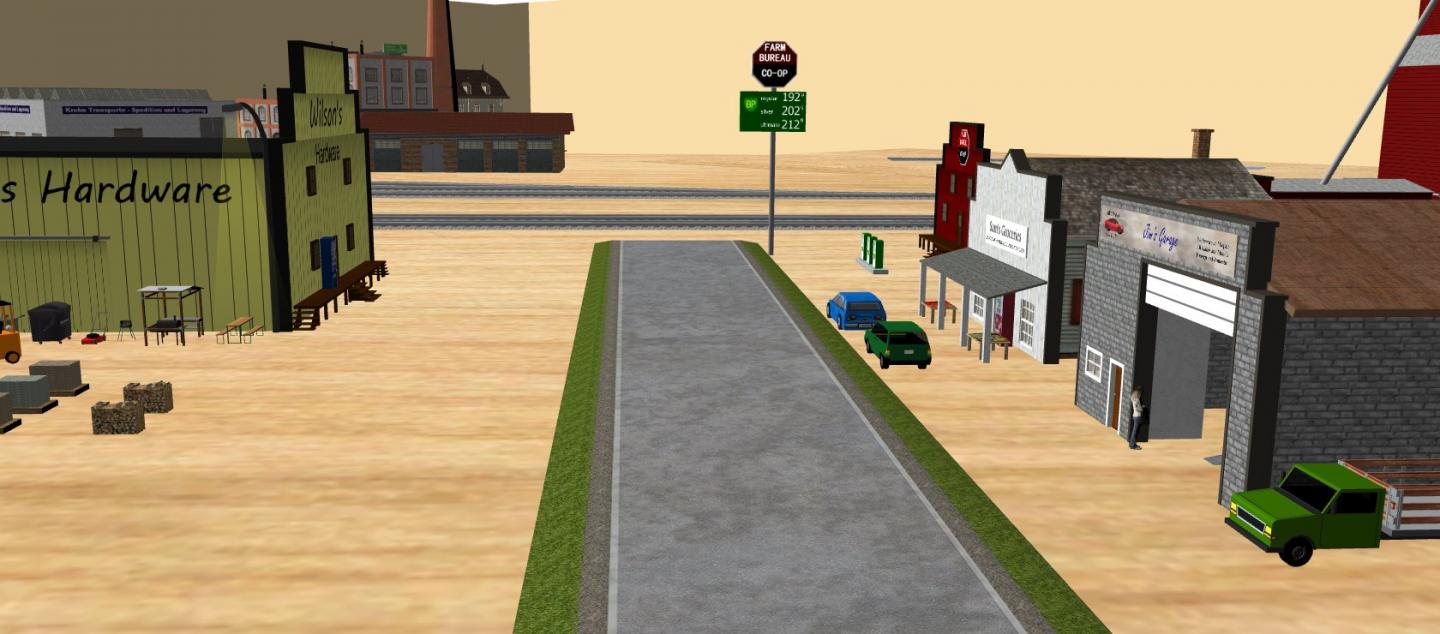
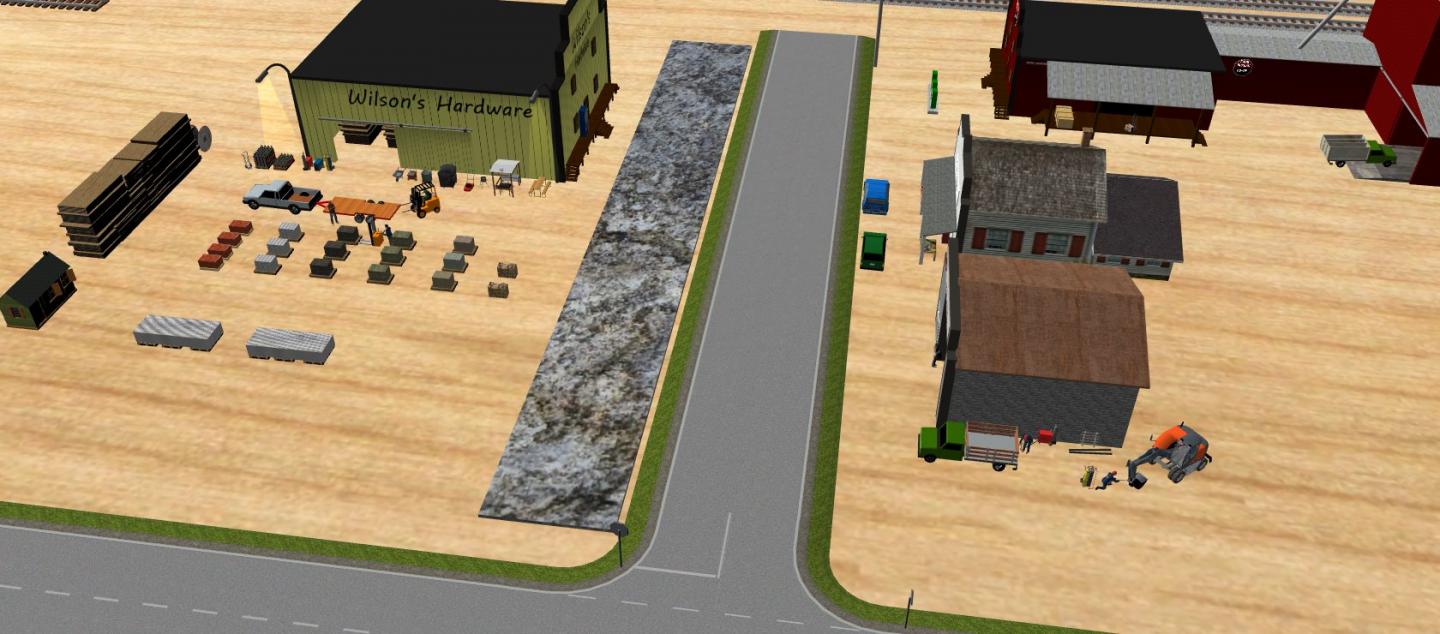
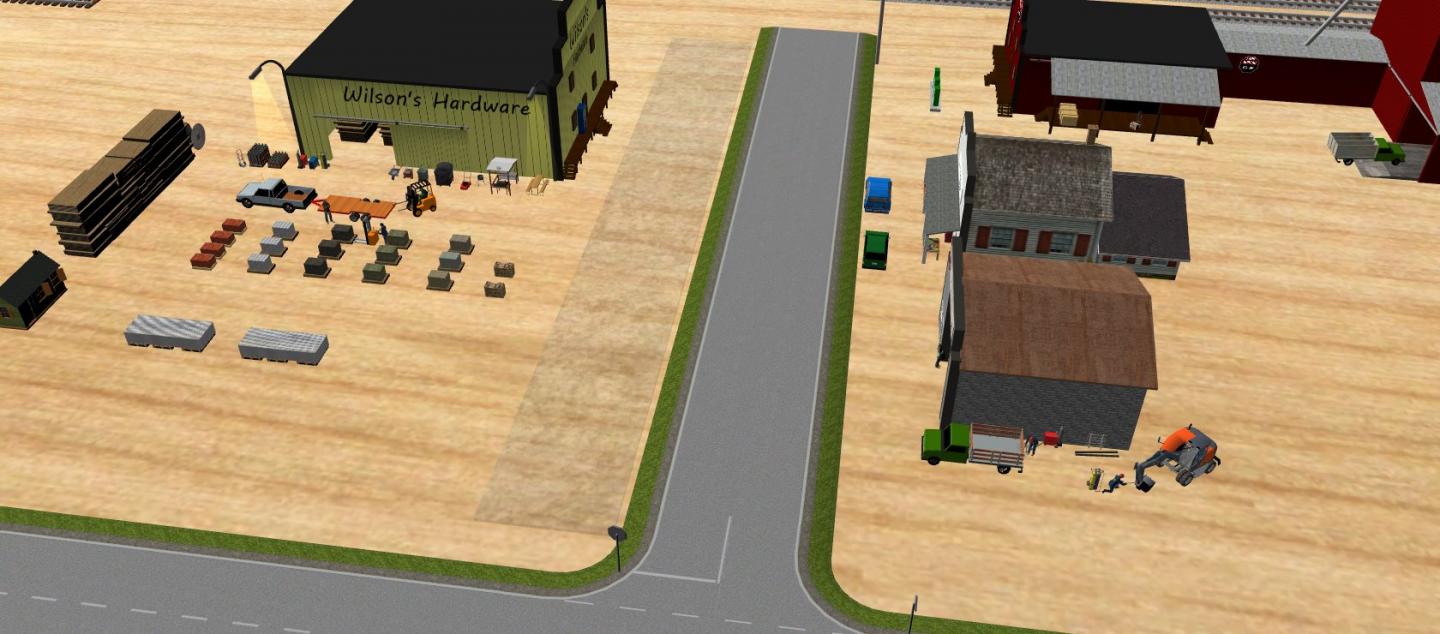
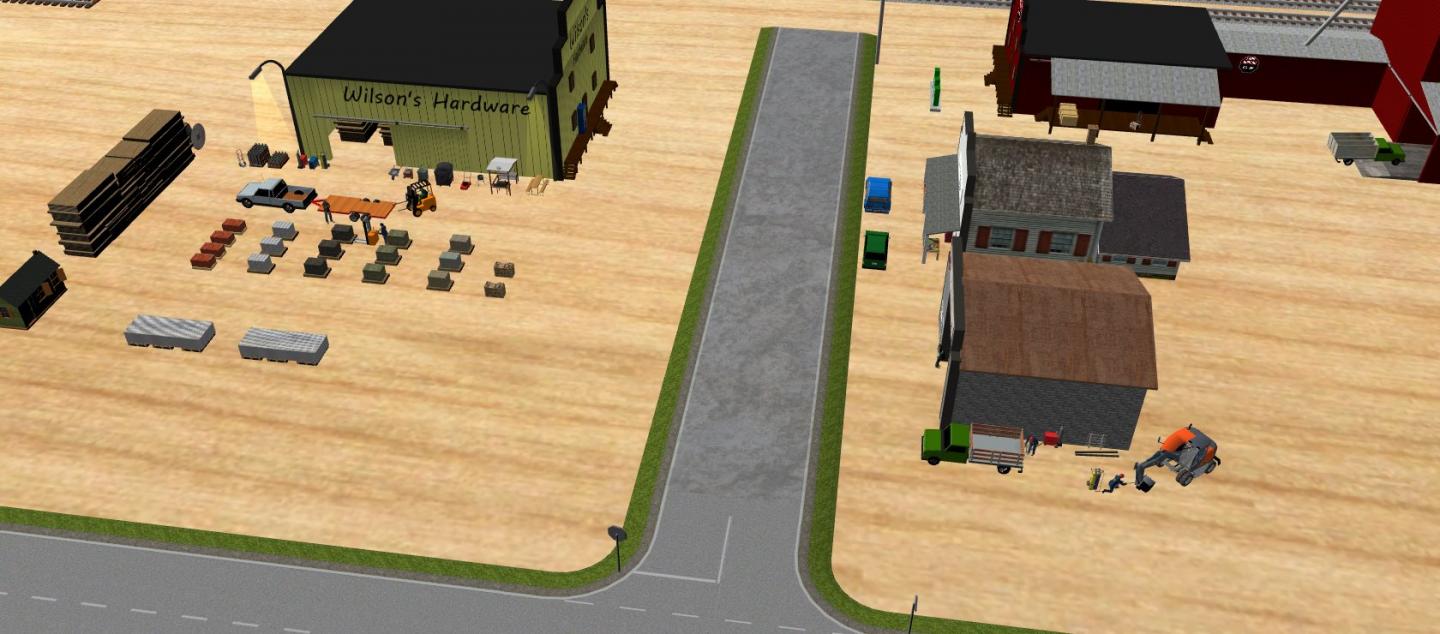
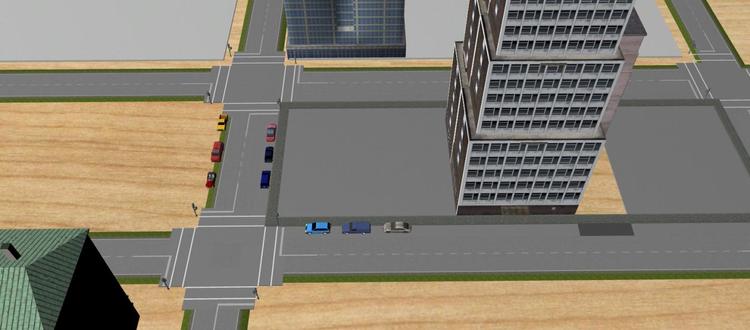
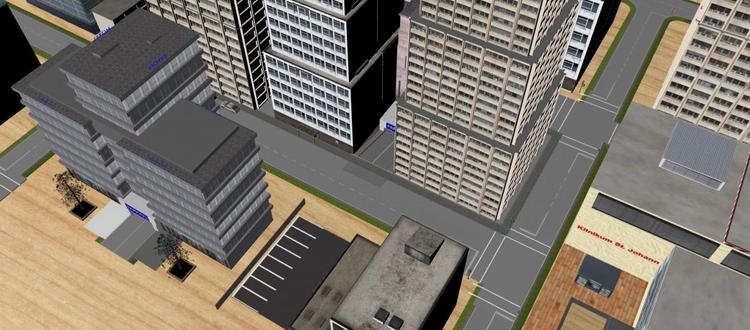
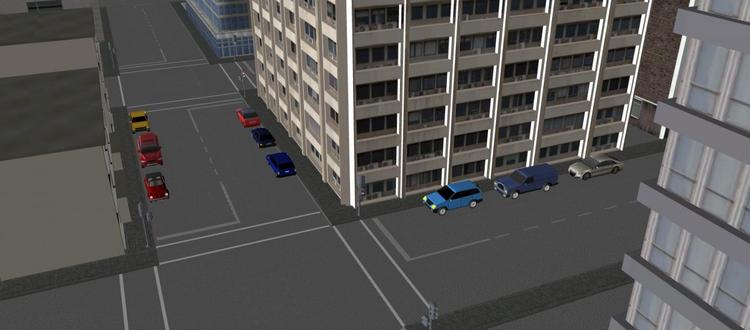
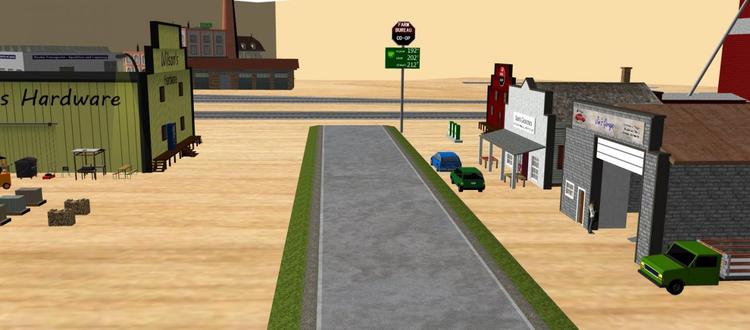
In a modern city, the streets are usually wide enough to park along the curb. The game's streets aren't wide enough for this, but this can be done using the Federal Highways in the game and a little scratchbuilding. Image 1 Image 2 shows some of the pieces you are going to have to build using quaders in the game's "primitives" section. If you haven't found these yet, they are in the "extra" section in the game menu. Image 2 First, you are going to have to "widen" the roads to create a shoulder wide enough for cars to park along the sidewalk. To do this, select a quader and adjust the height so it just covers the grass on the Federal Highway. Working in N Scale, and in inches, I used a height of 0.054. The length and width of the quader needs to be wide enough so there will be a shoulder on all 4 sides, but to get a smooth texture, you will have to make multiple sections. Unfortunately, I haven't found a texture in the game that matches the roads exactly, so I used Strleer. I set the texture scaling at 1,000 and 1,000, then set the color to the following specifications: Hue: 160 Sat: 0 Lum: 212 Red: 225 Green: 225 Blue: 225 Image 3 You will also need to make the sidewalks. Again, working in N Scale and with inches, I chose a height of 0.01 and a width of 0.5 for my sidewalks. The lengths will vary depending on how large the buildings are that you use, but in a typical American city, each city block is the same size, and has 2 or 3 buildings. Using the skyscrapers I built as a guide, I set the length of my sidewalks at 7.2 for the short legs, and used three quaders set at 8 for the long legs. If you only use one quader set at a length of 24, the texture of your sidewalks won't match. I chose the Kopfstein Muster texure for these sidewalks and left the color of the quader white. The game's intersections won't work, so you'll have to make your own crossroads and intersections. This is done using quaders for the road, crosswalks, limit lines, and roadway centerlines. To get the limit lines and the centerlines to match the game's roads, I set the colors to the following specifications: Hue: 160 Sat: 0 Lum: 171 Red: 182 Green: 182 Blue: 182 Image 4 Buildings in a down town area usually come right up to the sidewalk, as shown in image 5. This won't be possible using different size buildings, so you will have to make additional pads for the buildings to sit on wherever a building doesn't touch the sidewalk. Image 5 Images 6 and 7 show how additional quaders were used to make pads for the buildings to sit on. These pads need to be the same height as the sidewalk to prevent there being a "step down" from the sidewalk toward the building. You can also see where I added a "ramp" from the road to cross the sidewalk going into an underground parking garage between two buildings. Since you are making your own sidewalks, you will have to make a ramp or a dip in the sidewalk anywhere a car needs to cross the sidewalk to get into a parking lot or parking garage. Image 6 Image 7


-
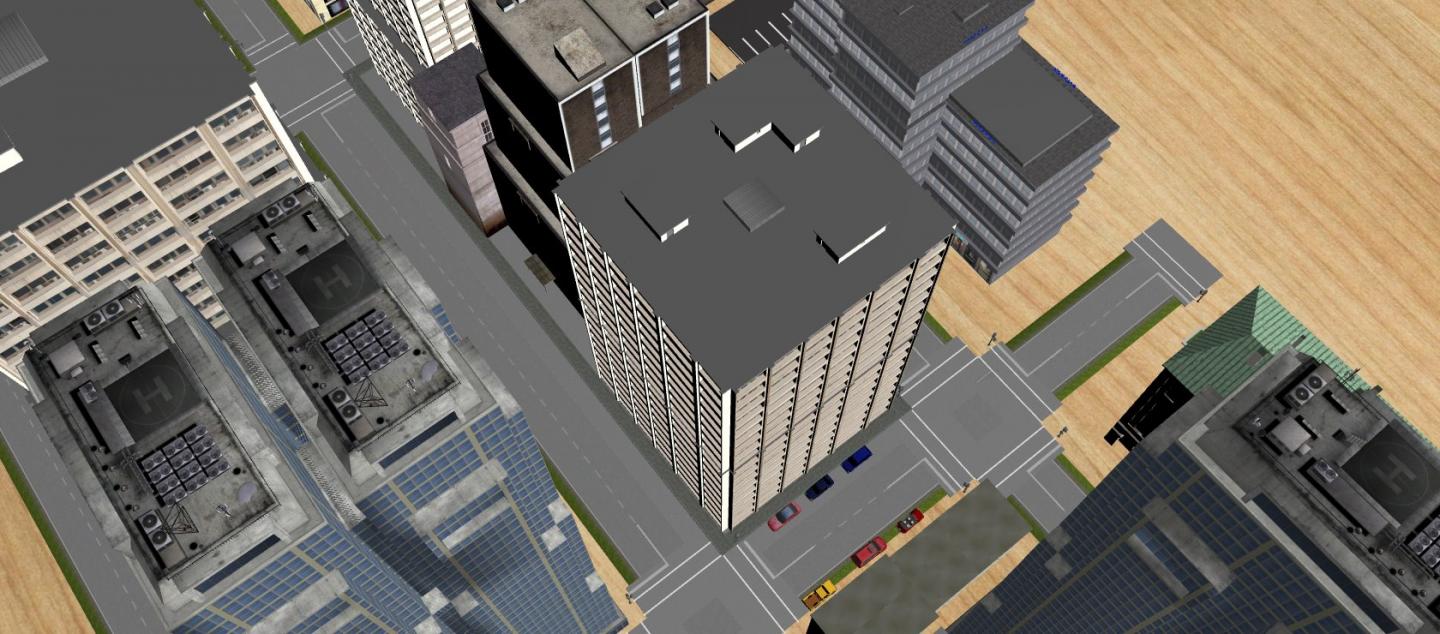
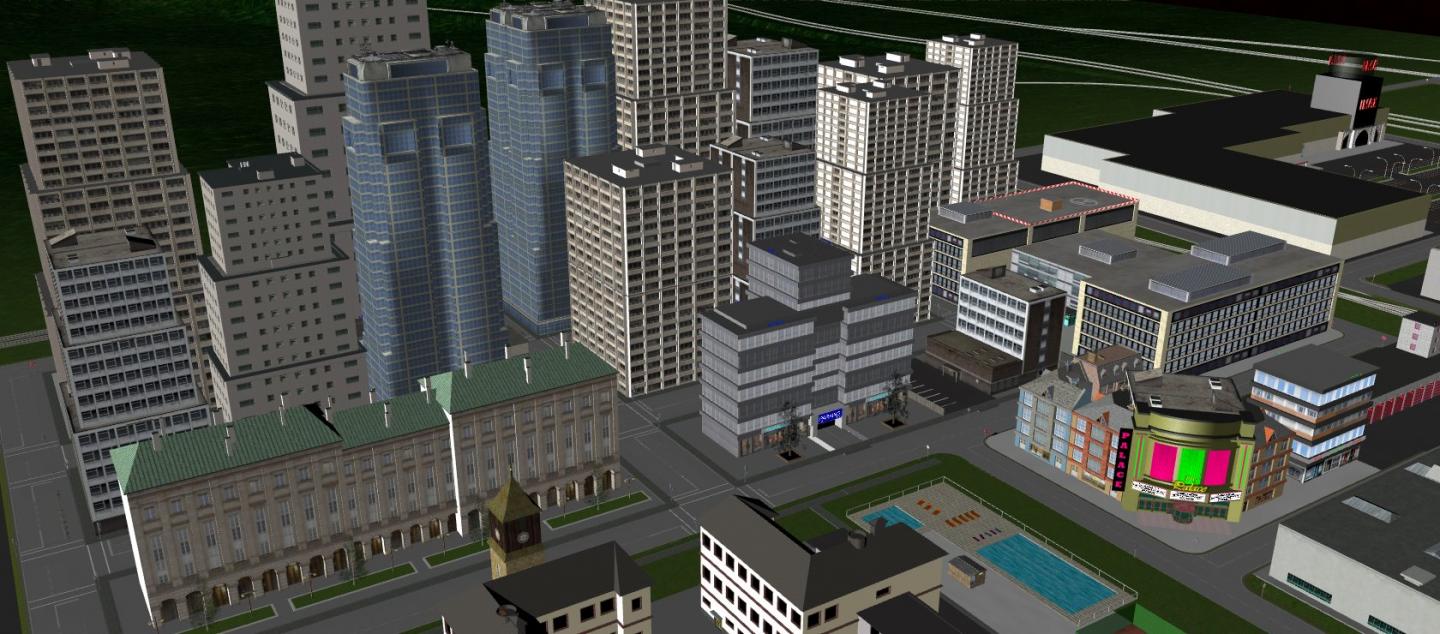
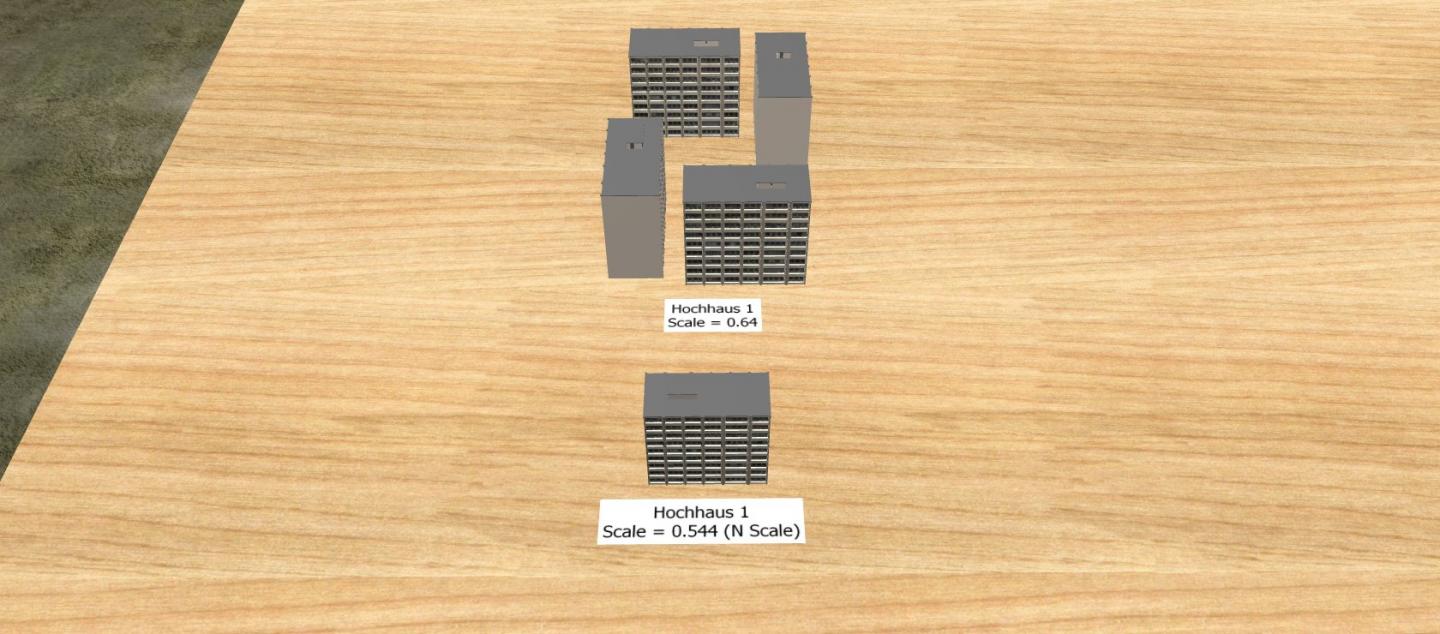
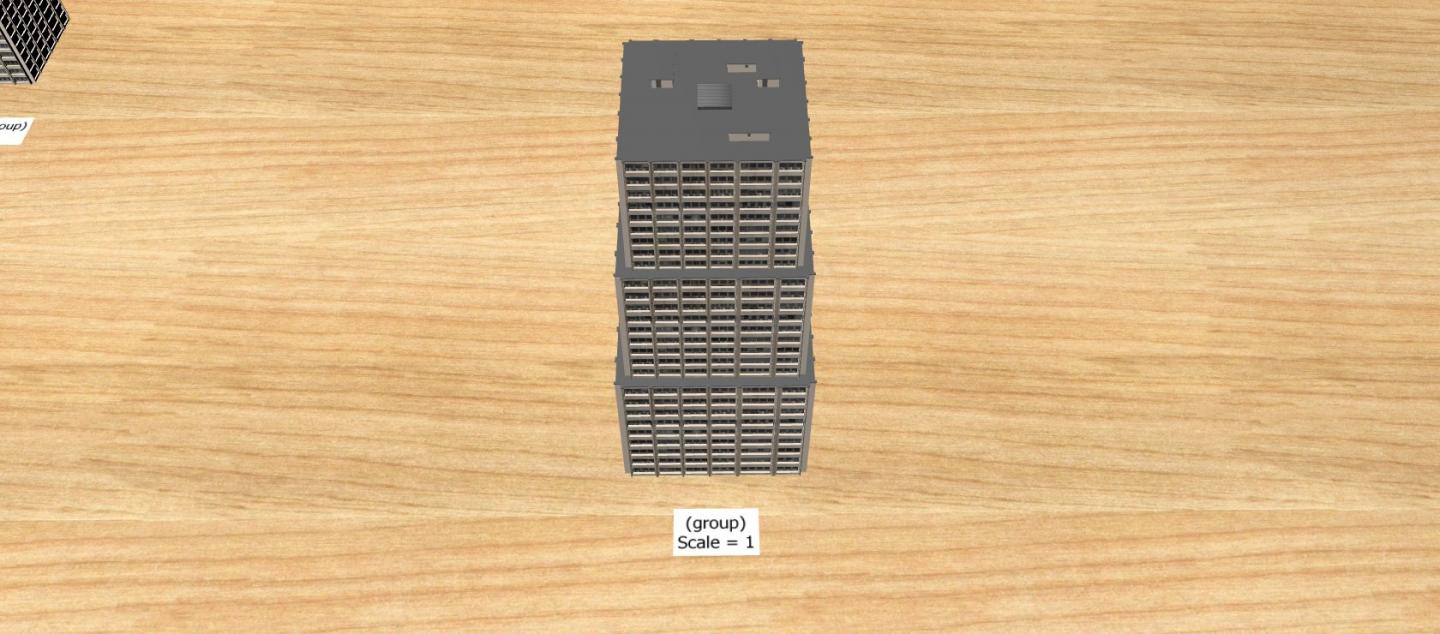
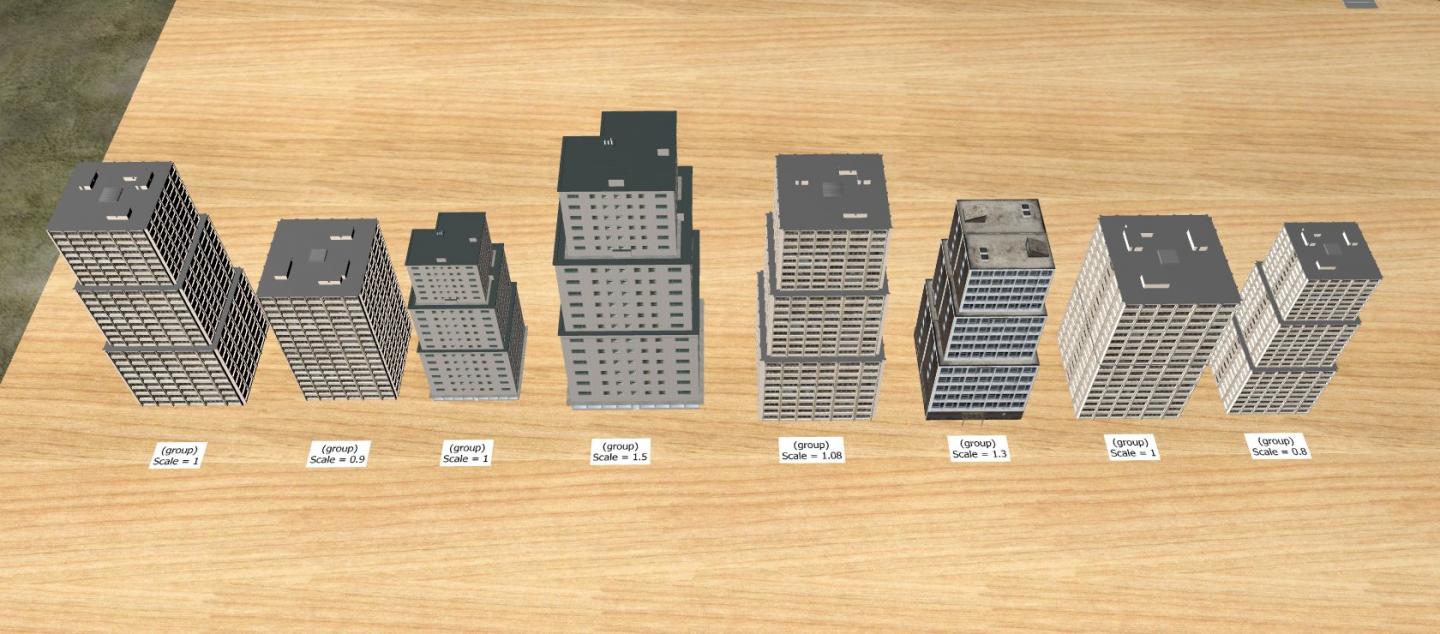
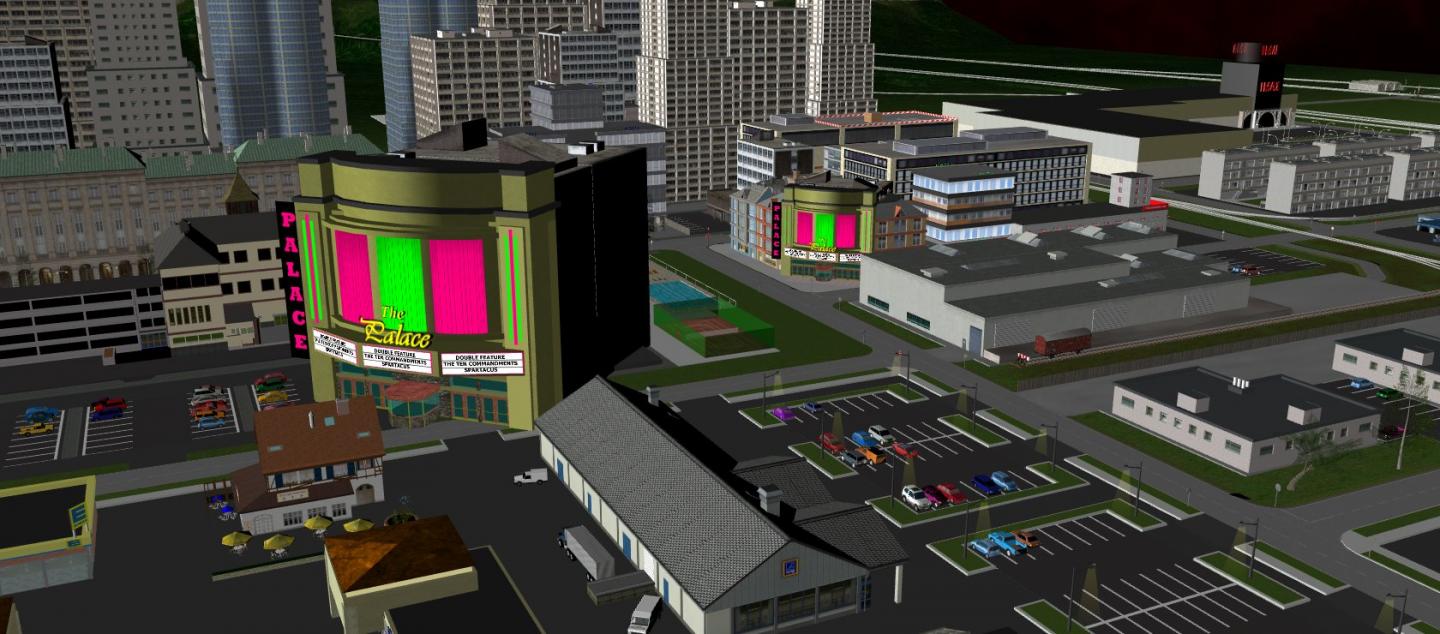
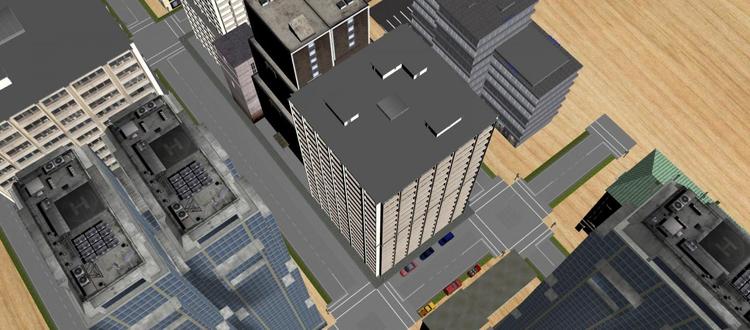
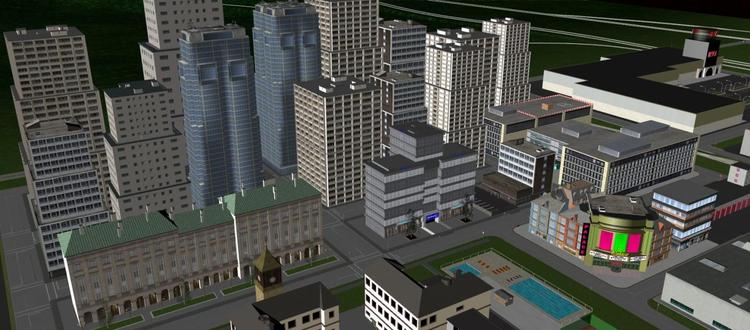
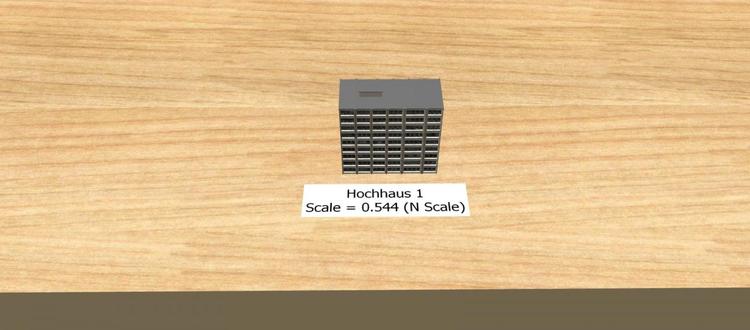
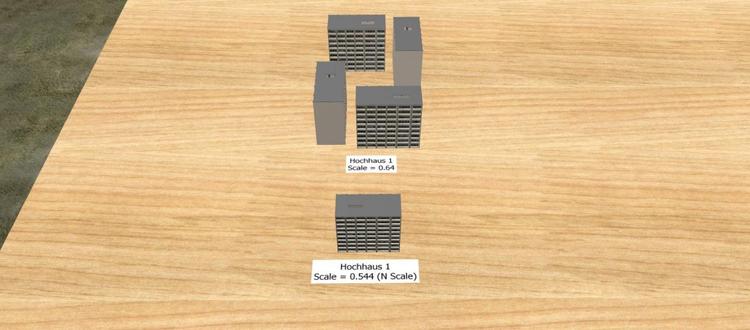
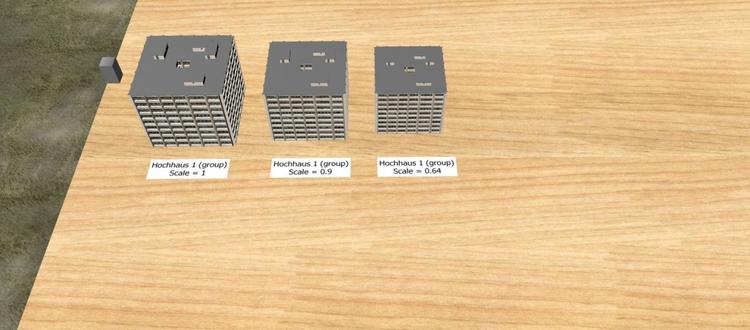
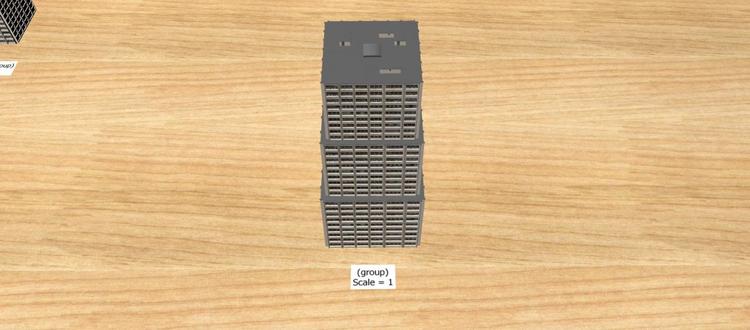
If you're building a modern city into one of your layouts, a selection of different shapes and sizes of skyscrapers is a necessity. Although the game doesn't offer these buildings, they are very easy to make using existing building's in the game, and as you can see from the screen shots from the layout I titled "Small layout 2", they look pretty good clustered together. I shared this layout under small layouts in the community, so you can open it and tear it apart if you want to see how each skyscraper was made. Image 1 Image 2 Image 3 To make skyscrapers, start with some of the game's buildings that you think will look good grouped together. In image 4, I've selectd the Hochhaus 1 in N Scale. Image 4 In image 5, I adjust the scale to what I think will look the best. In this case I took 4 of the Hochhaus 1 buildings and, increased the scale from 0.544 to 0.64, then rotated them so they can be grouped together. Image 5 In image 6, I grouped the 4 Hochhaus 1 buildings together to form a square, then copied and pasted the group twice. I left the original group scaled to 0.64, then increased the scale to 0.9 for the second group, and 1 for the third group. The gray block on the left will be used to fill the hole left in the middle of the top group. Image 6 Image 7 shows the three groups stacked together with the gray block filling the hole in the middle of the top group. Once you have adjusted the X, Y, and Z axis to get the 3 groups aligned the way you want them, select all three groups (and the gray block) and group them all together. Image 7 Image 8 shows a variety of sky scrapers that can be made this way from the game's existing buildings. You can increase or decrease the scale of each group to vary the finished size of the skyscraper, creating a more realistic down town setting. Image 8

-
No problem BahnLand. I think sharing our work is half the fun, but it's annoying seeing a bunch of question marks on the shared layout.
-
It looks good Henry. Using the holes was a little awkward for me at first, but after some experimenting with it, it was pretty easy. I think it has great potential to create a curved or irregular shape in the base without having to use the game's primitives or multiple sections of panels. I've checked out your St. Elle's layout in the community section. You've done some great work. Happy New year. David.
-
That's what I thought Henry. Thank you. If I wanted others to see a question mark, I could use any image from the web. I've always enjoyed sharing my work, and looking at what others have done. I've gotten some great ideas looking at the layouts others have done on here. That's why I'm asking for some storefront images in the catalog so if I do share a layout, others don't see a bunch of question marks.
-
If I do that, then the image will be saved on my computer. If I understand how this game works, doesn't that mean if I share a layout where I've used that image others will only see a question mark BahnLand?
-
I realize there has been no response to my other requests yet, but I have another one. Could you make the storefront images used on the Altstadtarcaden, Stadthaus Zeile 3, Stadthaus Zeile Eckhaus 1, Stadtzeile Eckhaus 2, Stadthaus Zeile 5, Ladenzeile HVG, Hotel Stadtblick available as textures that could be applied to a quader?
-
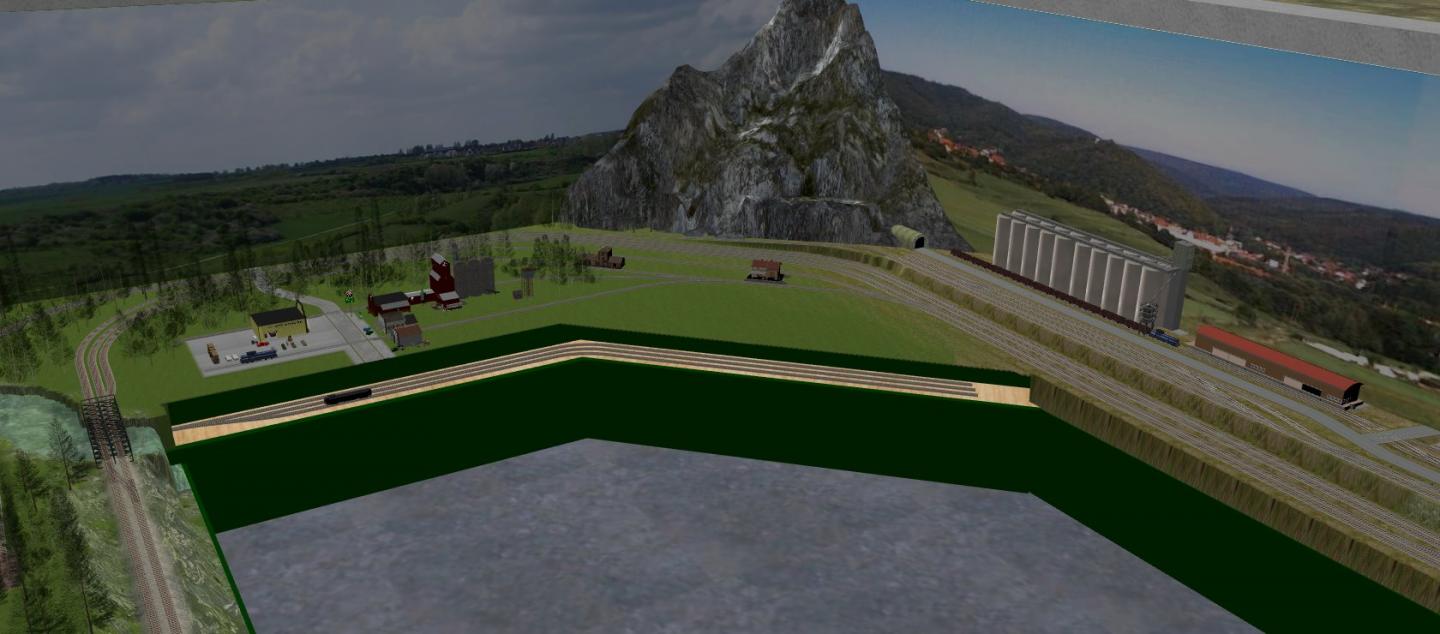
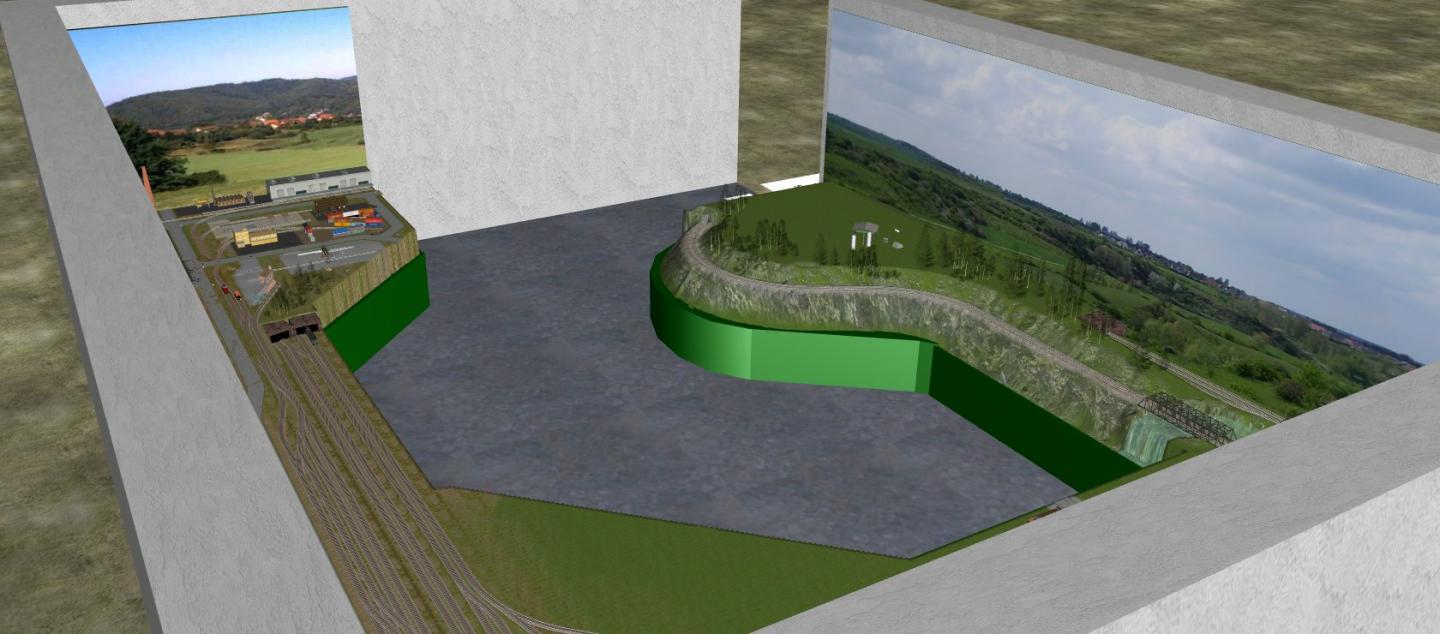
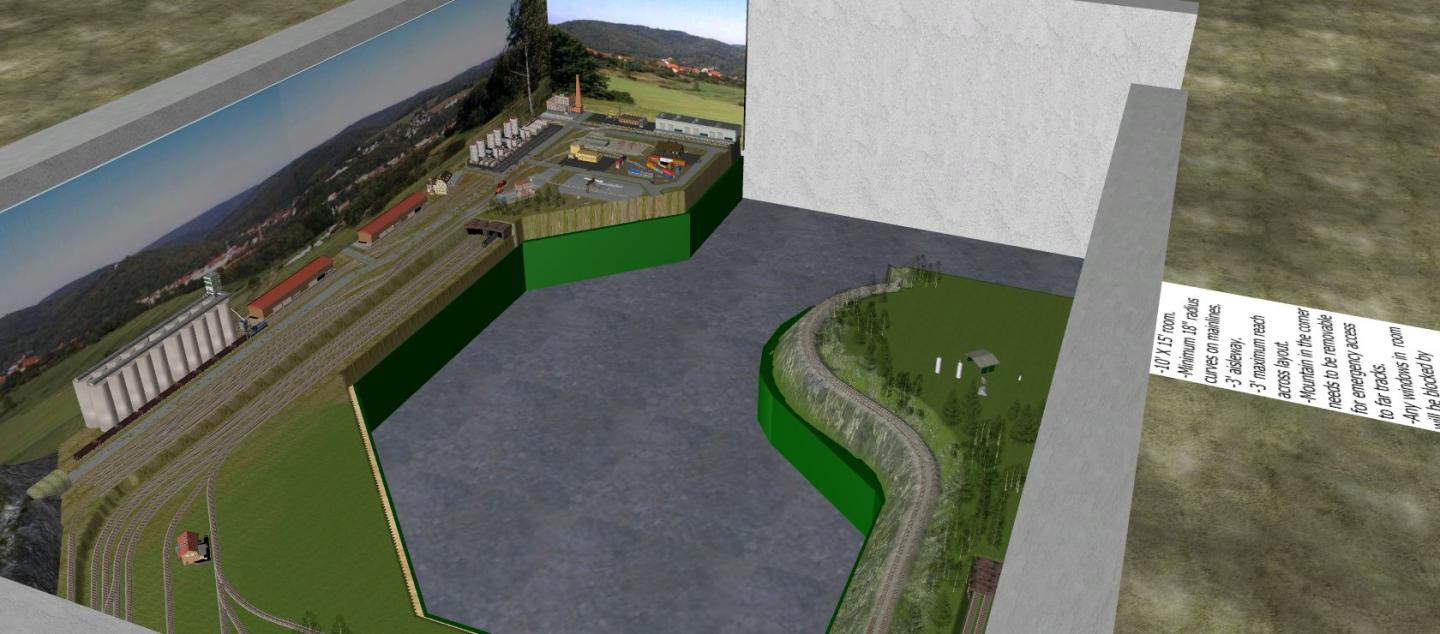
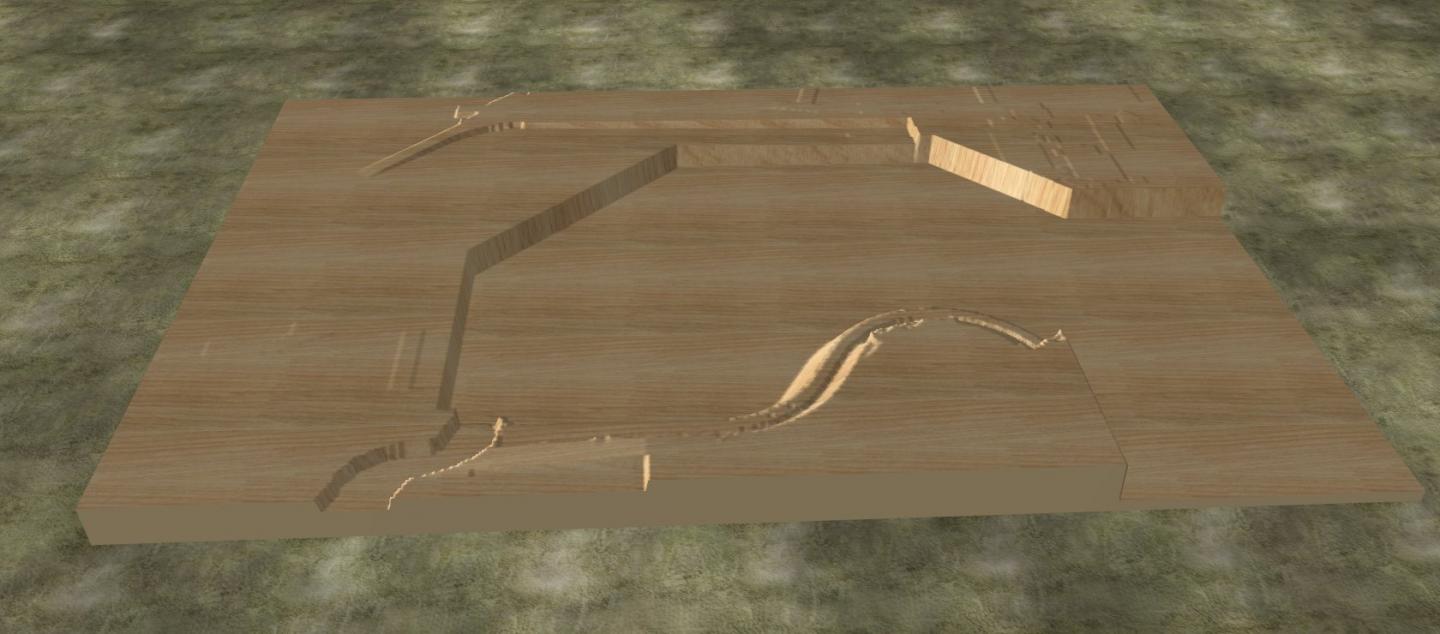
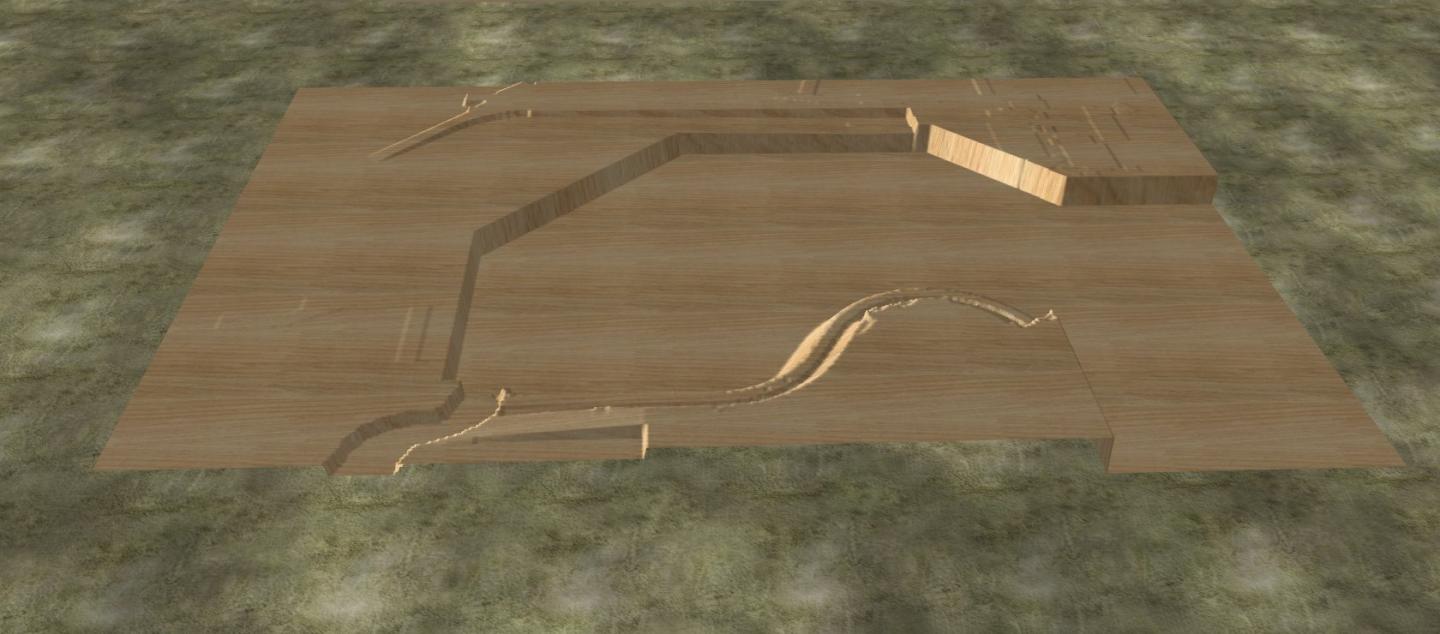
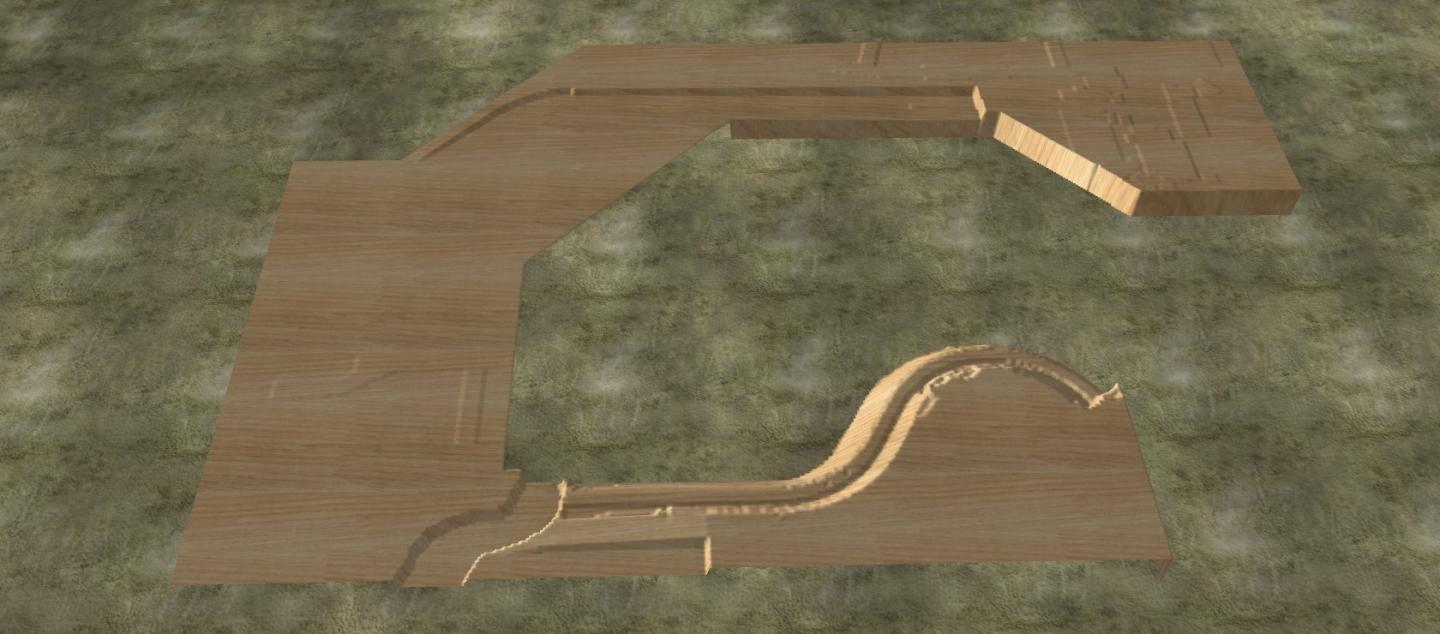
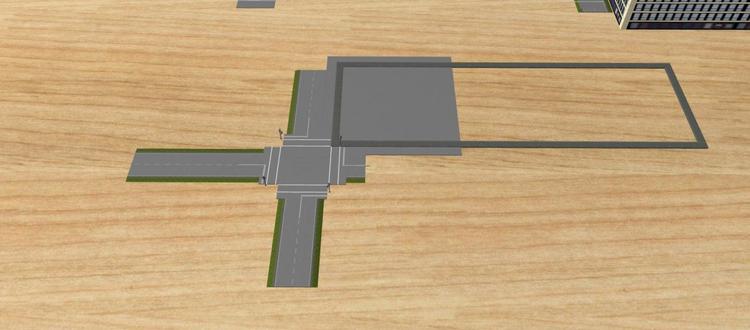
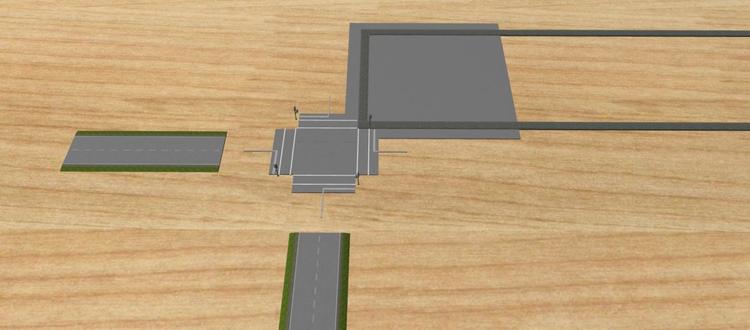
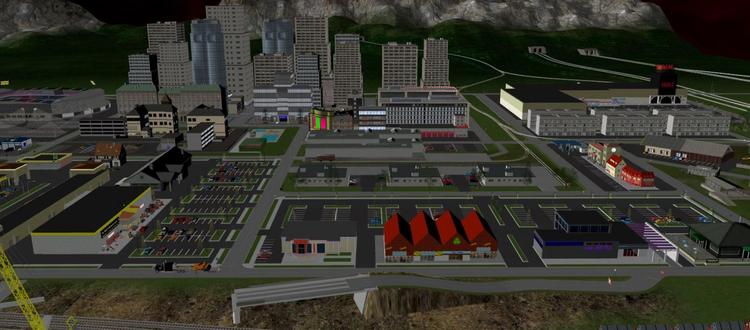
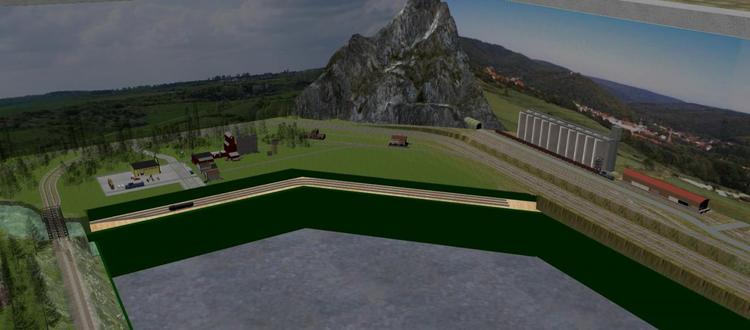
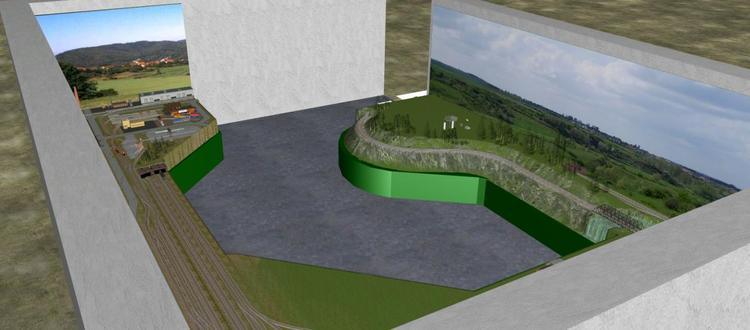
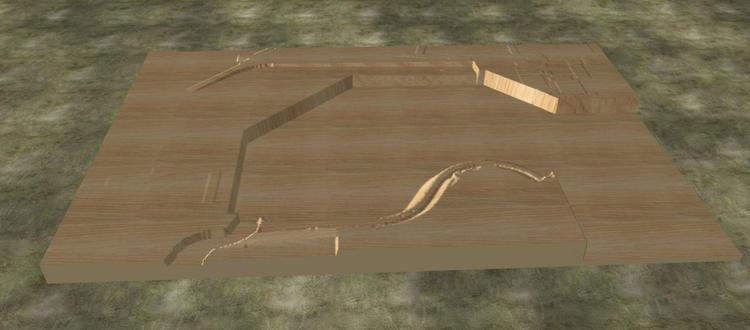
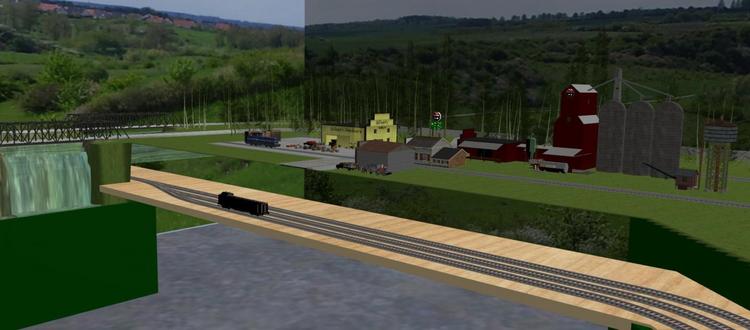
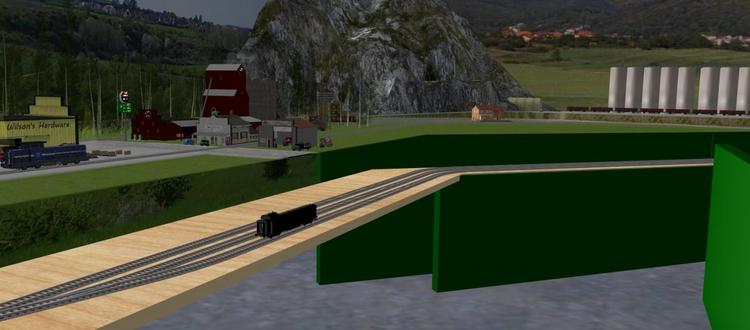
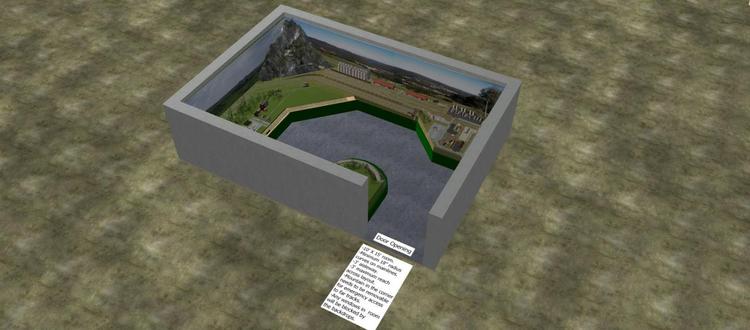
I usually build my layouts based on a 70' X 70' full basement or pole barn, but I thought it might be fun to do a layout for a spare room in a house. I chose a 10' X 15' limit to simulate an average room and set some restrictions. One of those restrictions was a minimum 3' walkway clearance, but just laying down multiple boards as a base like I would do on a walk-around layout didn't give me the desired results for such a small space. Also, when using multiple boards that overlay one another, adding ground textures can create irregular looking surfaces. Instead of laying down different size boards (Rechtecks), I decided to use one 10' X 15' board and adjust the height where the track would lay. This worked OK, but since the room's small size didn't allow for a hidden fiddle yard behind a backdrop anywhere, I needed to put one below the layout. I decided to use the hole tool to create an opening for access to a fiddle yard, and I think the results turned out pretty good. Images 1-4 show the layout so far. I decided to add the room's walls, floor, and green skirting around the layout's edges to give the layout a finished look. Image 1 Image 2 Image 3 Image 4 Image 5 shows the base with the height tool used to establish where the track could be placed allowing for the 3' aisles and the room's door. Without a fiddle yard under the table, this would be enough to get the necessary shape. Even using multiple panels, to get the curved portion of the base would require using either the height tool or hole tool. Image 5 Since I knew I was going to add a fiddle yard under the main table, I turned off the base and side walls. Image 6 Next, I set to work with the hole tool to remove everything except the area where the track would be placed, including an emergency access hole in the far corner since the track would be farther than 3' from the aisleway at that point. This can get a little tedious when working on a curved or angled edge, but it's not any worse than using the height tool to get the initial shape. Image 7 Image 7 shows the final result. You can see the open areas necessary for access to the fiddle yard I would add later. Image 8 In images 9 and 10 I removed the green skirting from behind the fiddle yard to show some detail of how the hole tool allowed me to create an open area to put a fiddle yard in place. Image 9 Image 10 If you design layouts for others, or you just like to do a little more than build a typical layout, I think this process makes for a good presentation.


-
Thank you BahnLand. Merry Christmas and Happy New Year from the United States. David
-
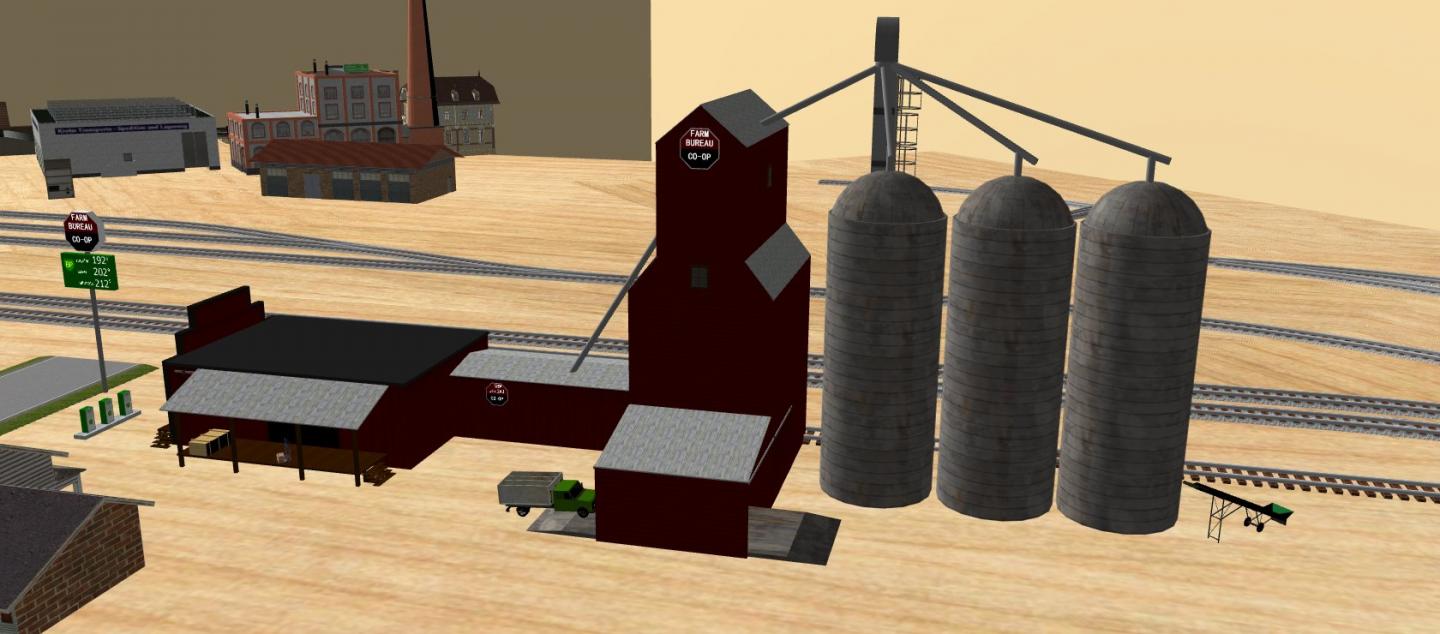
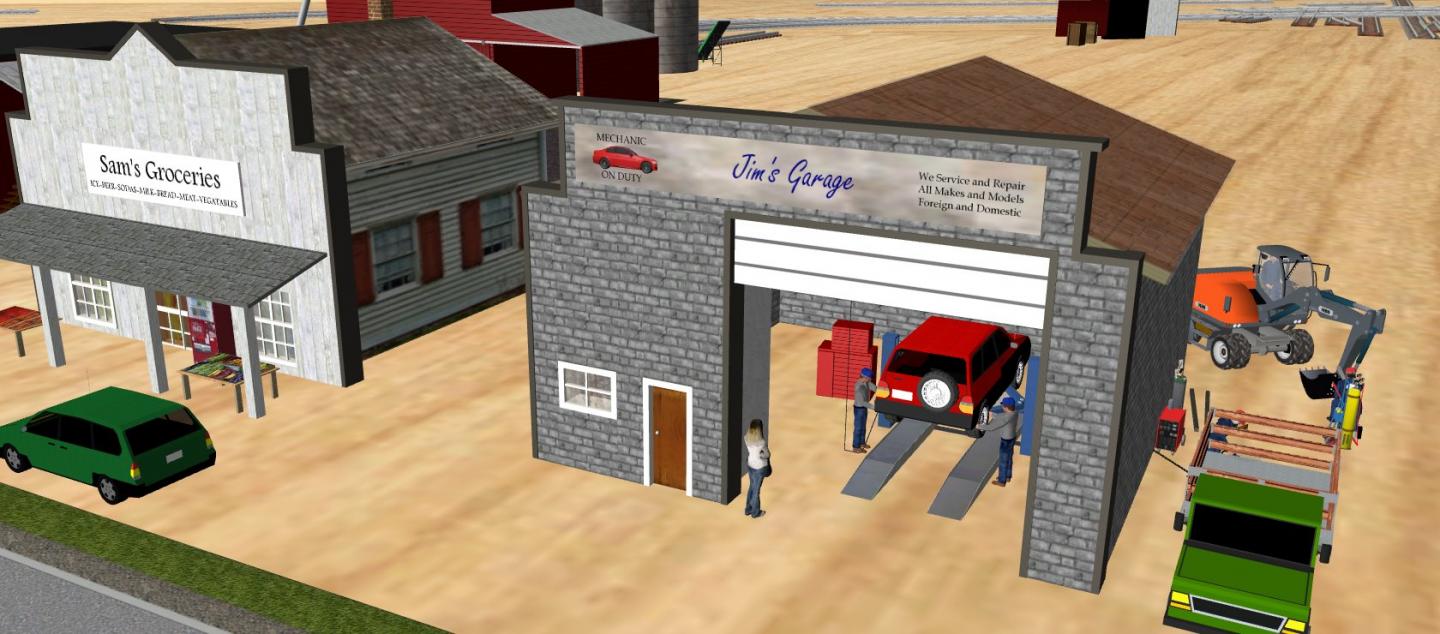
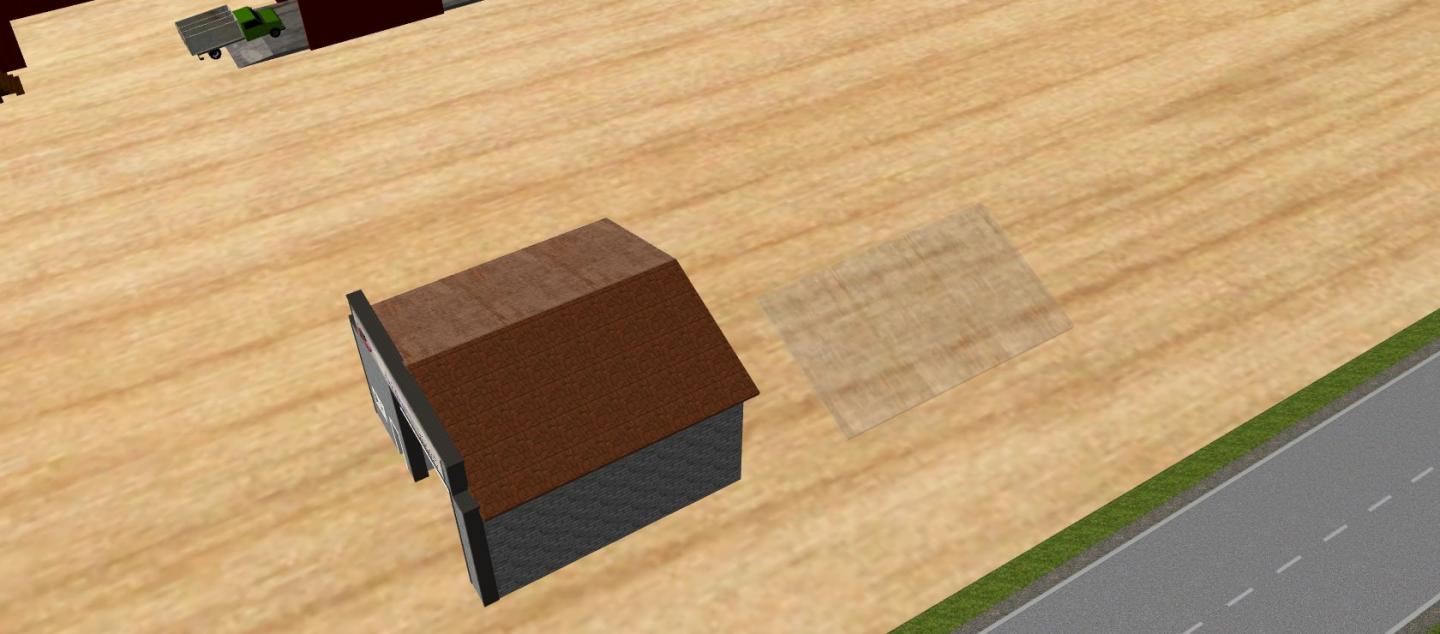
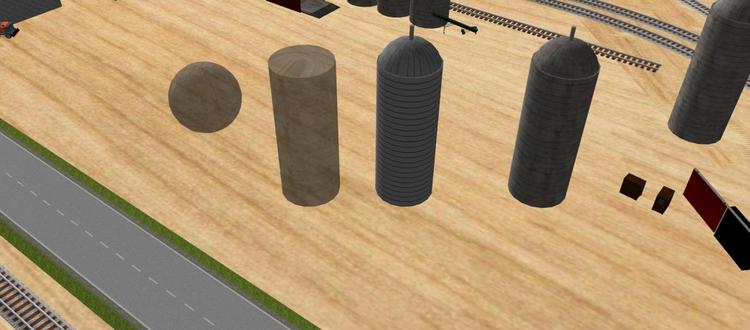
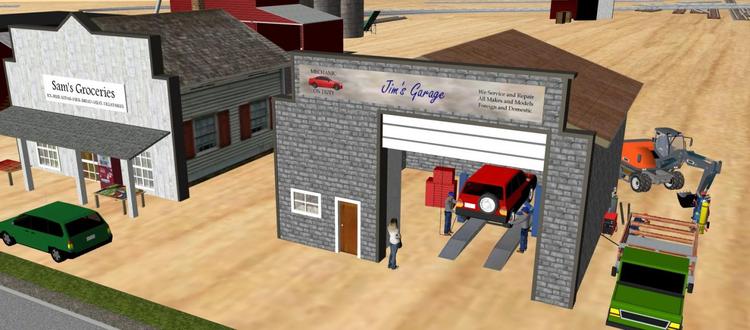
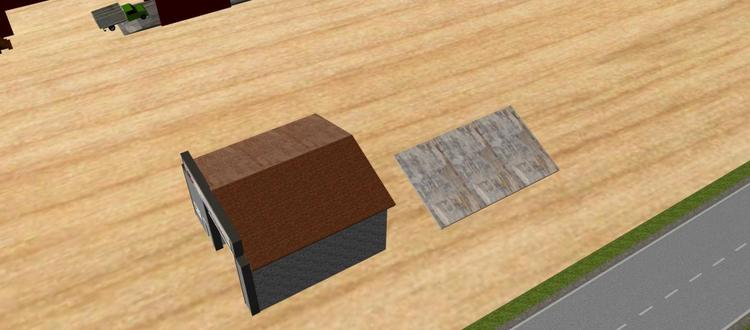
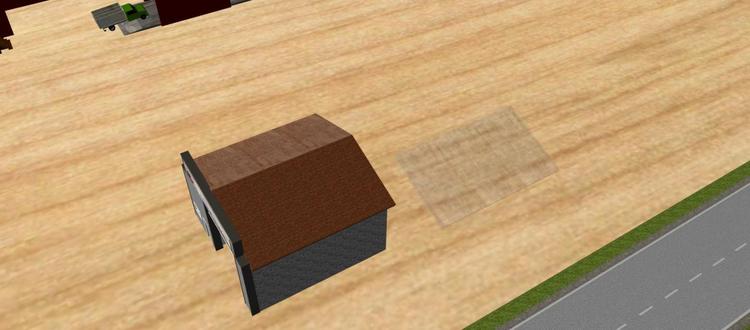
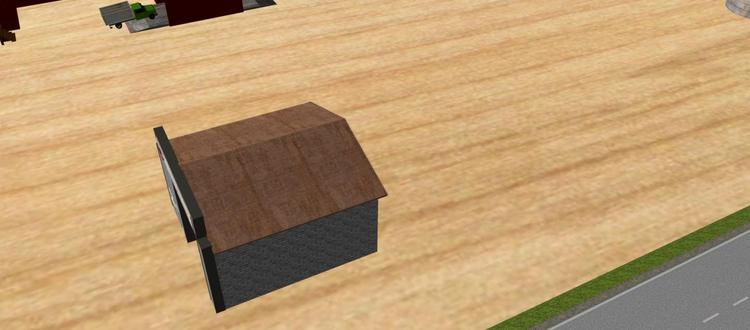
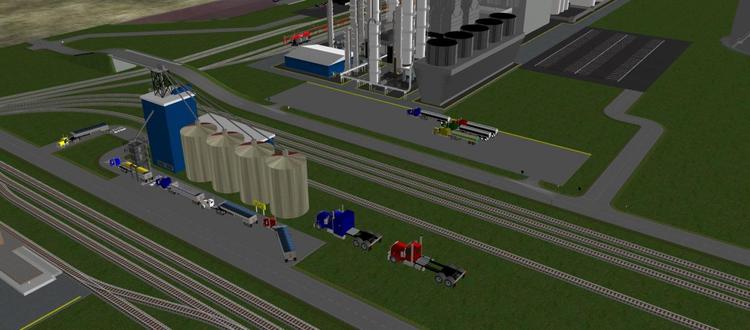
I've figured out that if you scratchbuild, and you want to share your layouts without people seeing question marks, you have to use the game's primitives, colors, and textures. Unfortunately the game is pretty limited with what you can do, so sometimes you have to get creative. On the grain elevator I've built in image 1, I wanted the silos to look weathered, but I had already used the Kalksand dunkel-gefugt to create the horizontal lines, and you can't apply two textures to the same item. The solution was simple: Image 1 Create a second sphere and cylinder slightly larger in diameter than the ones used to make the silos, apply a texture that creates the effect you want (I used Beton), set the transparancy to about 70-80%, adjust the texture to your liking, then cover the silos with the weathered pieces. Image 2 This same process can be used on other applications. On the garage I built, I wanted the roof that had a shingle texture applied to it to look weathered. Image 3 First I re-sized a cube to match the length, width, height and angle of one side of the roof and selected the Benton texture: Image 4 Next I set the transparency at 70%... Image 5 Then set the panels in place and grouped them with the garage. Image 6 This also works to make roads look more realistic: Image 7 Set the length, width, and height of a cube to match the road and apply a texture. I used Fels grau (07) on this one... Image 8 Set the transparency to around 70%-80% depending on how worn you want the road to look... Image 9 Then place the transparent piece over the sections of road you want and adjust the texture scaling to get the look you want. Image 10


-
Thank you quackster. Merry Christmas and God bless you. David. (A.K.A. Bad Attitude)
-
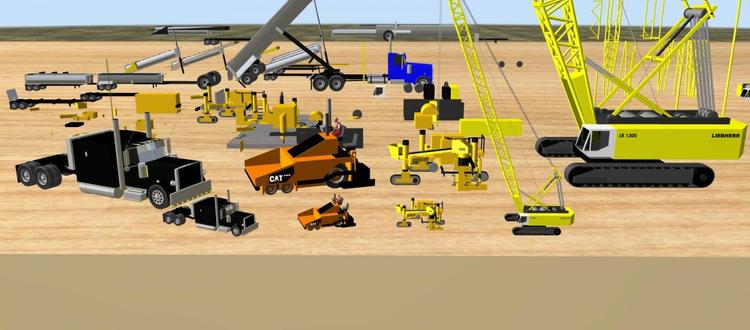
I typically work in N scale, and most of the time I scratchbuild items directly on the layout I'm working on. Since I do primarily work in N scale, I can "cheat" or ignore some of the smaller details that would need to be included on a larger scale model. Still, there are some details that can't be ignored. While building on the layout helps when it comes to making sure the new piece is going to fit in and look right where I want it, it can be more difficult working on small details than working in HO or a larger scale. One way to make this easier is to work "off site". By starting a new project as a "workbench", you can scratchbuild a building or a piece of equipment in a larger scale, such as HO or O, then either re-scale it on the workbench, or put it in your layout and rescale it. If you aren't sure how to do this, when you've built your project; 1. Group the scratchbuilt object. 2. Select it with your mouse and change the scale of the item to the scale of your layout in the game's lower menu. 3. With the scratchbuilt item still selected, select "edit" then "copy" from the game's top menu. 4. Close the "workbench", then open the layout you're working on. 5. Select "edit" then "paste" from the games top menu. The scratchbuilt item will now be on your layout in the scale of the layout. Here's a clip of one of my "workbenches" showing and example of how scratchbuilt items can be built in a larger scale to make the detail work easier, then reduced to the scale of the layout I'm working on before saving it and pasting it into a layout. If my workbench looks a little thick for some reason, it's because it is. I raise the terrain on my layouts to "5" before I start building so I can add rivers or lower elevations later, so it's a good idea to make your workbench the same thickness as your layout so items aren't lost somewhere under the layout's surface. Or you can bring the new item into the layout in the scale it was built, then reduce it to the layout's scale as shown below:

-
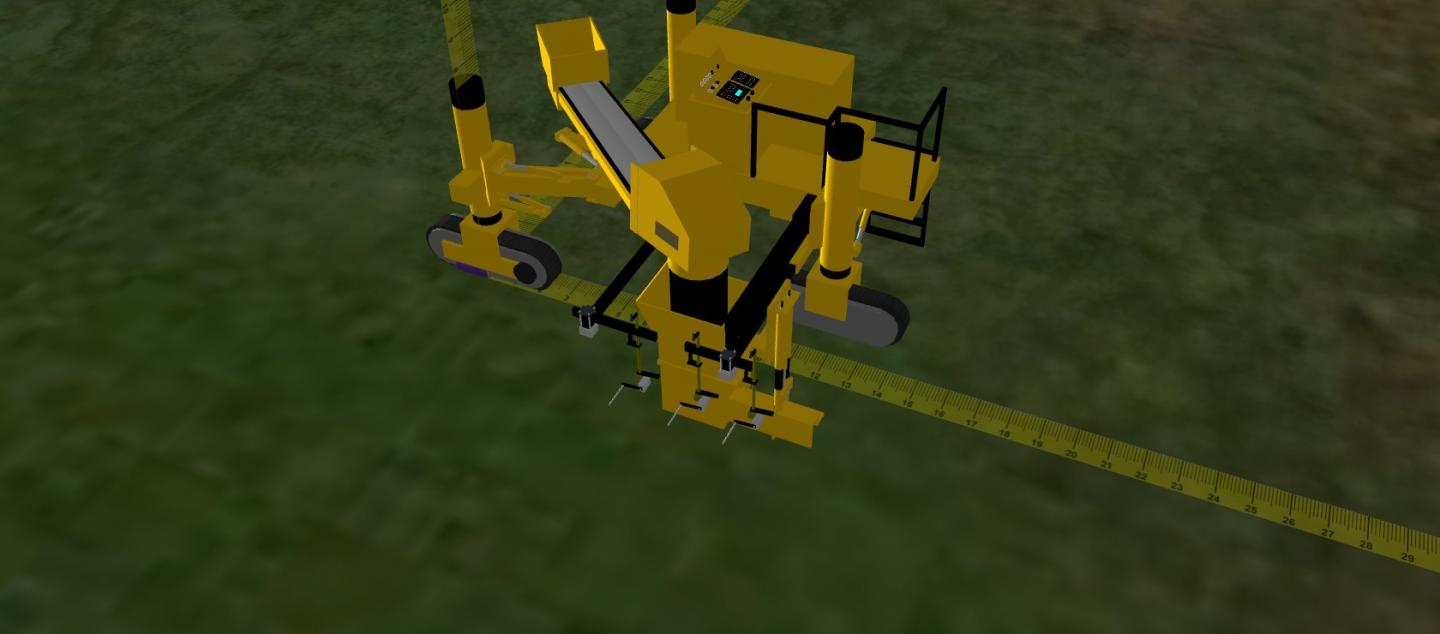
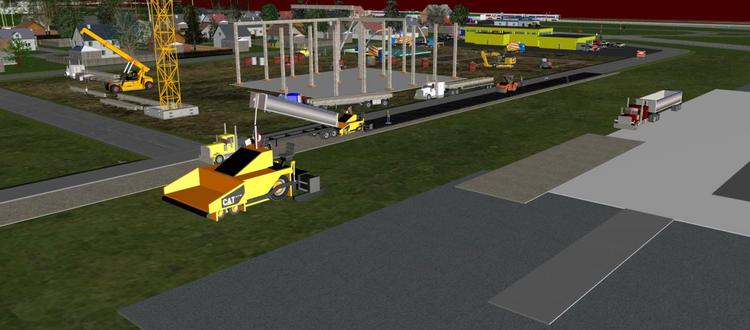
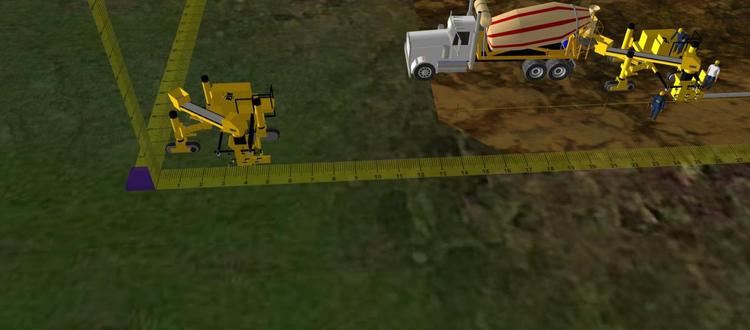
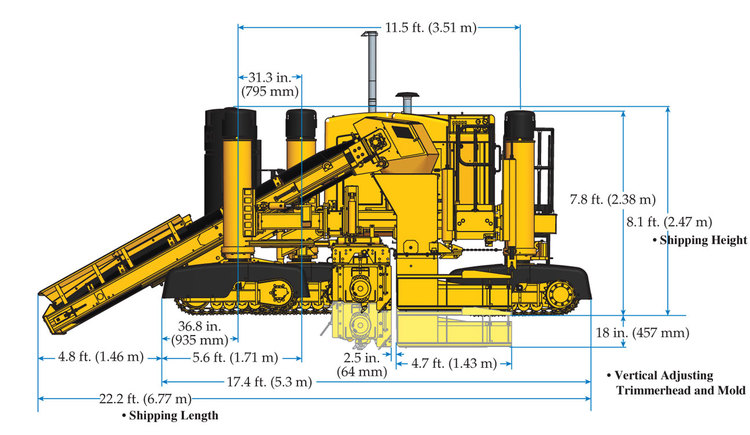
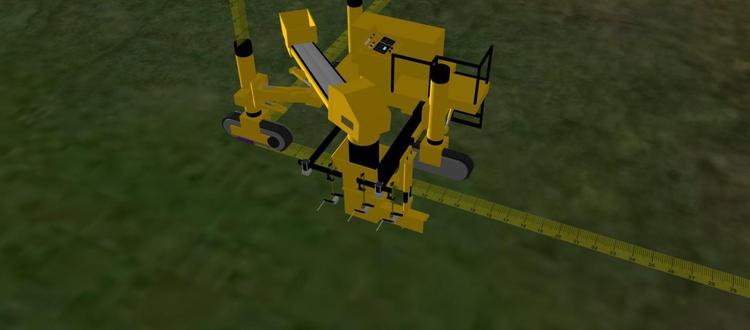
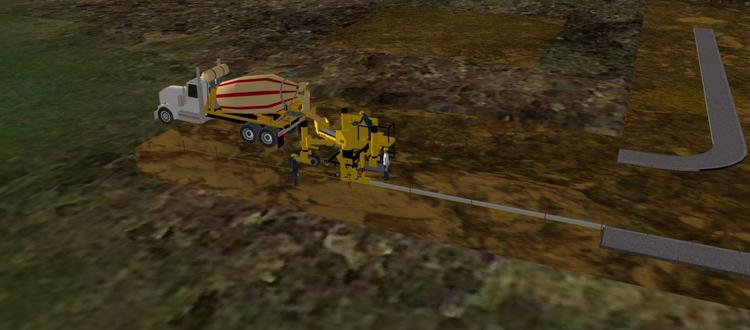
It can get tedious going through the calculations for each piece in a scratchbuilt model, and just guessing at the right size can result in an unrealistic piece, or a piece that requires hours of adjustment after the piece is finished. A quick way to make sure each piece is accurate is to change the scale of the universal line. Image 1 shows a scratchbuilt Gomaco GT-3600 curb machine with the standard universal line in N scale. Image 2 is from the manufacturers website. The distance between the centerline of the front track and the centerline of the rearmost track is given as 11.5 feet. (I'm old school, so I still work in inches and feet instead of metric). In image 3 I line up the center of the vertical universal line with the centerline of the front track, then adjust the scale of the universal line so it reads about 11.5 inches on the horizontal at the centerline of the rear most track. The universal line is now 1" = 1'. Since I primarily work in N scale, a new setting of 0.175 for the universal line's scale is close. You will have to make the necessary adjustments for the scale you prefer to work with. Image 4 shows the Gomaco GT-3600 in place laying some new curb in a construction area on one of my layouts. The size looks right compared to the rest of the figures. By changing the scale of the universal line to 1" = 1', you can adjust the sizes of the various primitives pretty fast and have them be accurate (or at least close enough to look good) for whatever kind of model you're building. Image 1 image 2 image 3 image 4
-
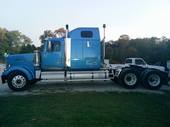
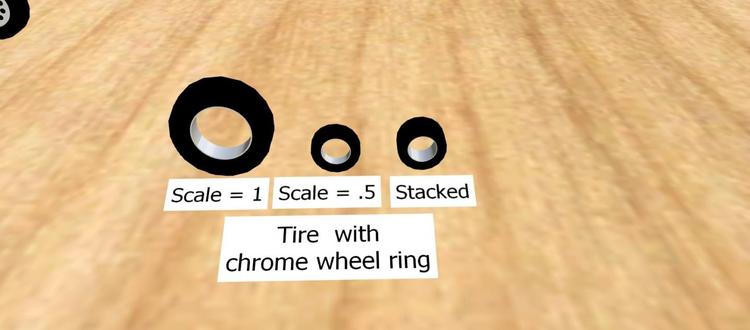
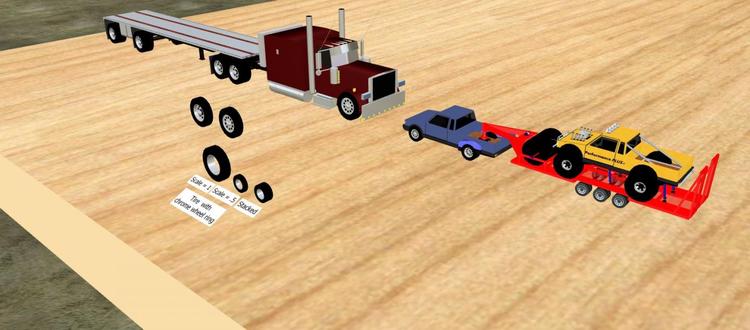
I have a request for a single tire with a chrome ring inside of it. The top image shows what I'm asking for. As I've shown in the top image, the scale could be changed so it could be used on cars, trucks, construction equipment, etc. I've also shown how it could be stacked to create a wider tire if desired. The bottom image shows how a user can create his/her own wheel designs for different vehicles. The reason I'm asking even though I've already made my own is because to get the chrome ring to look smooth requires over 100 primitives per wheel. Thank you. .
-
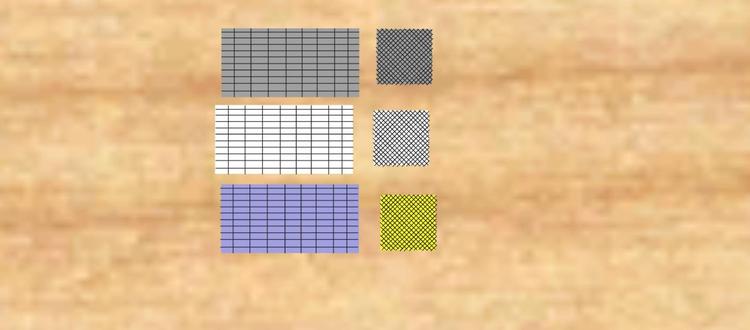
I have a request for two images like the Kalksand dunkel-gefut which I believe would be very easy to make. One is a series of horizontal and vertical black lines to create the pattern on the left images on any color primitive like the Kalksand dunkel-gefut can do. The other is a series of 45 degree diagonal black lines to create the pattern on right images on any color primitive like the Kalksand dunkel-gefut can do. These would be very helpful in making chain link fencing, grilles for cars and trucks, commercial concrete forms for construction scenes, a series of windows in an office building, etc. Thank you.
-
Thank you for the advice Plutoli. I'm a long haul truck driver. I use my PC at home, and a laptop on the road. I'll probably go with the usb stick idea. Thanks again for the idea.
-
That saved the layout to "My Documents". It appears the two computers have to be connected to one another, either through a LAN or a homegroup. I guess this means layouts that aren't published to the web are saved on the hard drive of the computer they were built on, not making them accessible from the internet when logging on from a second computer at a remote location.
-
Thank you BahnLand, I'll give that a try.
-
How do I access layouts on my laptop that I have built and saved on my PC, but haven't published to the internet?
-
Can you make the roads adjust the terrain like the track does please?
-
The new ""Kindereisenbahn" now shows an engine instead of a question mark. I guess no one can answer the second question.
-
Thanks Wustenfuchs. I can imagine people are difficult to draw for the game, because they are extremely difficult to make out of primitives.
-
I've noticed the game has a couple of horses with what appear to be western pleasure saddles. Unfortunately, there is no one to ride these horses. I've tried every person in a seated position, but they all get at least part of, if not most, of their lower legs cut off when placed on a horse. Any chance of getting a few men and women in a position to place them on the horses? Since the saddles are western pleasure, jeans, cowboy boots and western shirts would be nice, and even a cowboy hat or two. Of course, I wouldn't complain to see some horses in some action positions (such as jumping a rail or running) with English saddles and some riders with English riding gear also since I'm working on due ranch and an equestrian center for one of the layouts I'm building. There's also a very nice carriage available, but no one dressed appropriately to drive it. The English equipment and a properly attired driver for the carriage may be too much to ask for, but it would be nice to have a choice of riders for the existing horses.