simonjackson1964
Mitglieder
-
Benutzer seit
-
Letzter Besuch
Alle erstellten Inhalte von simonjackson1964
-
 Oooh, right... yes. Dummy vehicle on track and link the ship too it the same way the same way as I'm doing for cargo and drivers of road vehicles. I have a variable "Set Invisible" on every vehicle with cargo or people. Cargo and/or people are grouped into a named group, and the group is linked to the vehicle and named in the variable. Then when "a vehicle enters a track/street with the keword "Vanish"" it sets the vehicle and the linked object group invisible. Vice versa when leaving a track/street with the keyword "Reappear". Much better than having multiple tracks... (Sorry Dad) Thanks Hubert.
 -
The four vessels shown above are all sitting locked onto a virtual track a little way beneath the surface of the water. The collier at the front is about right. The tramp steamer (actually listed as a fishing boat, but she looks a tramp steamer to me) is sitting so high out of the water, she might actually capsize from the weight of her superstructure. The third ship is the empty collier. I couldn't find any lifeboats to put around her, but she's clearly going down... And lastly, the passenger ship, once again sitting at just about the right depth. Is there any way this could be sorted out so that all water vehicles with engines latch onto the virtual track at the same height? I'm not meaning the decks, that would actually be unrealistic, but maybe 1 mm below the plimsoll line? Maybe have empty cargo ships sit higher that laden ones... In fact on the big container ship they could be animated to set the "keel depth" depending on how many containers are sitting on the deck. (Best translation Google would give me) Die vier oben gezeigten Schiffe sitzen alle auf einer virtuellen Spur etwas unter der Wasseroberfläche. Das Kohleschiff vor uns ist ungefähr richtig. Der Trampdampfer (eigentlich als Fischerboot aufgeführt, sieht für mich aber wie ein Trampdampfer aus) sitzt so hoch aus dem Wasser, dass er aufgrund des Gewichts seiner oberen Struktur umkippen könnte. Das dritte Schiff ist das leere Kohleschiff. Ich konnte keine Rettungsboote finden, die ich um sie herum stellen könnte, aber sie geht eindeutig unter ... Und schließlich das Passagierschiff, das genau in der richtigen Tiefe zurück ist. Gibt es eine Möglichkeit, dies so zu arrangieren, dass alle motorisierten Wasserfahrzeuge auf der virtuellen Route auf derselben Höhe einrasten? Ich meine nicht die Decks, das wäre unrealistisch, aber vielleicht 1 mm unterhalb der Plimsoll-Linie? Vielleicht sind leere Frachtschiffe weiter oben als beladene ... Tatsächlich könnten sie auf dem großen Containerschiff animiert werden, um die "Kieltiefe" abhängig von der Anzahl der Container auf dem Deck anzupassen

-
I timed the TT rotation at about 6 seconds, set the delay to 7, and away it goes. Hmm, I never thought of using that, I always assumed it was for cranes and barn doors and the like. Anyway, it's working now, thanks. Now for the next bit.
-
Ahah... Yes. I just loaded a v5 layout that does the same thing in a simpler way, and that worked fine at v6. The delay is 10 seconds... In truth, the reason for the short delay is because the loco has to cross the same double slip to get to the siding as the returning shuttle train uses to get from the main line to the bay platform, and on my initial manual attempts the mainline wasn't as long as it is now, and I ended up with a crash. So time being of the essence the deferrals are as short as I could make them... But that does make sense! I might slow the loco down a bit more on entry too. or use the "Set Current Speed" to stop it, because I think the TT is turning before the loco has stopped! Thanks for the help guys! Ahah ... Ja. Ich habe gerade ein v5-Layout geladen, das auf einfachere Weise dasselbe macht und das in v6 gut funktioniert hat. Die Verzögerung beträgt 10 Sekunden ... In Wahrheit liegt der Grund für die kurze Verspätung darin, dass die Lok den gleichen Doppelschlupf überqueren muss, um zum Abstellgleis zu gelangen, den der zurückkehrende Shuttle-Zug verwendet, um von der Hauptstrecke zum Bahnsteig zu gelangen, und bei meinen ersten manuellen Versuchen versucht die Hauptstrecke war nicht so lange wie jetzt und ich endete mit einem Absturz. Die Verschiebungen sind also vorerst so kurz, wie ich sie machen könnte ... Aber das macht Sinn! Ich könnte die Lok auch beim Einfahren etwas langsamer machen. oder verwenden Sie die "Aktuelle Geschwindigkeit einstellen", um sie zu stoppen, da sich der TT meiner Meinung nach dreht, bevor die Lok angehalten hat! Danke für die Hilfe Jungs!
-
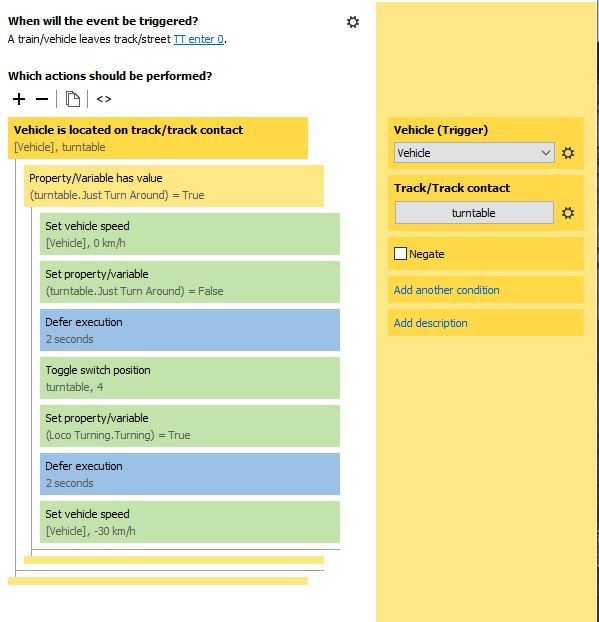
A steam train pulls into a bay platform, and stops. The carriages it is hauling are uncoupled. another engine is sitting in a connected siding and reverses onto the train. This new locomotive is coupled up, and as soon as all the passengers are aboard, it sets off on its way back to where the train came from. As soon as the departing train is clear, the locomotive that pulled the train in reverses back out into the siding the second engine was sat in, and from there makes its way to the turntable, reversing on due to the way the sidings are connected. Once on, the table swings around through 180° and the locomotive reverses off, now heading back the way it came, and parks up in the siding to await the return of the coaches. Seems fairly straight forward? In fact pretty standard practice in the age of steam, if no run-around track was available (In fact, before electrification, they did the same with diesel locomotives). And I have managed to automate the entire process except for one really annoying bit! The locomotive simply refuses to leave the turntable unless I manually set a speed for it. I've tried everything! This is the current event (of many different variations) The loco leaves the track that connects to the turn table. First I check if it's actually on the turntable, because if it's going back the other way I don't want to do any of this. The boolean "Just Turn Around" is telling the event that this locomotive is not heading for the loco shed or the coaling line. So far I'm not doing anything else but I believe in forward planning. So first action, stop the loco. The previous event that heads it in this direction sets the speed to -20 so it stops on the table. I set the variable that pulled me in to this option false, just in case that was somehow bouncing back in and setting the speed to zero - I put that there when I was using a track contact to trigger the event. Wait 2 seconds for the loco to get stopped, then swing the turntable around I only have settings 0 to 7, so 4 is a 180° turn. The boolean "Loco Turning.Turning" tells the track contact just beyound the next set of points to toggle them and send the loco back the way it came in. Two second delay for things to stop moving, and then set the trigger locomotive's speed to -30 so it reverses back out the way it reversed in. Everything works fine, except that last action. I've tried it with two different locos, I've tried it without the time delays, I've even tried putting an event in to check if the loco stops and restarting it. That was interesting because the event triggered and must have attempted to do the restart, because it reset a variable designed to stop it restarting the train any other time... But the locomotive stubornly refused to move. There is something somewhere that is setting it's speed to zero repeatedly. And it has got to be in that event, because when I give in and set the loco's speed manually , Off it goes, and as I said the rest of the events work fine, bouncing the loco from one to the next as it hits the track contacts.
-
Actually, it's fine. It was a lot simpler than I was expecting for some reason! All sorted!
-
I am trying to do this... Slightly more complex but essentially the same - set the route from a table on the train. Except I can't remember what the event on the track contact looked like. And the video seems to have gone! Help?
-
Ah... I think I have found a solution... The transparent "container floor" strategically placed on the waggon. Still interested to know if anyone has a simpler solution.
-
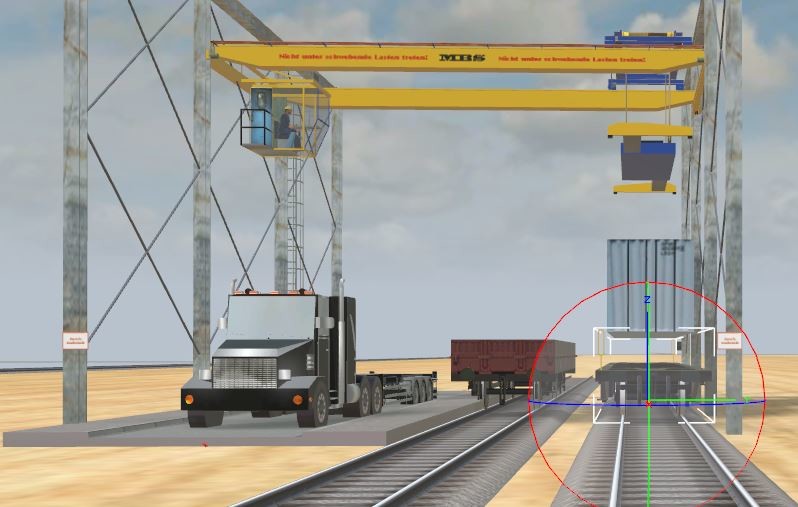
Trying to make a freight terminal. There are plenty of containers, plenty of container waggons, plenty of flatbed lorries. And plenty of cranes that will pick up a container from one place and put it on another. And they all seem to work fine. Except for one problem. As you can see, the crane has placed the container perfectly on top of the flatcar... Except the top of the flatcar is 1m (scaled) above the bed of the flat car. I have looked at every single flatcar available in the catalogue and they all have something sticking up above the load bed. Is there something I'm missing here? And if so please could the solution be in English as I don't speak German.

-
Have you tried this with V6 yet?
-
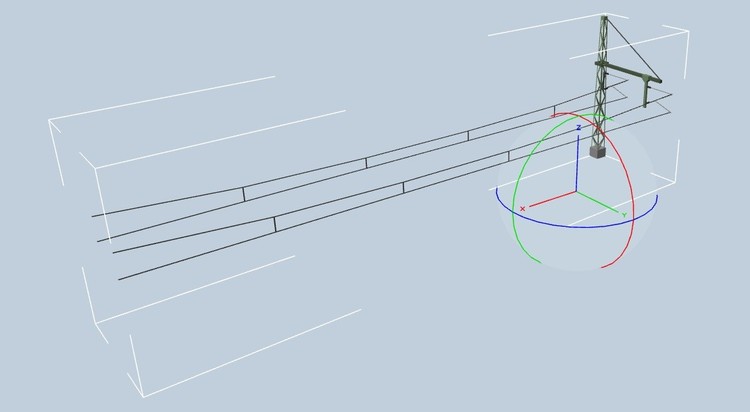
The above is prototype overhead catenary wires. Note that the wires are all straight. In version 5, with the "non-flexible" bending it was possible to recreate this. At version six, it seems the non-fexible bending has been removed entirely, meaning that the overhead wires curve majestically and unrealistically around with the track. Sure, it's a lot easier to pit them on, but it's now impossible to make it look right. Or maybe I'm missing something?
-
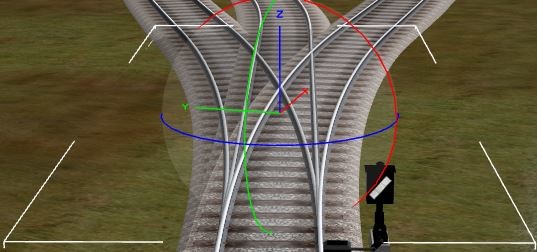
Something I forgot... If a catenary mast happens to land in the way of a signal or in the middle of a turnout or some other feature that is only on one side of the track. there is a simple solution: Only do this to a mast that has been un-grouped. Select the mast and boom (or booms/hangars) but NOT the catenary wires. The name will show as "Multiple Selection". On the position tab, the rotations will average to zero. In the Z rotation, type 180 and enter. This will reverse the orientation of the mast and boom. Then slide it across the track until the boom locks in place. Etwas, das ich vergessen habe ... Wenn ein Oberleitungsmast zufällig auf dem Weg eines Signals oder mitten in einer Weiche oder einem anderen Merkmal landet, das sich nur auf einer Seite der Strecke befindet. Es gibt eine einfache Lösung: Tun Sie dies nur an einem Mast, der nicht gruppiert wurde. Wählen Sie den Mast und den Ausleger (oder die Ausleger / Hangars), aber NICHT die Oberleitungen. Der Name wird als "Mehrfachauswahl" angezeigt. Auf der Registerkarte Position werden die Umdrehungen auf Null gemittelt. Geben Sie in der Z-Drehung 180 ein und geben Sie ein. Dadurch wird die Ausrichtung von Mast und Ausleger umgekehrt. Schieben Sie es dann über die Schiene, bis der Ausleger einrastet.
-
Hi people. (For those who read German I'll provide a translation, but please don't blame me if it's hilariously wrong - blame Google Translate!) I know there is a plug-in that puts up a catenary system on the track, but to be honest, I've not found it easy to use, even once I translated the instructions.Also, any variations need to be added in afterwards, and things like turnouts, signals, station platforms and the like all need to be re-done. And from past experience I have found that linking the actual catenary to the masts can cause what I call "fold-back" on the spline, where it tries to link from the wrong side. After some trial and error however I have come up with a fairly straight forward routine for creating a continuous catenary system manually. The first step is to find a length of track on your layout that is straight. Curves get dealt with later. I'm actually electrifying an N-Guage double track oval (with various complications), so the simplest section is two tracks running side by side dead straight and 30mm separation (using the orange crosses). Second step is to create a single section of catenary. You need one mast, one boom per track and one catenary wire per track. There are masts for two and three tracks, and extra booms will convert into a hangars for the extra tracks. Position one boom per track, making sure they are in line. The booms lock onto the track and everything else locks to them so get the booms right. Then you put the mast, any hangars, and finally the catenary wires on. With the wires, one end will snap to the boom. Set the spline to "flexible Bending" and stretch the wire as long as you want it, but watch out for the "lump in the middle" - if you go too far, it will produce a middle "hanging point". There are ways around this, but I'll get to them. I stop the stretch just short of the hanging point appearing. The other important thing is to keep the wire as straight as possible. Make sure that the white frame-markers have no width. The height stays the same and it's the length you change. Once you have your catenary unit built, select the entire unit - that is, select all the parts of the unit, then click [edit][group]. This will merge the individual parts into a single item. And that's the difficult bit done. Position the group on the track where you want the catenary to start - tunnel mouth, station terminus, whatever. The important thing is that the mast is against the start point. You can always remove it later but the booms are what put the wires in the right place. Now, copy the group and paste a new one into the layout. Move it to the track. The booms with lock it in place automatically. Then slide it along the track until the ends of the wires on the first unit line up with the booms on the new one. One final stage: Select the first group and click [Edit] [release group]. Then select one of the wires and set "Bending". (Important: NOT flexible bending!) Then move the end of the wire next to the new mast sideways until it snaps into place. Repeat with the other wire. If one or both refuses to lock, adjust the position of the new mast until they do. Repeat as necessary. MOST IMPORTANT: Do not release the group on the unit you just placed. You will need this as a group to copy, if you stop to take a break. Curves are a little more complex. you will probably need to shorten the span, depending on the curve radius, Also note that the outer wire will be longer than the inner one. But the catenery system has some variations to help. there are booms designed for left curves and right curves that offset the wire, and there are wires for left and right, and also for the transition from straight to curved. (Note that to transition back you need to use the opposite transition and change the direction.) Junctions are something I've not got to yet, but I expect to deal with them in a similar way, by adding variations of the boom, catenary and mast. I'll let you know in a subsequent post when I get there. Simon ............................................................... Hallo Leute. (Für diejenigen, die Deutsch lesen, werde ich eine Übersetzung bereitstellen, aber bitte beschuldigen Sie mich nicht, wenn es komisch falsch ist - beschuldigen Sie Google Translate!) Ich weiß, dass es ein Plug-In gibt, das ein Oberleitungssystem auf der Strecke installiert, aber um ehrlich zu sein, fand ich es nicht einfach zu bedienen, selbst wenn ich die Anweisungen übersetzt habe. Außerdem müssen später alle Variationen hinzugefügt werden und Dinge wie Weichen, Signale, Bahnsteige und dergleichen müssen alle neu gemacht werden. Und aus früheren Erfahrungen habe ich herausgefunden, dass das Verknüpfen der eigentlichen Oberleitung mit den Masten zu dem führen kann, was ich als "Zurückklappen" auf dem Spline bezeichne, wo versucht wird, von der falschen Seite zu verbinden. Nach einigem Ausprobieren habe ich mir jedoch eine ziemlich einfache Routine ausgedacht, um manuell ein kontinuierliches Oberleitungssystem zu erstellen. Der erste Schritt besteht darin, eine gerade Länge in Ihrem Layout zu finden. Kurven werden später behandelt. Ich elektrisiere tatsächlich ein N-Guage-Doppelspur-Oval (mit verschiedenen Komplikationen), so dass der einfachste Abschnitt zwei Spuren sind, die nebeneinander und mit einem Abstand von 30 mm (unter Verwendung der orangefarbenen Kreuze) verlaufen. Der zweite Schritt besteht darin, einen einzelnen Abschnitt der Oberleitung zu erstellen. Sie benötigen einen Mast, einen Ausleger pro Spur und einen Oberleitungsdraht pro Spur. Es gibt Masten für zwei und drei Gleise, und zusätzliche Ausleger werden in Hangars für die zusätzlichen Gleise umgewandelt. Positionieren Sie einen Ausleger pro Spur und achten Sie darauf, dass sie ausgerichtet sind. Die Ausleger rasten auf der Strecke ein und alles andere rastet ein, damit die Ausleger richtig laufen. Dann setzen Sie den Mast, alle Hangars und schließlich die Oberleitungen auf. Mit den Drähten rastet ein Ende am Ausleger ein. Stellen Sie den Spline auf "flexibles Biegen" und dehnen Sie den Draht so lange, wie Sie möchten. Achten Sie jedoch auf den "Klumpen in der Mitte". Wenn Sie zu weit gehen, wird ein mittlerer "Aufhängepunkt" erzeugt. Es gibt Möglichkeiten, dies zu umgehen, aber ich werde sie erreichen. Ich stoppe die Strecke kurz vor dem Aufhängen. Die andere wichtige Sache ist, den Draht so gerade wie möglich zu halten. Stellen Sie sicher, dass die weißen Rahmenmarkierungen keine Breite haben. Die Höhe bleibt gleich und es ist die Länge, die Sie ändern. Wenn Sie Ihre Oberleitungseinheit erstellt haben, wählen Sie die gesamte Einheit aus, dh wählen Sie alle Teile der Einheit aus und klicken Sie dann auf [Bearbeiten] [Gruppe]. Dadurch werden die einzelnen Teile zu einem einzigen Element zusammengeführt. Und das ist das Schwierige. Positionieren Sie die Gruppe auf der Strecke, auf der die Oberleitung beginnen soll - Tunnelmündung, Stationsendpunkt, was auch immer. Wichtig ist, dass der Mast am Startpunkt anliegt. Sie können es später jederzeit entfernen, aber die Ausleger bringen die Drähte an die richtige Stelle. Kopieren Sie nun die Gruppe und fügen Sie eine neue in das Layout ein. Bewegen Sie es auf die Spur. Die Ausleger verriegeln es automatisch. Schieben Sie es dann entlang der Schiene, bis die Enden der Drähte an der ersten Einheit mit den Auslegern an der neuen übereinstimmen. Eine letzte Phase: Wählen Sie die erste Gruppe aus und klicken Sie auf [Bearbeiten] [Freigabegruppe]. Wählen Sie dann einen der Drähte aus und stellen Sie "Biegen" ein. (Wichtig: NICHT flexibel biegen!) Bewegen Sie dann das Drahtende neben dem neuen Mast zur Seite, bis es einrastet. Wiederholen Sie dies mit dem anderen Draht. Wenn sich einer oder beide weigern, zu verriegeln, passen Sie die Position des neuen Mastes an, bis dies der Fall ist. Bei Bedarf wiederholen. WICHTIGSTES: Lassen Sie die Gruppe auf dem Gerät, das Sie gerade platziert haben, nicht los. Sie benötigen dies als Gruppe zum Kopieren, wenn Sie eine Pause einlegen. Kurven sind etwas komplexer. Abhängig vom Kurvenradius müssen Sie wahrscheinlich die Spannweite verkürzen. Beachten Sie auch, dass der äußere Draht länger als der innere ist. Das Oberleitungssystem bietet jedoch einige Variationen. Es gibt Ausleger für linke und rechte Kurven, die den Draht versetzen, und es gibt Drähte für links und rechts sowie für den Übergang von gerade zu gekrümmt. (Beachten Sie, dass Sie zum Zurückübergehen den entgegengesetzten Übergang verwenden und die Richtung ändern müssen.) Kreuzungen sind etwas, was ich noch nicht muss, aber ich erwarte, dass ich auf ähnliche Weise damit umgehen kann, indem ich Variationen des Auslegers, der Oberleitung und des Mastes hinzufüge. Ich werde Sie in einem späteren Beitrag informieren, wenn ich dort bin. Simon
-
Gotta watch those sneaky initial values! It is great fun. My first real working layout was at V4, and was a two track end-to-end with reversing loops and a fiddle-yard at one end, a decent size station and a working coal mine and power station coal depot. All fully automated except for the start buttons, it had an 18 waggon coal train that had the wagons filled at the mine by a shunter, then when all three rakes of 6 waggons were full, the main loco collected them and took them down onto the main line (which was on continuous running so the coal train sometimes had to wait for a slot to pull into), then along to the power station where the coal waggons opened at the bottom and dumped the coal out. There was another manual intervention to make the loco run around the train and take it back empty to the mine... Unfortunately there was a loss of function when V5 came out and I couldn't get it to work without a total "re-wire". I currently have three "Active" layouts - one called double loop and branch which I'm quite pleased with (Speaks for itself, it's a double oval and a branch line), one called "Single Line" that is literally a single track that crosses and recrosses itself, for some interesting interactions - my idea was to see how many trains I could get on a single track.... The current layout actually has proper German signalling (Or as close as I can get it without speaking the language), is a WIP, and has two double track ovals on different levels, each with a fiddle yard, and various ways of getting from one level to the other and back... I'm kinda just fiddling with it in the hope that V6 comes out before I've done too much and have to start again!
-
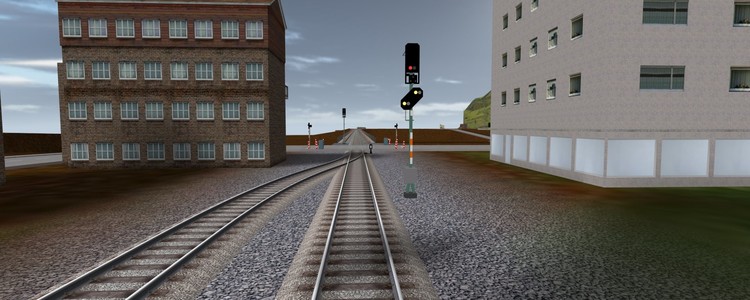
@Henry Yep that was it. It's not perfect, because the signal stays where it is but the base moves, or vice versa but it's close enough. So thanks Note the black contact box is different in the third picture. Can't be helped, it's just the way it is!


-
Hey @Dad3353 I just had a look at the layout Variations. Did you solve the issue with the N2 crossing yet? Because I can tell you what is wrong and if you haven't found it, I think you might kick yourself...! Simon
-
Also... A quick flirt with Google Translate reveals that @Henry did something similar in his signalling tutorial for the ground signal of a 3-way point. I knew I'd seen that somewhere! And I now know how to do the 3-way point on my layout too!
-
Well that turned out to be trickier than I thought it would be... The hard part was making it so it would take trains alternately if they were waiting, but just pass the trains from one side if none were coming the other way... Still not perfect - If I take all the trains off going anticlockwise but leave them running clockwise, I have to manually change a couple of points and signals to start things moving for some reason I don't want to try and solve... Now looking at my junctions... Oh yes, this is going to be interesting when I get it going. I'm going to use a variant of storing the train's route in the locomotive - Which I would never have thought of so thanks @Goetz Bu one thing that was bugging me was how to get a pre-signal to change the signal it is repeating when a point between them is thrown? I tried using an event on the point to change the property "link", but I realised that's the "physical link" that makes two objects move together, not the "connection" which is what I was trying to change... Then I came up with the perfect solution. I'm not using the pre-signals for anything except decoration. I might at some future date add something that causes a train to go slower if it passes a signal at VR0, but I'm not yet and if I do I will allow for this. So, we have a pre-signal, a facing junction and two main signals, and we want the pre-signal to show the aspect that mirrors the main signal that the junction is currently set to. How do we do this? We can't change the signal's connection property, and we can't connect both main signals back to the pre-signal because that would result in one of those signals changing the other. How do we do it? We use two pre-signals. Link one to one main signal and link the other to the other one. Then use the event on the points to toggle the visibility of both signals. Then we simply put them both in the same place (on the mast of the main signal before the junction). And the effect is exactly what I wanted! I just had to tell someone... And there might be someone reading this who realises that the visibility property is exactly what they need but hadn't thought of it!
-
Got that working, I used the track contact on advance (pre-) signals to check the block indicator and set things accordingly. I've also managed to get a train exiting the viaduct to start a train waiting to enter. Currently figuring out how to combine the two so a train that has already passed the advance signal but not stopped yet still gets started... I think I have a solution... Yep, that will work!
-
Thanks. Now I just have to put the rest of the signals in where I think I need them, along with their contacts, decide how I'm going to set the preceding signal to green (probably when signal contact is activated on leaving, and store the name of the preceding signal in each one). But most importantly I need to figure out how to automate this: Yep, that's a single track viaduct with a train waiting at both ends. (view from the cab of one and the other is that raised blip in the far distance...) I really wanted a viaduct, and couldn't find a two-track one I liked. And I figured it would make operating the layout entertaining to have a single track section. It's only since I got the "stop at red" working that I was able to put two trains on the track, and it is good fun sending them past each other manually, but I want to get on with other parts of the layout, so now I have to create an event for a train arriving at each end that checks if a train is already on the viaduct and if not, sets the route and clears the signals (There's an exit signal at both ends to prevent the train going onto the wrong track). I've already got events that set and clear a global boolean "Viaduct blocked". My one concern is the one in a million chance that two trains arrive at the same time. Because it's bound to happen! Murphey's law says so... And just delaying execution on one side doesn't help, because it just means that the other train has to arrive that little bit later to be at exactly the same time. I've not been able to think of a solution for that one since I first downloaded the free version 3 and then bought version 4. I suppose I could use two booleans, one for each direction, so I check the one for my direction. If it's true, I stop. If it's false, I set the one for the other direction true, wait a second then check the one for my direction again. If that's true I flash a big red light and pause the program....
-
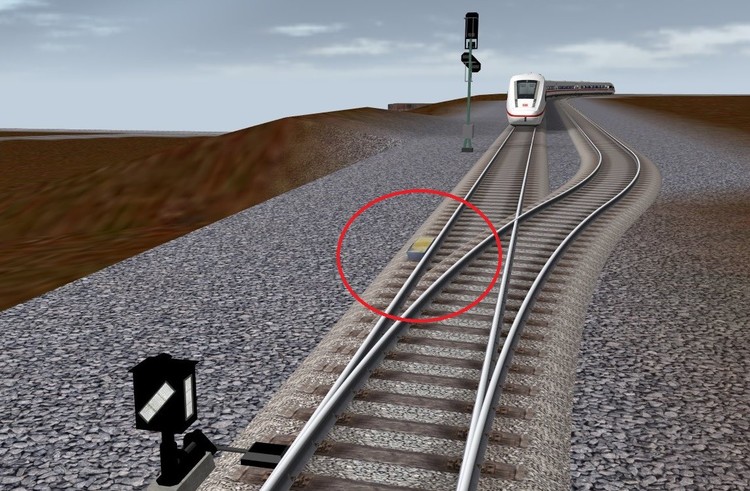
So... With programming/coding there is no "Right" way of achieving something as long as it works... I have just done the same on V5, (because I have no patience and I want it now!) and it's actually a bit simpler... An object variable on the track contact, which is set further back from the signal to allow the train to slow (distance by trial and error!), holds the address of the signal it relates to. When the contact with the keyword STOP is triggered on entry, if contact.variables["Signal for"].state == 0 then vehicle.targetSpeed = 0 contact.variables["Signal for"].variables["Train at"] = vehicle end When a signal with keyword "signal" is changed if not (signal.state == 0) then if signal.variables["Train At"] ~= nil then signal.variables["Train At"].targetSpeed = 100 signal.variables["Train At"] = nil end end And that's it... Well, apart from "Closing the door". On the prototype, back in the old days of manned signal boxes on every station and at every junction, the signalman would wait until the train had passed completely before setting the signal on and blocking the track - he would do this latter by sending a coded bell message down the telegraph to the next signal box, saying "Train in block". (And I'm not being sexist, just historical, I don't think there were female signalpeople until very recently. Not in the UK anyway.) But these days,in the UK at least there is an actual track contact, something like this(?), just beyond the signal and when the locomotive passes over it, it sets the signal red. Which is why, when watching from the window of a passenger train in the UK, the signals always seem to be red when you go past them, unless you are right at the front of the train. If the track is straight enough (or curved just right) you can sometimes see the signal change as you get closer to it. Because of this I prefer to use the signal track contact event "On entering (Vehicle Centre)" which realistically changes the signal while the train is still passing it. (Of course to be totally true to prototype one could use one of these and have it set the signal "on entering"... But that's too much hard work!
-
Hey guys Thanks a million, those were really helpful. V6 looks really amazing and I can't wait to see it. (By the way, I spotted the missing full-stop before either of you! My wife must think I'm crazy, because I was all but yelling "There's a full-stop missing...!" at the computer screen!)
-
@Goetz That is what I was hoping for. I didn't think I could possibly be the first one to see the need. @Dad3353 Thanks. Yes I'm aware of the track contacts that can be used in conjunction with the signal to slow and/or stop the train, but the problem with the current system is that you have to specifically name each contact and signal (yes it's worth doing that anyway), but then you need a separate event for every contact because each one is dependent on the state of the signal behind it, but there's no link between the signal and the advance contact point. I suppose one could soft-code a link - create an object variable on the contact that held the state of the signal, and have an event that updated it when the signal changed. But again you'd need a different one for every signal. less work than having an event for every contact for every state of the signal, but it seems a bit superfluous if V6 is coming soon... When is V6 due out?
-
This might already have been suggested, and may even be in the pipeline - I don't read German I'm sorry to say, so I don't know what all the other headings are. My suggestion is that the track contact on the various signals be capable of being moved away from the signal itself. Either that or have the ability to connect a track contact to a signal. As it is at the moment, you either have the train reach a red signal and stop a little way past it (or stop unrealistically suddenly if you use "set current speed"), or you check each individual track contact with the exact same code but each one having it's own event. What I have in mind is something like: When any signal contact is triggered, if the signal [Trigger] is 0 Set vehicle[trigger] target speed to 0. And have the trai slow realistically to a halt just before the signal.
-
Actually, I found that there is a type of spacer (the yellow arrow shaped ones) that behaves itself.... When is V6 due for release? Because unless it's today I'm not going to be able to stop tinkering with layouts... I still think the best thing about 3D Train Studio is the fact that other than the initial outlay for the program, I can build as many layouts as I like and it doesn't cost anything except time. I just checked and the price of a 1m length of Peco streamline flexi-track is just under £5, that's just over €5.Call it even... A set-track point is £11.50. that's €12.50 near enough... And £16 for a streamline electrofrog point... To put together some of the layouts I've seen could cost well over a thousand pounds on track alone. As for rolling stock, forget it! So frankly, I don't mind the fact that everything I do is going to be obsolete when V6 comes out, because it's not like I'm paying for point motors and electronic stuff that I'm going to have to throw away because it won't work anymore!