

.JPG.60f131f7d73de70dfed09e53715d9cf1.JPG)
220hotwheels
-
Gesamte Inhalte
528 -
Benutzer seit
-
Letzter Besuch
Beiträge erstellt von 220hotwheels
-
-
18 minutes ago, Goetz said:
Hi Pete,
found it:
Kind regards
GoetzHi Goetz
That's brilliant, many thanks. I thought I had looked at all possible options, clearly I had not. Anyway, onwards and upwards now, thanks.
Kind regards
Pete
-
Hi to all my fellow MBS enthusiasts.
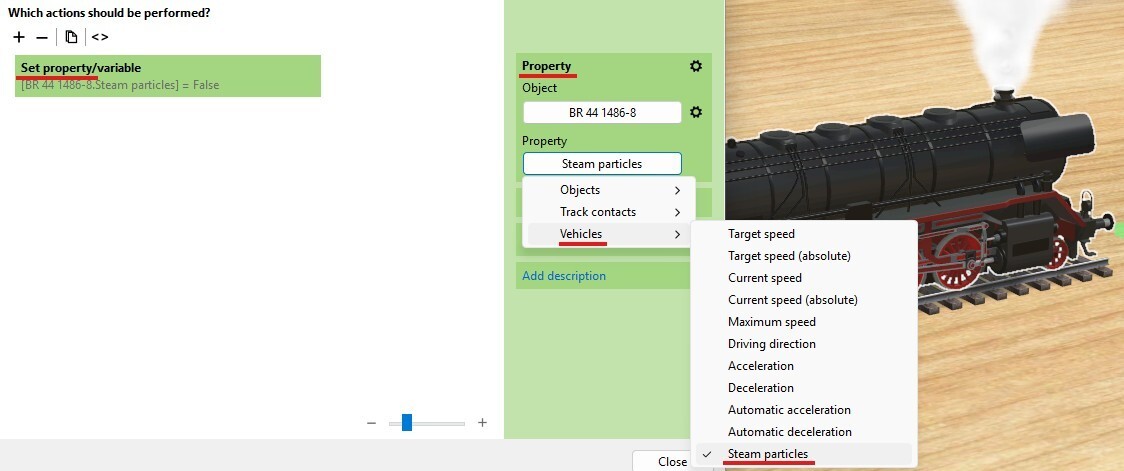
This may seem like a very basic question but can anyone please tell me how to enable or disable the steam particle for, example, the above loco, in Event Management.
Clearly it is possible to manually do so in properties but I am wanting to do this automatically through the EV.
Kind regards
Peter
-
Thank you @Sualokink, thank you @Neo. All is now working perfectly.
Best regards
Pete
-
1 hour ago, SualokinK said:
I seem to be slowly becoming senile.
I was sure I'd tried every variation. I guess I hadn't.
Excuse me pleaseNeothat I have to ask you again for permission
 .
.
I seem to be slowly going senile.
I was sure I'd tried all the variations. I guess I haven't after all.
Sorry @Neo that I have to ask you again for the release.Best regards,
SualokinKYou and me both. I simply put it down to yet another senior moment, I have lots of those, but it does cover a multitude if things.
Best regards
Pete
-
Hi Sualokink
I notice that the door mirrors have now been attached to the RS3 version and work perfectly when the doors open but as yet none of the doors work with the RH drive version. No doubt you have this in hand but just in case I thought it worth mentioning.
Best regards
Pete
-
Hi Sualokink
Well you've doner it yet again. Another superb model to add to your ever growing stable of wonderful models. A special thank you for the right hand drive version which is very much appreciated.
Best regards
Pete
-
2 minutes ago, 220hotwheels said:
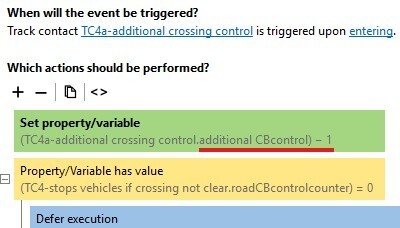
Having looked into this I can see my mistake, it should be a number and not a keyword. The sole purpose for this TC is to stop vehicles entering the level crossing if the way ahead is not clear, i.e. if the traffic light 'A' Nunthorpe Road is red. I've now made the correction.
Many thanks
Pete
Hi Goetz
I have also noticed that due to so much meddling with the Bentley I seem to have a train or two out of position. This has now been corrected. You will also no doubt have numerous large question marks for both 2 trains, their carriages and a couple of cars. If this is any issue I can supply the appropriate file to correct this anomaly. These are The Flying Scotsman, The Mallard, and 2 BMW cars.
Kind regards
Pete
-
1 hour ago, Goetz said:
The event TC4a-additional crossing control produces an error message, because you attempt to subtract 1 from what is actually a keyword.
Having looked into this I can see my mistake, it should be a number and not a keyword. The sole purpose for this TC is to stop vehicles entering the level crossing if the way ahead is not clear, i.e. if the traffic light 'A' Nunthorpe Road is red. I've now made the correction.
Many thanks
Pete
-
1 hour ago, Goetz said:
Incomplete or not, Pete ... That is one impressive layout
")
No apologies needed!Thanks Goetz. My trouble is that I tend to get side tracked, have a great idea and then set about implementing it, not always to the best effect.
Pete
-
54 minutes ago, Herman said:
Hello Pete, look at the track contact. When stopping the bentley hits this next track contact.
But it is an acceleration contact to 25 km/h , so the Bentley immediately goes on. I placed the second TrCt a bit further.Correction not the case here because the deceleration of your Bently is high enough. The real cause is that you took the wrong name of the TC. See further.
Kind regards, Herman
Thanks Herman, yep I found that too by going back over everything.
Kind regards
Pete
1 hour ago, Goetz said:Hello 220hotwheels,
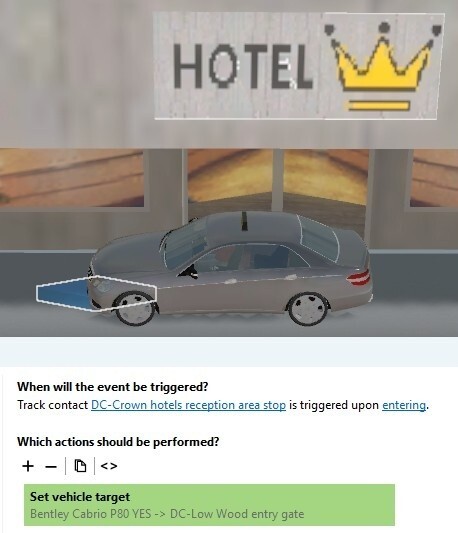
here is one situation which causes the Bentley to lose it's route:
When any vehicle enters the contact at the hotel, you assign DC-Low Wood entry gate as the Bentley's new target. But the Bentley is nowhere near this hotel. From it's current location, the target is out of reach for the Bentley. And when you assign an impossible target, the set route is lost.
unrelated:
The event TC4a-additional crossing control produces an error message and pauses the layout when the event trace window is open. I haven't figured out yet what that error is about.Kind regards
GoetzThank you very much Goetz. That was meant to be the start point for the return of the Bentley to Low Wood but I will remove it for now and rethink at a later date. I am also looking into the event TC4a-additional crossing control.
Kind regards
Pete
-
1 minute ago, SualokinK said:
Hi Pete,
Here is the E variant again.
Now the Bentley drives out of the exit ramp once to the right and once to the left and also stops further into the road.
Maybe it will help and, as Goetz already wrote, it has nothing to do with the Bentley, but depends on the position of the contacts.
Because Goetz has offered his help, I will withdraw. It is the better plant manufacturer.Best regards
SualokinK
Test layout single lane junction E.mbp 8.72 kB · 0 downloads
19 minutes ago, Goetz said:It has nothing to do with the Bentley in particular (nor with stopping the car at a more realistic position than I did in my lazy layout).
We'd love to help you identify the true cause of your predicament. Alas ... without access to your troubled layout, that's a tad difficult.
Kind regards
GoetzHi Goetz
I do very much appreciate your offer of help. I do think I am beginning to overthink this problem. I have attached the layout along with the outward route shown. When I did a quick run through the Bentley failed to stop at the second junction as well as the traffic lights, but I only went that far before stopping. To start things off just set the speed for the Bentley to -8kph. Apologies for such an incomplete layout, it is very much a work in progress with alterations and improvements taking place all of the time.
Kind regards
Pete
-
1 hour ago, Goetz said:
Hello Pete,
these twitches happen when no target is assigned.
You never assign a target for the return route, leaving it to chance which way the Bentley goes when it comes back.Also, switches and targets don't mix well.
I replaced the switch in your virtual track loop with two normal track pieces, assigned a destination for each step of the way and everything runs like clockwork:Test layout single lane junction G.mbp 9.11 kB · 1 download
A second variation with fewer (hence the F
 ) contacts:
Test layout single lane junction F.mbp 11 kB · 0 downloads
Kind regards
GoetzHi Goetz
Thank you so much for your solutions. As I'm sure you have already noticed Sualokink has also offered a similar solution and my reply to him is perhaps self explanatory.
It never ceases to amaze me just how complex elements of MBS are. Having set the route in 4 parts following the advice from Herman I have found that sometimes it will work OK and on other occasions the section of route set is replaced by a route set for another vehicle. I am wondering if it might be prudent to remove the Bentley Cabrio and replace it with a completely new on to see if this might solve the confusion with the other routes.
Anyway, much head scratching is now the order of the day in the hope that those little grey cells will stop dancing about and all line up with the correct, final, solution.
Once again many thanks for your help.
Kind regards
Pete
-
1 hour ago, SualokinK said:
Hi Pete,
Please take a look at variation E.
Best regards
SualokinKTest layout single lane junction 1.mbp 23.96 kB · 4 downloads
Hi Sualokink
Many thanks for your solution. As you have seen it follows very closely the solutions offered by Goetz and in all 3 cases the car stops on exit well before a car would actually stop under the same circumstances. This is perhaps why I have had so much trouble, I have tried to create as close to reality as possible with the car stopping right at the point where it would in real life. That said I do seem to have got round that to a point, the point at which the route is set seems critical in ensuring the car remains on the left hand side of the road on exit. Another, self inflicted problem is the space in which I am able to set start and end route points. At the moment the car pulls into the drive and heads for the garage on the right. After a short stop it then reverses out, stops before moving forward, opening the gates and then setting the exit route. It stops at the junction with the road before moving off. This now works fine but trying to set the complete route is proving a nightmare. Clearly my understanding of what is required is still not quite there. Herman pointed me in the right direction by using the "set target" element of EV and whilst I have been able to get so far with the route using this method I find that for some unexplained reason the route will suddenly simply disappear. More investigation is required.
Anyway once again many thanks for your solution.
Best regards
Pete

-
2 hours ago, gmd said:
Hi Pete,
You didn't get an answer yet, and to be honest, I do not quite understand what you are actually asking ?
The picture does not help me either. Maybe you can elaborate a bit and you may get some answers.
Regards
gmdHi gmd
Typical of me, I know what I am trying to say but don't explain it properly for others to understand.
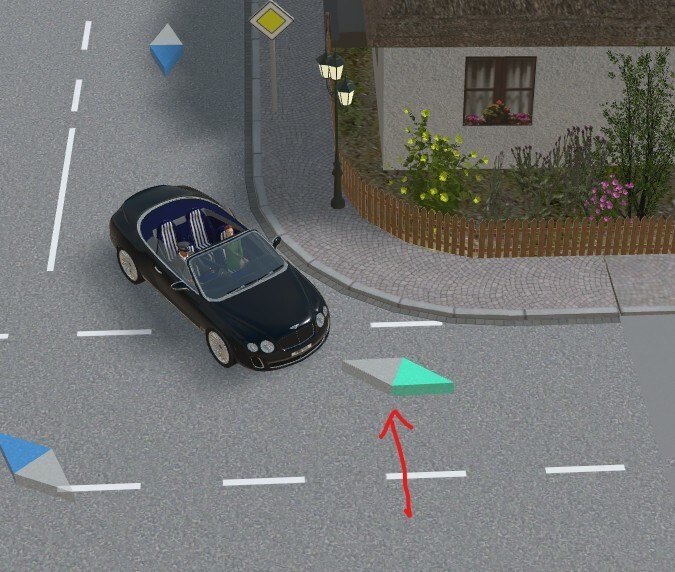
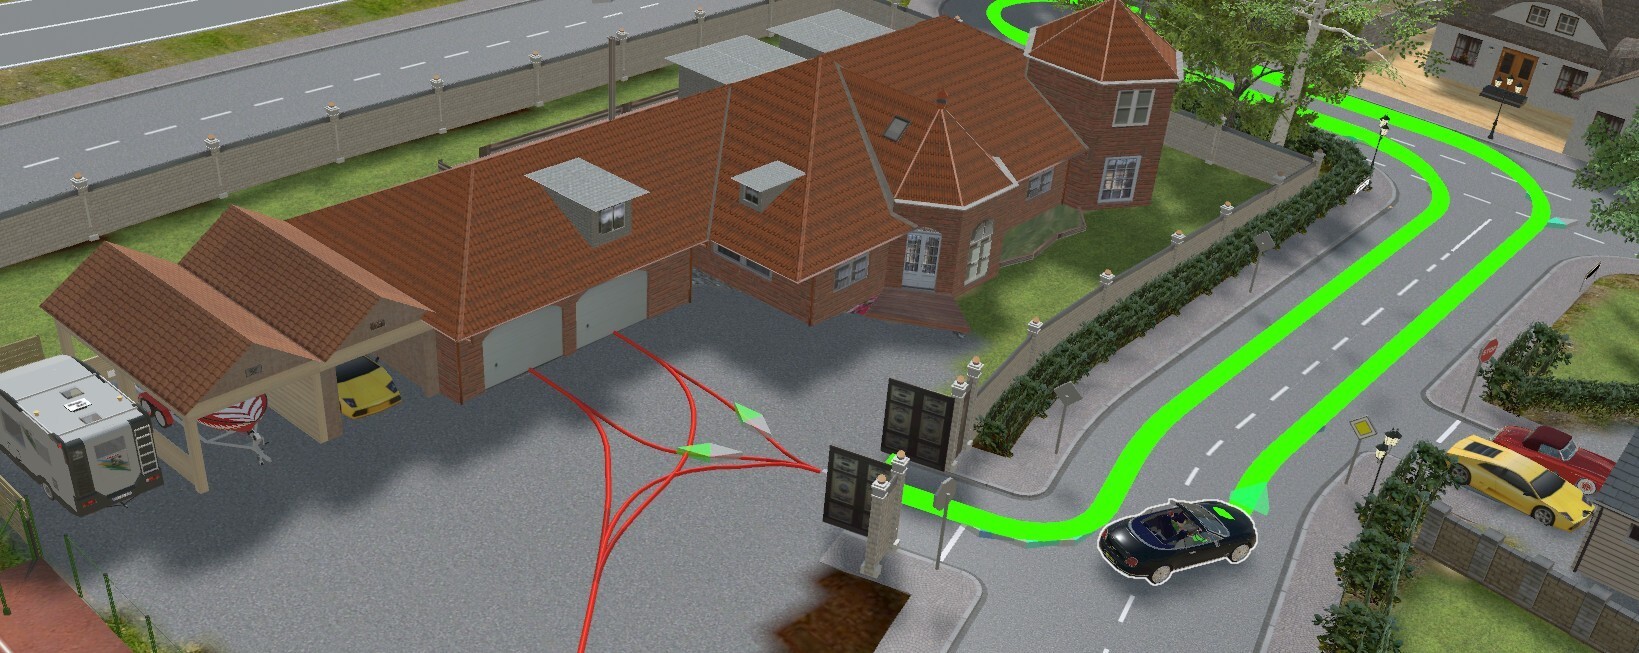
Basically the layout that I am working on is designed with right hand drive vehicles. Setting the route for all thus far has been no problem. However I now have to set the route for a Bentley Cabrio to leave the owners property and head into town to visit a friend in her apartment. So far so good. The junction into the property is a standard single lane junction as per the initial screenshot. The issue that I had was that despite setting the route to depart through the gates, do a quick round trip (for experimental purposes only) and then return to the property. However I could not get the Bentley to follow the route set, it simply departed heading across the road and onto the opposite side as if it were a left hand drive vehicle.
Since posting my question Herman has come back to me with a solution which works fine, see attached small demo layout, but in trying to apply this to my actual layout it is not working as I had hoped. In fact the Bentley seems to have a mind of it's own and will follow the set route for so long and then it simply goes it's own sweet way and the set route is lost. Other vehicles follow a similar route without issue.
To try to explain the problem I have made a short demo. A) uses Herman's method and works perfectly with no rear twitch when arriving back. B) Is the initial standard junction that has given me so many headaches. C) Is my solution to the problem with B but it produces rear end twitch on return. D) Is a modification of C with much reduced rear end twitch.
The solution would seem to be to follow the advice offered by Herman and to split the route into sections. My attempt at this has so far been a bit unpredictable which would suggest that I am doing something wrong. Having set the routes as A to B, B to C, C to D I find the route disappears once the Bentley enters C to D. It also ignores traffic lights set at the end of B to C. Clearly I have much more work to do in locating the source of the problem.
Many thanks for your interest in this issue.
Kind regards
Pete
-
Hi to all my fellow members
I wonder if anyone can give me a valid reason why the vehicle exiting onto this junction will not follow the route designated for said vehicle but simply takes the junction route to the opposite carriageway. Clearly I can solve this issue buy constructing my own junction but should this be necessary?
Kind regards
Pete
-
18 minutes ago, SualokinK said:
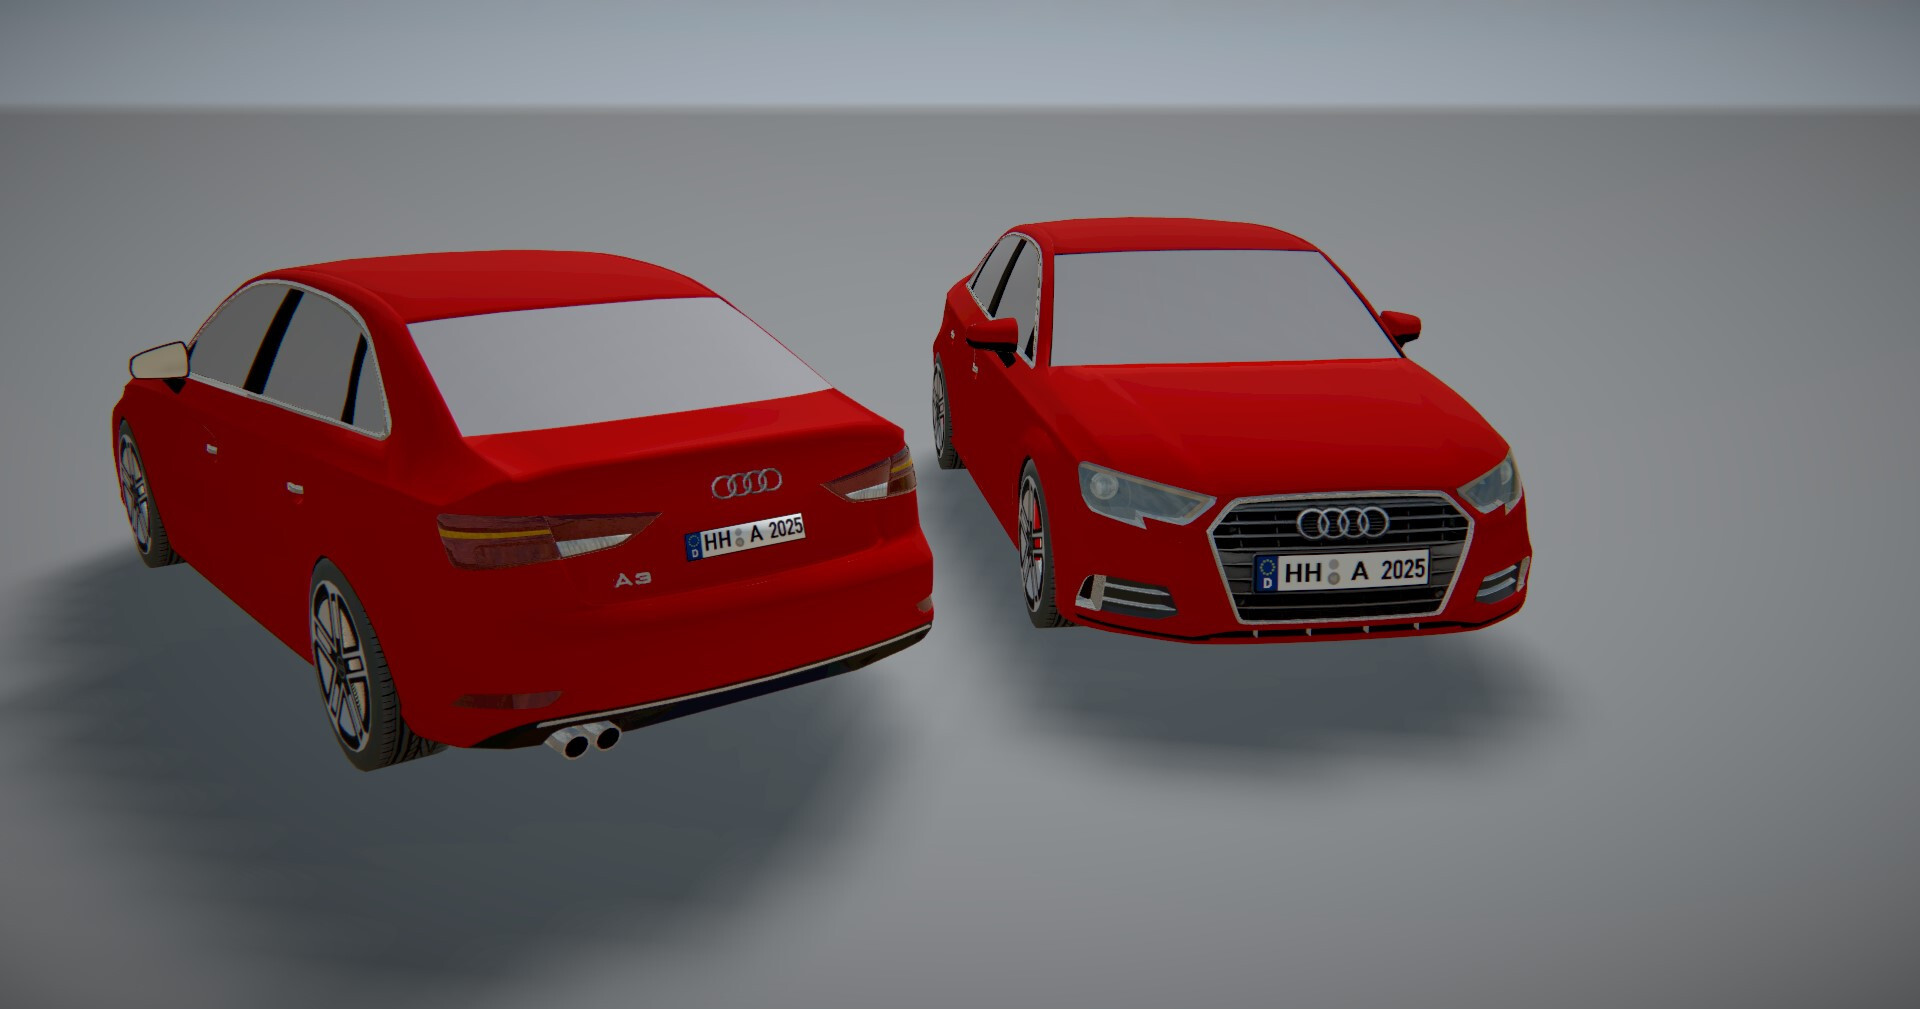
Hello everyone, HelloChris06,
It's April and I've prepared something:
Is the model roughly what you imagined?
The model is still missing its interior, so the windows aren't transparent yet and the doors can't be opened.
However, some animations (switches) are already functional, and some work still needs to be done on the texture (e.g., shine).The model is available in the catalog as design ID 7BFDE12B-5B8C-49DB-A8E2-ADE2DE5569E7 .
Best regards,
SualokinKHi Sualokink
This looks like the start of yet another great model from "The model master". Cheeky request, but that's me all over, any chance of a right hand drive version?
Best regards
Pete
-
3 minutes ago, SualokinK said:
Hello everyone,
The Bentleys including their personnel and the Mercedes-Benz L6500 semi-trailer truck with a Kässbohrer semi-trailer bus from 1939 are now available.
Also some reworked city streets and some city streets for left-hand traffic so that the Bentleys can drive in their usual environment.
Thank youNeo and everyone else for the clicks
Best regards,
SualokinKThat is brilliant news and once again very many thanks for taking the trouble to produce not only the superb Bentley and it's personnel but also for the right hand drive road junctions. They really do provide greater flexibility in layout design.
Best regards
Pete
-
54 minutes ago, Phrontistes said:
You could take a look at this layout: 61F3BB89-118E-4D37-AAA2-FC1E202A887B. The concept is not simply to switch traffic lights in turn, but depending on traffic, as is the case almost everywhere in real life.
Wow, now I really do feel like a novice. I've only briefly looked at your EV but I'm very impressed. You have certainly given me something to aspire to but it will clearly take me some time to get my head round what I need to do in order to improve my approach to these two elements. I think the phrase that springs to mind in summarising is "less hit and miss more realism and accuracy". I now do fully understand your suggestion to apply 'logic' although the degree of logic depends upon the individuals extent of knowledge. Clearly mine has a way to go yet.
Pete
-
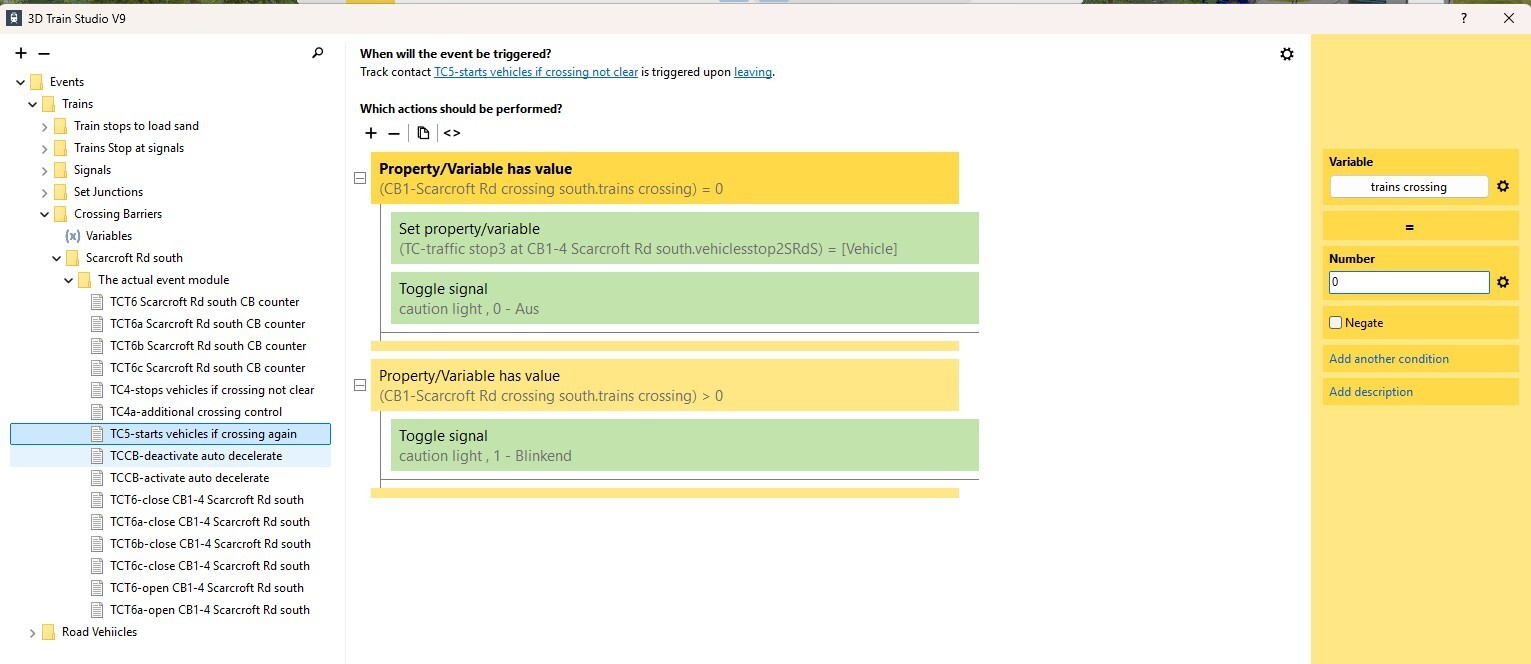
16 hours ago, 220hotwheels said:
Thank you Goetz. That sounds so simple a solution and so obvious. I'll make the changes and hope no other issue ensue. If they do then more work for those little grey cells!!
Hi Goetz
I began to plan what I needed to do in order to follow your advice and whist doing so had a bit of a eureka moment with regards to the TC that ultimately controlled the release of vehicles to cross the barrier. I've attached a screenshot of the result which does seem to work OK.
However I now plan to follow your guidance with another alternative using the switch to see if by doing so I can reduce some of the TC's used. It might also prove useful to provide greater control of the road 'T' junctions.
Pete
Level crossing and traffic light controlled road junctions demo_2.mbp
-
3 minutes ago, Goetz said:
Place one switch somewhere near the crossing.
Use this switch to control the road traffic. (Connect the road contacts to that switch to change their state)
Let the switch determine when the barriers should close.
And when all trains have cleared the crossing, you first open the barriers and then, after a shot delay, set the switch to "go"Thank you Goetz. That sounds so simple a solution and so obvious. I'll make the changes and hope no other issue ensue. If they do then more work for those little grey cells!!
-
20 hours ago, simonjackson1964 said:
I'm not sure if this is happening, but one ting I have found happens is, if you have the "automatic acceleration" enabled on the road vehicles, the one that is supposed to stop as the barrier comes down will instead keep going if it is following too close to the one in front. I did come up with a solution for this, but since I lost my computer last year, I don't remember what it was.
I do know it involved turning off the automatic acceleration for each vehicle as it approached the crossing, then (I think) turning it back on again when the vehicle speed reached zero, or it safely cleared the crossing...
I'm not even certain if that will be of any help, or if it is even relevant - you might have already thought of it... Let alone whether that is actually what I did or exactly how I did it.
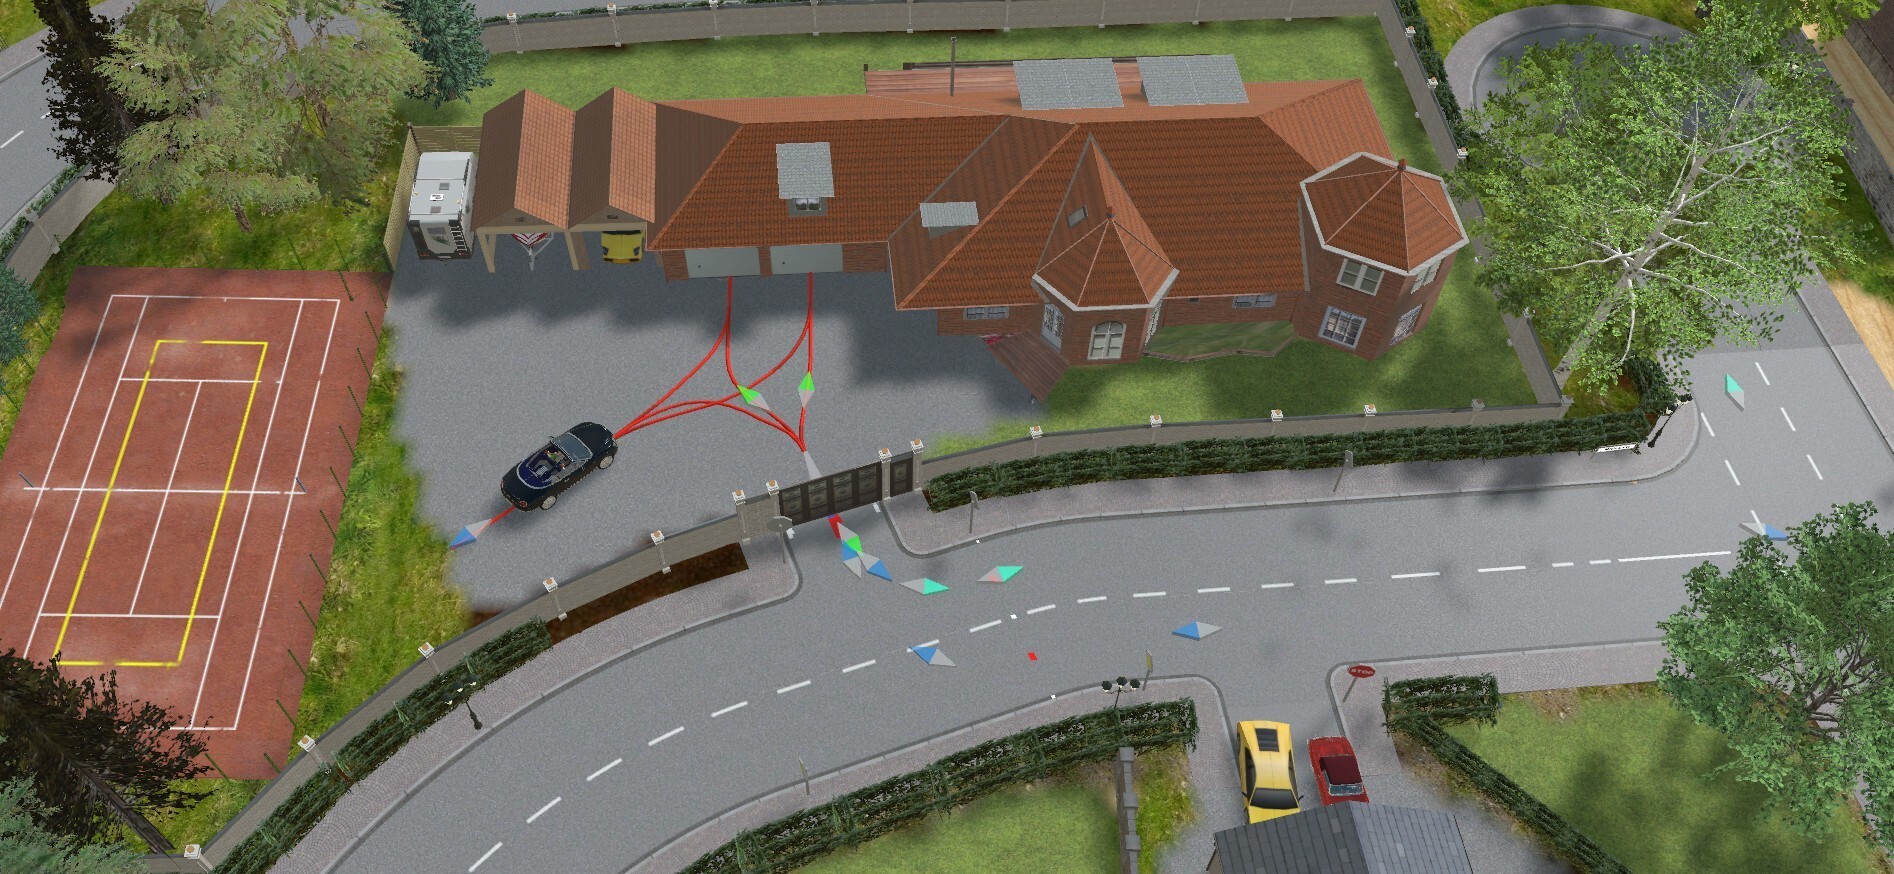
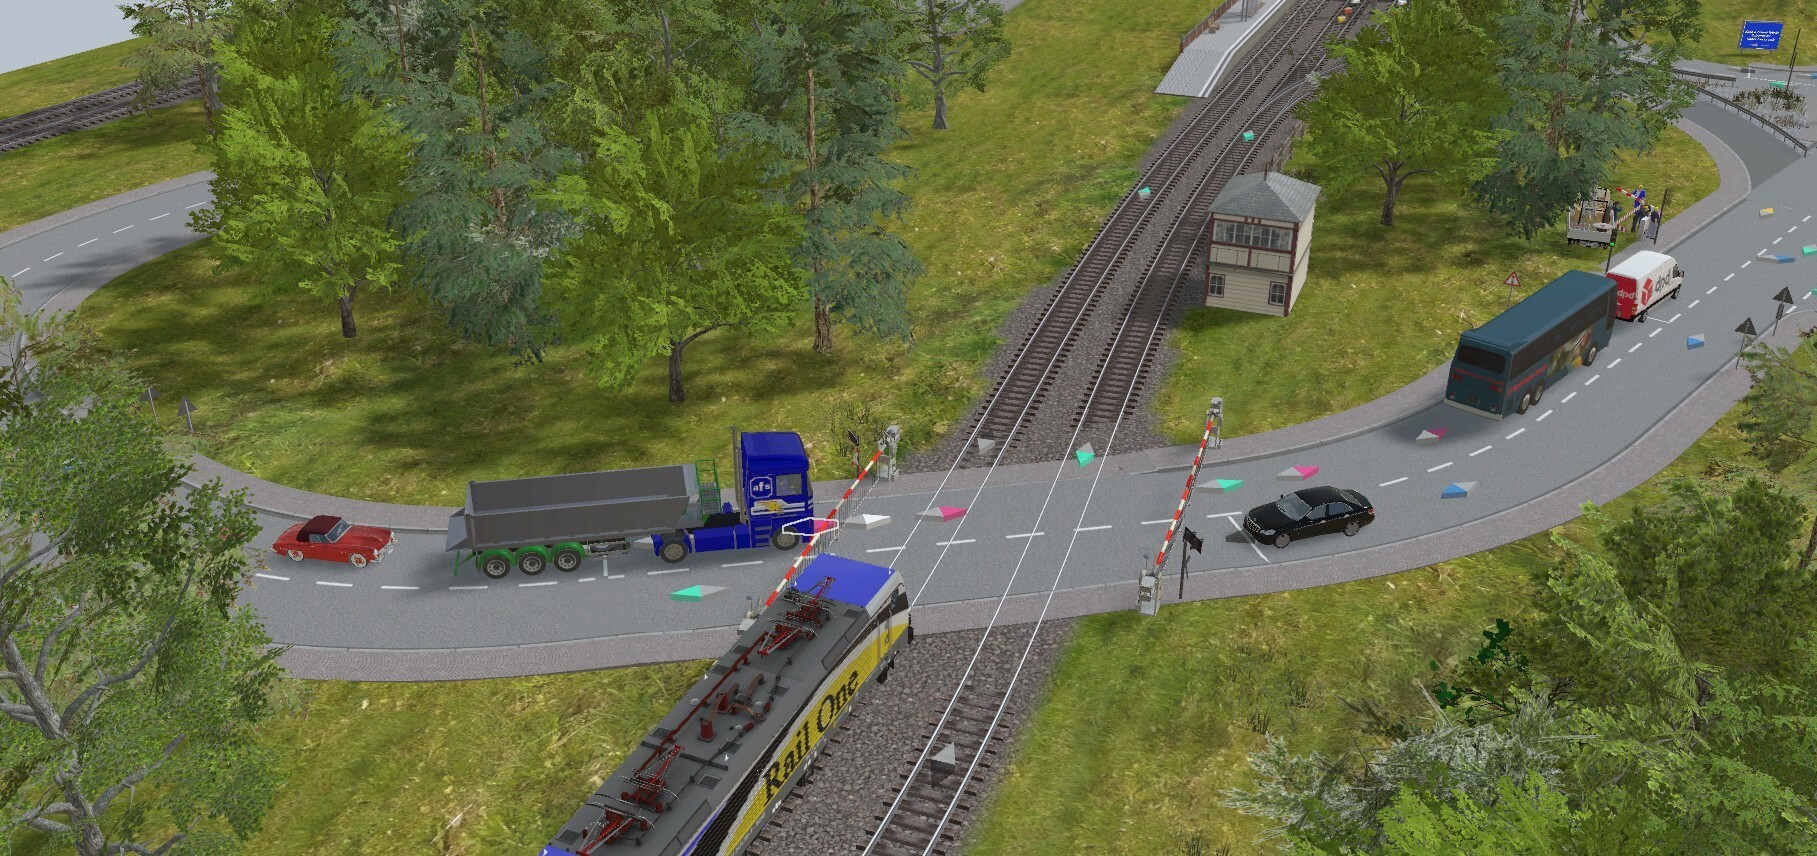
Having applied, what I consider, a bit more of a logical approach to this problem I feel that I have made steps forward. However there remains one issue that I simply cannot find the solution to.
In the attached screenshot the CB is down, the AFS tipper has stopped as has the vehicles on the opposite carriageway. The problem is that once the bus has left the TC at it's rear the TC on which the AFS tipper truck is stopped then changes to 20kph and the truck simply drivers through the barrier, the train etc. Logically the TC on which the tipper truck is stopped needs to be linked to the actual CB stop TC if the barriers are down but once the barrier is open then it needs to revert back to the TC at the back of the bus (as per the screenshot) and despite my best efforts I have not been able to achieve this.
Any suggestions would be greatly appreciated. Getting this right will provide greater flexibility under other circumstances.
Pete
Level crossing and traffic light controlled road junctions demo_2.mbp
-
11 minutes ago, Phrontistes said:
Just a suggestion, because that's how I tend to do it: It's better to have fewer contacts with more logic. The primary logic must of course be that the car is not allowed to move when the barrier is closed.
Once again thanks for that. I'll take another look at all of this later and see if I can make a more "professional" solution based on your suggestion.
-
1 hour ago, Phrontistes said:
Yes, it is. It doesn't look like every vehicle always stops in front of the barrier. It's not easy to avoid this completely. But as a first step, you could disable this stopping when the traffic light is green.
Thanks for that. I'll take another look at that element. The problem seems to be trying to strike a happy balance between the various vehicle sizes. At the moment I have chosen to get everyone to stop until told to proceed. I introduced the second barrier stop to try to ensure that if the barrier was down and a vehicle stopped on the temp stop that it did not begin to move through the closed barrier if the vehicle on the other side moved due to a traffic light change and therefore release the one stopped on the other side temp stop. Yes it can release it but then it must stop at the second barrier stop to await said barrier lifting. I'm still not sure I have this right yet as the temp stop sets a speed to go which I think the second barrier stop might simply ignore but as yet this has not come into play.
More monitoring ahead.
Kind regards
Pete
-
Hi Phrontistes
Having taken your advice I have introduced some TC's to control the traffic on the side affected by the traffic lights. It does seem to work OK but I can't help feeling that my interpretation is just a bit ham fisted. The traffic flows OK but it is a bit stilted. I have played around with the position of the TC's but seems to make much of a difference. Perhaps you know of a more sophisticated way to approach this which will add greater realism. Otherwise I will revise the *.pdf and repost.
Kind regards
Pete
Level crossing and traffic light controlled road junctions demo_1.mbp
SualokinK's Modellbau V9
in Modelle
Geschrieben
Hi Sualokink
Yet more great models from the Sualokink stable. As yet I have not had time to check them out fully but hopefully that will be rectified later this evening. I can now update my police station with additional modern equipment. As always a right had drive version would be perfect but then it's not a perfect world anymore!!!!
Best regards
Pete