Curt84328
Mitglieder
-
Benutzer seit
-
Letzter Besuch
Alle erstellten Inhalte von Curt84328
-
 I'm not sure I understand the question. I will try to answer. Train enters track. > Set Variable (Train Present) to 1 / check variable (Variable is changed checks Train Present for value 1. result stop train (Other Track) train leaves track > Set variable (train present) to 0 / (same check as above) value 0 result, do not stop train (other track) (this is all done by the same check as above) It's simple Boolean Algebra. Hope this helps
 -
well, it does raise terrain for tracks, you can set the width of the embankment, you can select one, or several tracks to select to raise the terrain beneath the tracks. Have you seen the auto tunnel program, which can also be used for bridges. There is also an auto embankment program, but I have not tried it.
-
Thanks much, that worked great.
-
Item 8. If you do not plan to build in real life, have you considered the uses of the track editor completely? item number 9. Most real track companies make flex track, and the MBS has it in most sets. It should not be stretched (but can be) but can be cut shorter (Shortened in MBS) or bent to fit. your second number 9. I do not like auto embankment. It tends to mess up to easily. I frequently change the width of the terrain to avoid burial of a lower track and auto embankment would ruin that,. Sometime on elevated track, I install bridges.
-
Is there a way to cut a hole for a tunnel in the base plate when the baseplate is flat (It has not been elevated, all at 0 elevation) Gibt es eine Möglichkeit, ein Loch für einen Tunnel in der Bodenplatte zu schneiden, wenn die Grundplatte flach ist (Es hat sich erhöht nicht, alle bei 0 Elevation)
-
I was wondering if anyone was interested in creating a 3D model of the Union Pacific Locomotive 119 used in the ceremony at Promontory Point, Utah in May 1869. This is considered a standard Locomotive for the time, and I think it would be a valuable addition to MBS. I have a lot more pictures and information is anyone is interested. Ich habe mich gefragt, ob jemand interessiert war, an bei der Schaffung ein 3D-Modell der Union Pacific Lokomotive 119 verwendet der Zeremonie am Vorgebirge -Punkt Utah Mai 1869, Dies ist eine Standard-Lokomotive für die Zeit betrachtet, und ich denke, es wäre eine wertvolle Ergänzung zu MBS sein. Ich habe viel mehr Bilder und Informationen ist jemand interessiert ist.

-
I was goofing around with the Height Map, and imported a gray scale picture. This is funny, but absurd. Ich war mit der Höhe Karte herum vermasseln, und importiert ein Graustufenbild . Das ist lustig, aber absurd.https://www.facebook.com/groups/308438074537/
-
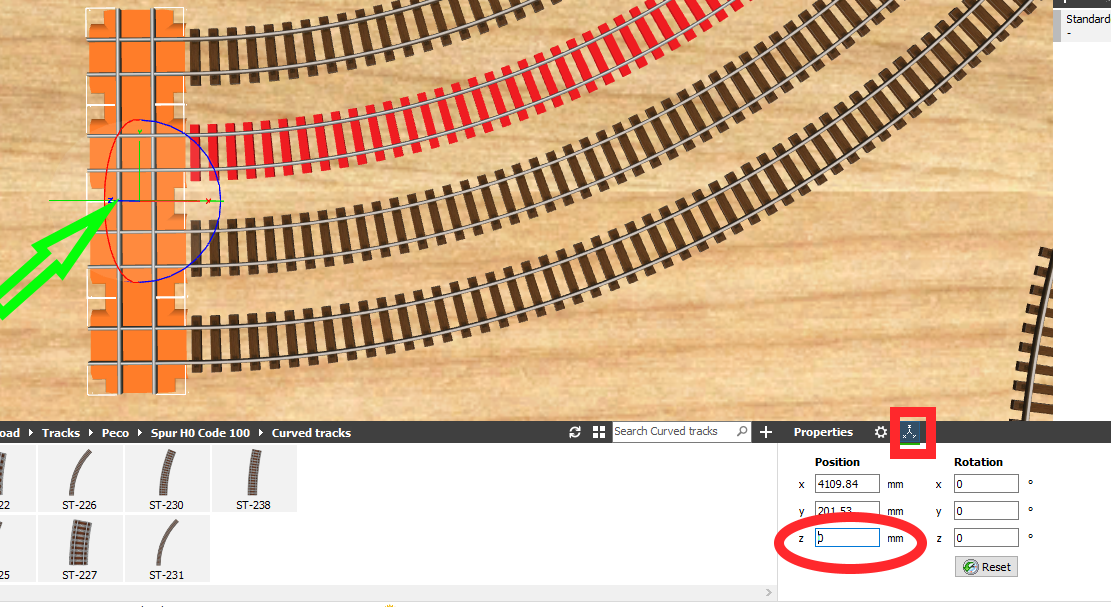
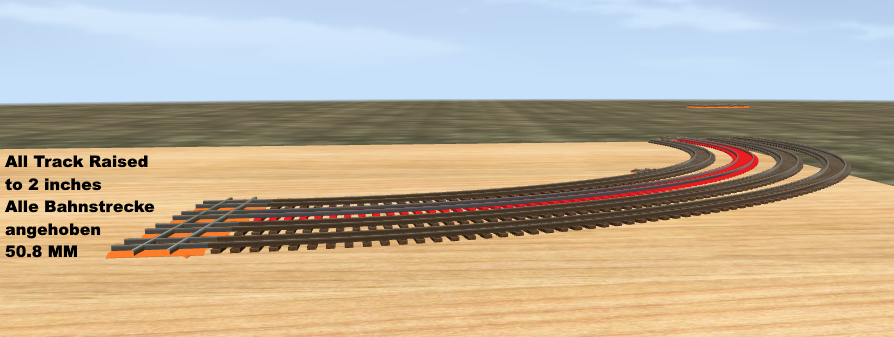
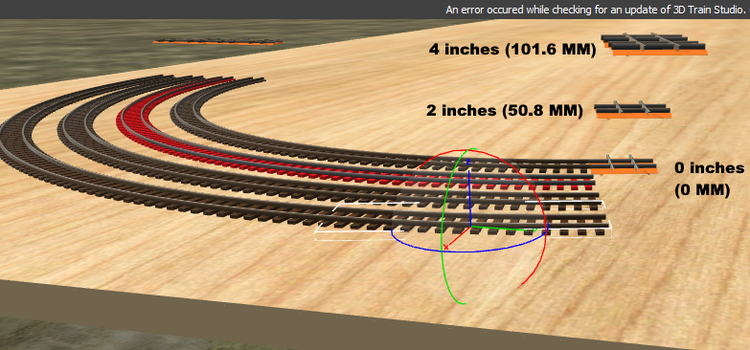
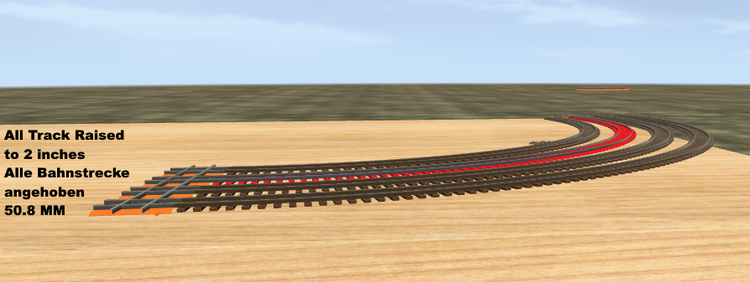
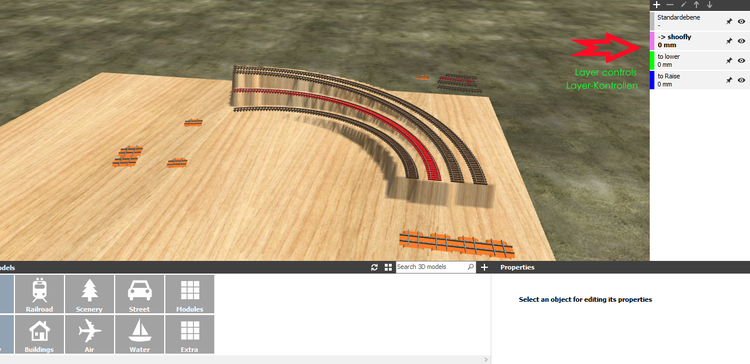
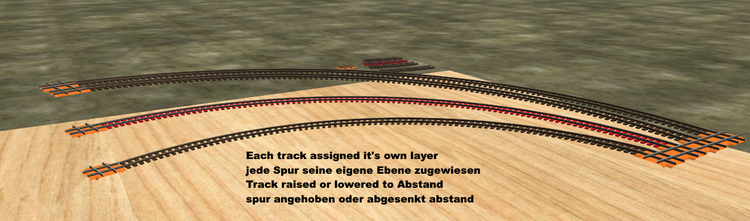
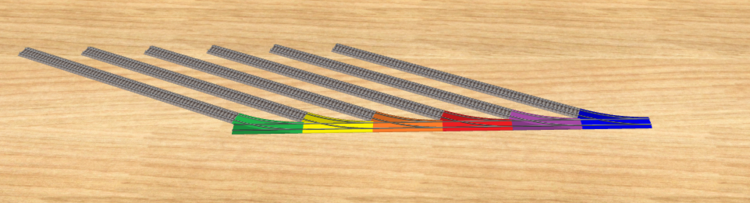
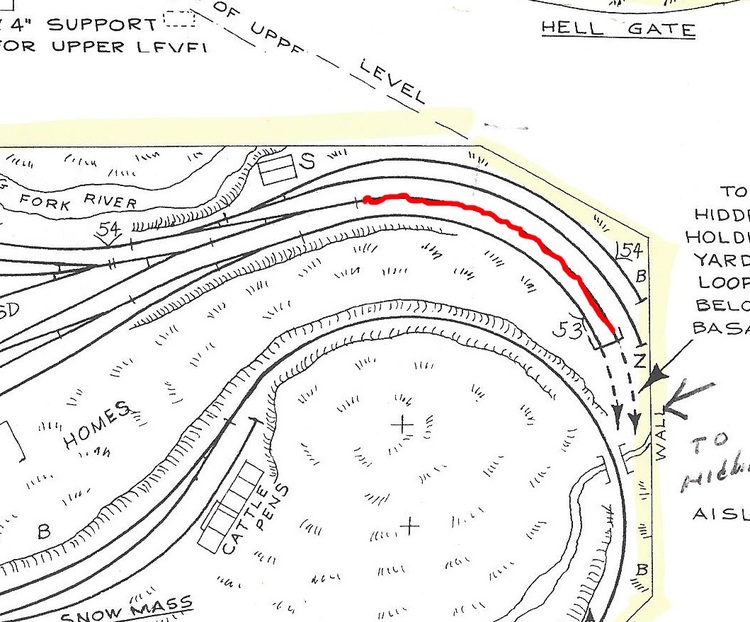
It is time to start laying trackage down. Es ist jetzt an der Zeit zu beginnen trackage zur Festlegung. Warning: This post contains a lot of images. Achtung: Dieser Beitrag viele Bilder enthält. Look at the plans for the "Hidden Yard" and you will see 3 tracks going from the bottom towards the top, with a space for a 4th track between the innermost and the next outer track. We will be putting down 4 tracks. 3 Permanent and one temporary (In America this is called Shoofly Track). I start by creating a section for each track with the correct radius and degree. I also created a Track Spacer (an Abstand) and placed them all in the bottom corner of the bottom plate for easy access. Schauen Sie sich die Pläne für die "Schattenbahnhof " und Sie werden sehen, 3 Spuren von unten nach oben gehen, mit einem Platz für eine vierte Spur zwischen dem innersten und dem nächsten äußeren Spur. Wir werden vier Spuren Niederschlagung . 3 Permanent und eine temporäre (In Amerika das nennt man Shoofly Track). Ich beginne mit einem Abschnitt für jeden Track mit dem richtigen Radius und Grad zu schaffen. Ich habe auch einen Track-Spacer (ein Abstand) und platziert sie alle in der unteren Ecke der Bodenplatte für den einfachen Zugriff. using the grid view, place the first section in the proper location (127 MM from bottom and 744.6 MM from right edge) die Rasteransicht , legen Sie den ersten Abschnitt an der richtigen Stelle (127 MM von unten und 744,6 mm von der rechten Kante) mit Place a Track Spacer (an Abstand) at the end of the track, and then add 3 more above the track as shown. Legen Sie einen Track-Spacer (ein Abstand) am Ende der Spur, und fügen Sie dann 3 mehr über der Spur, wie dargestellt. This will ensure that each track is the proper distance apart (Seperated from the other tracks) Dadurch wird sichergestellt, dass jeder Track ist der richtige Abstand (getrennt von den anderen Spuren) All four lines have now been started, and you can select each track and you can append the number of tracks needed to complete each line. Alle vier Linien haben nun begonnen, und Sie können jede Spur auswählen und Sie können die Anzahl der Spuren anhängen benötigt jede Zeile zu vervollständigen. Placing a track spacer at the top end of each line is a good way to check that the radius for each line is correct. The red track is a temporary track, The tracks are missing their track bed because I think they look better without a track bed. eine Spur Abstandshalter am oberen Ende jeder Zeile zu platzieren ist eine gute Möglichkeit, dass der Radius zu überprüfen, für jede Zeile korrekt ist. Die rote Spur ist ein temporäre Spur, Die Spuren sind ihre Gleisbett fehlt, weil ich denke, dass sie ohne eine Spur Bett besser aussehen. If you look at the plans, you will see that the bottom edge of the track curves are elevated 2 inches (50.8 MM) from the bottom plate, You could select each track and manually raise it to the correct height with the height increasing each segment to a maximum height of 4 inches at the top, but this results in an uneven incline with small height bumps. It is also a lot of work. Wenn man sich die Pläne anschauen, werden Sie 2 Zoll die untere Kante der Bahnkurven erhöht (50,8 MM) von der Bodenplatte zu sehen, dass, könnte man jede Spur auswählen und manuell mit der Höhe auf die richtige Höhe heben jedes Segment zu erhöhen bis zu einer maximalen Höhe von 4 Zoll an der Spitze, aber dies führt zu einer unebenen Steigung mit geringer Höhe Beulen. Es ist auch eine Menge Arbeit. Personally I think this method is crazy. Ich persönlich denke, diese Methode ist verrückt. try raising the 4 track spacers at the bottom to the 2 inch level (50,8 MM) using either the gizmo, or manually entering the Z adjustment as shown above. versuchen, die 4-Track-Abstandshalter an der Unterseite der 2-Zoll-Niveau zu heben (50,8 MM) entweder mit dem Gizmo oder manuell die Z-Verstellung Eingabe wie oben gezeigt. Raise the track spacers at the other end to the following heights. Innermost at 0 inches (0 MM), the red track at 2 inches (50.8 MM) and the two outermost tracks at 4 inches (101.6 MM) Heben Sie die Spurabstandshalter am anderen Ende auf die folgenden Höhen. Innerste bei 0 Zoll (0 mm), die rote Spur auf 2 Zoll (50,8 mm) und die beiden äußeren Spuren auf 4 Zoll (101,6 mm) by adjusting the view, you can now select all tracks (Minus the abstands) and raise the whole thing to the level of the bottom abstands. MBS has a feature called Layers, and we will use layers for the next step. indem Sie die Ansicht anpassen, können Sie nun auswählen, alle Tracks (minus der abstands) und erhöhen die ganze Sache auf das Niveau des Bodens abstands. MBS hat einen Feature-Layer genannt, und wir werden Schichten für den nächsten Schritt verwendet werden. Each line (Track) will be assigned to it's own layer, with the innermost track being in one layer, the red track being in a second, and the two outermost tracks being in a third. the base, abstands and other items being left in the default layer. Jede Zeile (Track) wird auf seine eigene Ebene zugeordnet werden, wobei die innerste Spur in einer Schicht zu sein, wobei die rote Spur in einem zweiten, und die beiden äußersten Spuren in einem dritten zu sein. die Basis, abstands und andere Elemente in der Standardschicht gelassen wird. By hiding layers, you can select one line at a time, and then raising or lowering the tracks to the correct abstand at the top. This creates a very smooth incline with no bumps. do this for all tracks. Then move the abstands away from the tracks..... Durch das Verbergen Schichten, können Sie eine Zeile zu einem Zeitpunkt auszuwählen, und dann erhöhen oder die Spuren auf den richtigen Abstand an der Spitze zu senken. Dadurch entsteht eine sehr glatte Steigung ohne Beulen. tun dies für alle Spuren. Dann bewegen Sie die abstands weg von den Gleisen .... select all the track, adjust the width of the terrain to 50.8 MM, click Adjust Terrain, and all trackbed is adjusted in one click. Alle wählen die Spur, stellen Sie die Breite das Gelände auf 50,8 MM, klicken Sie auf Anpassen Terrain und alle trackbed wird in einem einzigen Klick eingestellt.


-
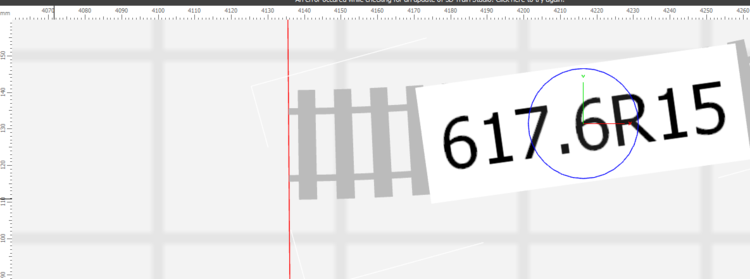
We will be laying down tracks soon, but there are a few things to add first. Railroad track spacing: The default main line spacing in HO Gauge is 2 inches (50.8 MM) with 2.5 inch (63.5 MM) used in yards and for curves of less than 18 inch (457 MM) spacing should be 3 inch (76.2 MM). This is so that Railroad cars do not hit each other when they pass each other. Our curves are all larger than 457 MM and so we can get away with 2 inch spacing (50.8 MM). railroad sidings laid out with Turnout switches automatically have a 2 inch (50.8 MM) spacing. (See the image) Curves are measured from the center of the track, and so since the outside curved track in our layout is 617.6 MM radius, the spacing is 50.8 MM, the inside curved track will have a radius of 617.6 - 50.8 or 566.8. Please do not guess on track spacing, Use an Abstand (Track spacer). If there is not one in your selected track set, find one from another track set, edit it in track editor, change the scale if necessary and change the Length 1 to 50.8 Wir werden Spuren zur Festlegung bald, aber es gibt ein paar Dinge, zuerst hinzuzufügen. Bahnspurabstand: Die Standard-Hauptzeilenabstand in HO Gauge ist 2 Zoll (50,8 mm) mit 2,5 Zoll (63,5 mm) in Meter und für die Kurven von weniger als 18 Zoll (457 mm) Abstand sollte 3 Zoll sein (76,2 MM) . Dies ist so, dass die Eisenbahnwaggons treffen einander nicht, wenn sie einander passieren. Unsere Kurven sind alle größer als 457 mm und so können wir mit 2-Zoll-Abstand (50,8 MM) weg. Eisenbahn Abstellgleise mit Turnout automatisch ein 2 Zoll (50,8 MM) Abstand haben Schalter angelegt. (Siehe Bild) Kurven werden von der Mitte der Spur gemessen wird, und so, da der Außenkurvenbahn in unserem Layout ist 617,6 mm Radius, der Abstand beträgt 50,8 mm, die innere gekrümmte Spur einen Radius von 617,6 bis 50,8 oder 566,8. Bitte nicht erraten auf Spurabstand, Verwenden Sie einen Abstand (Track Spacer). Wenn es nicht ein in der ausgewählten Spur-Satz ist, eine von einem anderen Track Set, bearbeiten es in Track-Editor, die Waage bei Bedarf ändern und die Länge 1-50,8 ändern
-
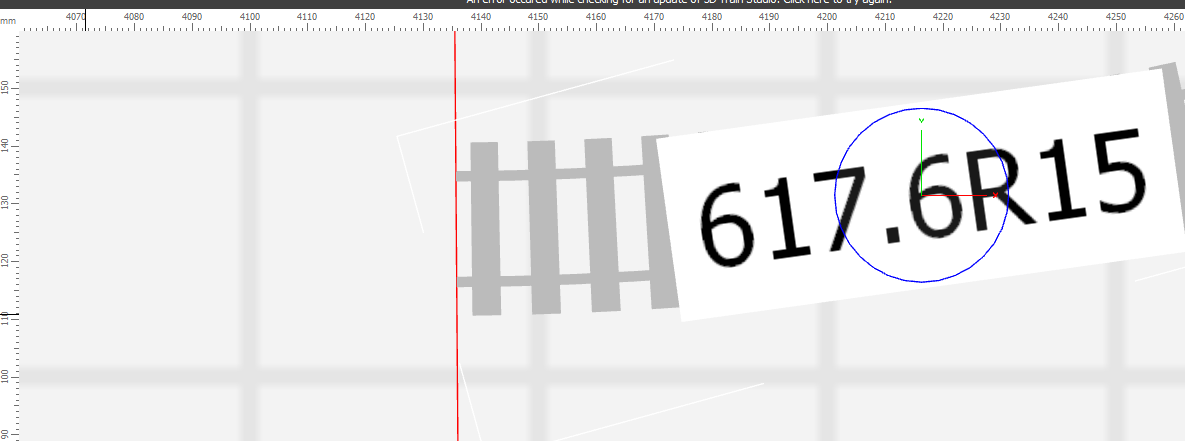
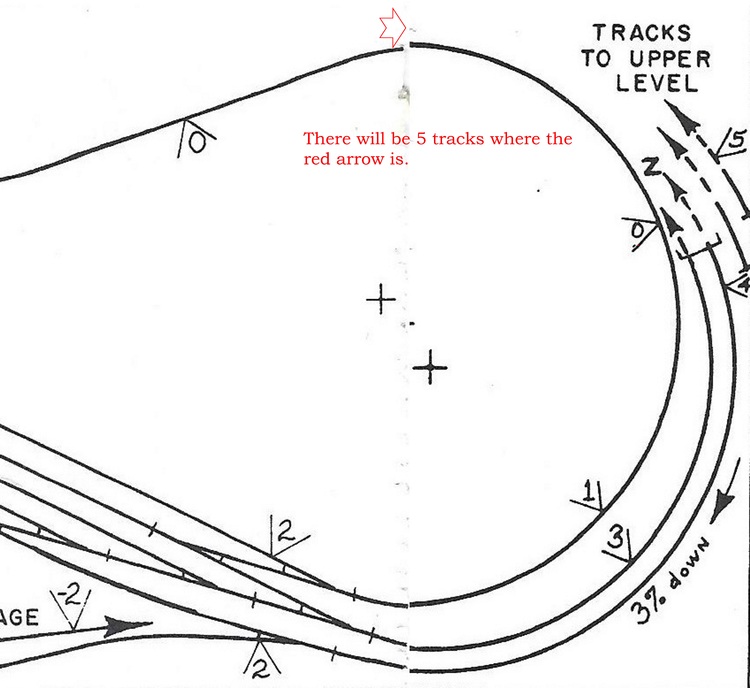
Now it is time to get ready to lay down some railroad tracks. There are a few things to consider before doing so. Looking at the plans we see a large curve going from bottom to just over half way to the top. (115 degrees out of a 360 degree circle). We need to determine how big of a radius to use, and how much space to leave at the top and bottom of the bottomplate. The plans for the upper level show the large curve continuing up to the top (Marked in red) and 2 curved tracks above it. the width of the bottom plate is 1540 MM. You should pay close attention to Railroad Track Spacing ( in German Abstand ) HO Scale uses a minimum of 2 inches between tracks (50.8 MM). I like to use a space between the top railroad track and the edge of the panel of 3 inches (76.2 MM) with two rails above our curved section, and the top edge, we have 50.8 + 50.8 + 76.2 or 177.8 MM from top edge down to the track we are calculating the curve of. Our bottom and side edges are 127 MM. add the top and bottom and we get 304.8 MM take 1540 - 304.8 and we get 1235.2 the diameter of our curve. half that is 617.6 MM the Radius of our curve. 115 degrees breaks down to 7 sections of 15 degrees. If you do not intend to build a real model and just put it on the computer, then you can use the track editor to make a section 617.6 R 15 degrees. If you are going to build in real life use the largest curve you can find, but do not edit track. Nun ist es Zeit, sich bereit, einige Eisenbahnschienen zu legen. Es gibt ein paar Dinge zu beachten, bevor dies zu tun. Mit Blick auf die Pläne, die wir eine große Kurve von unten nach oben auf etwas mehr als die Hälfte Weg gehen sehen. (115 Grad aus einem 360-Grad-Kreis). Wir müssen feststellen, wie groß der Radius zu verwenden, und wie viel Platz auf der Ober- und Unterseite des Bodenplatte zu verlassen. Die Pläne für die obere Ebene zeigen die große Kurve nach oben und 2 gebogene tracmodelks darüber weiter nach oben. die Breite der Bodenplatte beträgt 1540 MM. Sie sollten aufmerksam auf Bahngleis Abstand (in deutscher Sprache Abstand) HO Scale verwendet ein Minimum von 2 Zoll zwischen den Tracks (50,8 MM) bezahlen. Ich mag einen Raum zwischen der oberen Bahnstrecke und der Rand der Platte von 3 Zoll zu verwenden (76,2 mm) mit zwei Schienen über unseren gekrümmten Abschnitt und der oberen Kante, haben wir 50,8 + 50,8 + 76,2 oder 177,8 mm von Oberkante nach unten auf die Fahrbahn wird die Berechnung wir die Kurve. Unser Boden und die Seitenränder sind 127 mm. fügen Sie die oben und unten, und wir bekommen 304,8 nehmen MM 1540-304,8 und wir 1235,2 der Durchmesser unserer Kurve bekommen. halb so groß ist 617,6 MM der Radius unserer Kurve. 115 Grad bricht bis 7 Abschnitte von 15 Grad nach unten. Wenn Sie nicht beabsichtigen, ein reales Modell zu bauen und es nur auf dem Computer setzen, dann können Sie den Track-Editor zu verwenden, um einen Abschnitt 617,6 R 15 Grad machen. Wenn Sie vorhaben, im wirklichen Leben zu bauen, die größte Kurve verwenden Sie finden können, aber keine Spur bearbeiten.
-
wenn ich Zeit habe, konnte ich versuchen, einige Tutorial-Videos zusammen in Englisch zu stellen. Der Herbst ist eine arbeitsreiche Zeit für mich, würde es in 2 Monaten sein
-
Next Section, If you change the baseplate dimensions, as shown here in picture 1 (Dimensions Marked with RED arrows), it will change the grid layout view scales. You can change the grid size number, (The Red Star), but heed the warning, smaller grids do use more graphics power. Picture 2, see how the grid no longer lines up at 0,0. This is due to changing the baseplate dimensions. (Incidently, the dimensions of a US Standard sheet of Plywood are 122 cm x 244 cm). You need to change the position numbers (Circled in green) for the edges to line up at 0,0 again. Nächster Abschnitt, Wenn Sie die Bodenplatte Abmessungen ändern, wie in Bild 1 (Maße markiert mit roten Pfeile) hier gezeigt, werden die Raster-Layout-Ansicht Skalen ändern. Sie können die Rastergröße Nummer zu ändern, (Der rote Stern), aber die Warnung beachten, kleinere Grids Sie mehr Grafik-Power verwenden. Bild 2 sehen Sie, wie das Gitter nicht mehr Linien bei 0,0 bis. Dies ist darauf zurückzuführen, die Grundplatte Abmessungen ändern. (Nebenbei bemerkt, sind die Abmessungen einer Standard-US Sperrholzplatte 122 cm x 244 cm). Sie müssen die Positionsnummern zu ändern (in grün eingekreist) für die Kanten bei 0,0 wieder ausrichten.


-
I'm going to start with the drawing for the "Hidden Yard" level of the layout, and add a few comments and pictures as I go. The plans are scaled for HO scale, and English Measurements. Numbers in darts \1/ (like this) are measures of Height above ground in Inches, The first thing I did was to superimpose a circle drawing with degree marking on the plan like second picture. I needed the circle to estimate the number of degrees from the bottom of the circle to where the tracks end (marked Z) for the circle tracks on the right side. it turned out to be 105 degrees. I calculated that each section should be a 15 degree section. The size of this piece is 5 ft by 16 ft or 60 in x 192 in, multiply by 2.54 to get CM. start 3D Train Studio, Select new Project, and the Rectangle (01) to start. click edit below basic shape and enter the new dimensions (488 x 154). while we are at it, change the thickness. 50 MM is excessive in my opinion, most plywood for building railroad layouts is .75 inch or 19 MM More to come... Ich werde mit der Zeichnung für die "Schattenbahnhof" Ebene des Layouts, und fügen Sie ein paar Kommentare und Bilder zu starten, wie ich gehen. Die Pläne werden für HO Maßstab skaliert und Englisch Messungen. Die Zahlen in Dart \ 1 / (wie diese) sind Maßnahmen der Höhe über Grund in Zoll, Das erste, was ich tat, war, einen Kreis zu zeichnen superimpose mit Grad auf dem Plan wie eine zweite Bildmarkierung. Ich brauchte den Kreis der Anzahl der Abschlüsse von der Unterseite des Kreises zu schätzen, wo die Spuren enden (markiert Z) für die Kreisbahnen auf der rechten Seite. es stellte sich heraus, 105 Grad zu sein. Ich berechnet, dass jeder Abschnitt eine 15-Grad-Abschnitt sein sollte. Die Größe dieses Stück ist 5 ft von 16 ft oder 60 in x 192 in, multipliziert mit 2,54 CM zu erhalten. 3D-Zug Studio zu starten, wählen neues Projekt, und das Rechteck (01) zu starten. klicken Sie auf Bearbeiten unter Grundform und geben Sie die neuen Dimensionen (488 x 154). während wir es, ändern Sie die Dicke sind. 50 MM ist übertrieben meiner Meinung nach, die meisten Sperrholz für den Bau von Bahnanlagen ist .75 Zoll oder 19 mm Da kommt noch mehr...


-
I'm going to document the process of building a model railroad layout here with some tips and tricks and comments. It will be in English, with a translation to German by Google. This is intended for new users and for those living in the United States, although comments from anyone are welcome. Some of this will seem very basic, but if you are a first time modeller, some of this may come in handy. Ich werde den Prozess des Aufbaus einer Modellbahnanlage hier mit ein paar Tipps und Tricks und Kommentare zu dokumentieren. Es wird auf Deutsch von Google mit einer Übersetzung in Englisch, sein. Dies ist für neue Anwender gedacht und für die in den Vereinigten Staaten leben, obwohl Kommentare von jedermann willkommen sind. Ein Teil davon wird offenbar sehr einfach, aber wenn Sie zum ersten Mal Modellierer sind, die zum Teil so weit kommen kann sich als nützlich.
-
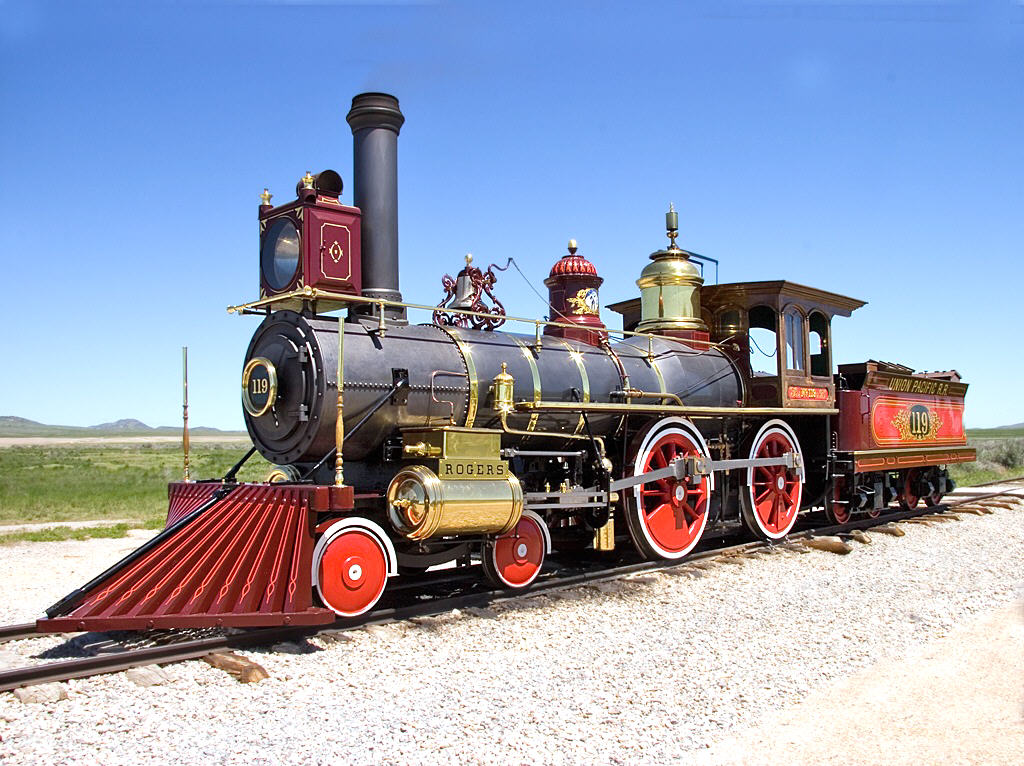
Locomotives used in 1869 at Promontory Utah for the Driving of the Golden Spike. 119 is a coal burning locomotive build by Rogers Locomotive works. Jupiter is a wood burner (Hence the balloon stack) and was built by Schenectady Locomotive Works. These are perfect replicas built from photographs and original drawings. They run nearly every day during the tourist season.
-
I thought you might enjoy this video https://drive.google.com/open?id=0B5mdlg392OLScDFBN2VLRzZVbms
-
Sie brauchen, um das Modell aus Mixer in .3ds Format exportieren und dann in MBS, gehen Sie zu Katalog, wählen Sie 3D-Modell, dann neu, und wählen Sie, was Sie importieren. gibt es ein Feld auf dem nächsten Bildschirm, wo Sie Maustaste und wählen Sie Ihr Modell, sollte es einfach gehen von dort
-
Ich habe eine andere winzige Abschnitt hinzugefügt. einer der vielen Steinbrüchen und Bergwerken im Layout. der erste Beitrag enthält das Hauptlayout als MPB und dann mit Reißverschluss
-
Möglicherweise können Sie diese mit Variablen zu tun. Andernfalls werden Sie wahrscheinlich haben, um Gruppen zu verwenden
-
I blew it, I was thinking scale, but was wrong. I do not think Gargraves intends mixing types of track. IE, no plastic track and wooden rail track on same layout. it is easier to get and maintain a curve with plastic track than with wooden ties. I suspect that is the reason for the difference in radiaii.
-
Henry, The FAQ suggests that the 0 scale track is intended mainly for Indoors. Some parts cannot be used outdoors, and since this trackage can be used with track from other manufactorers, it is almost surely 1:48
-
http://www.gargraves.com/
-
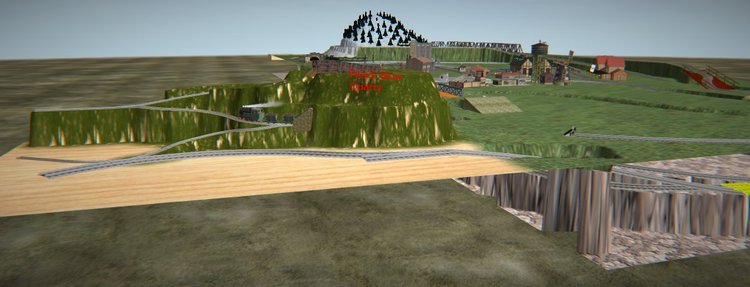
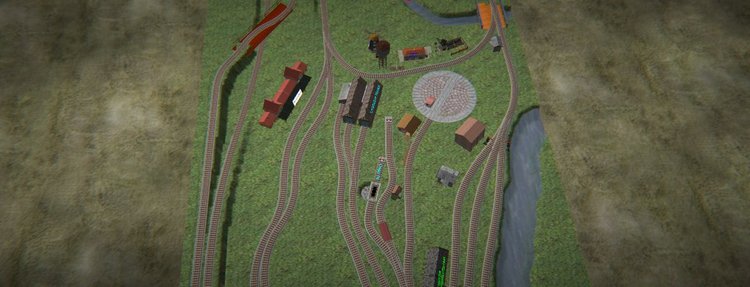
die Beschreibung des Layout ist in Englisch, sorry, zu hart, um manuell übersetzen. Ich füge eine Zip mit dem Layout zu diesem Eintrag Here it is, the central module of my Colorado Midlands Layout. Under the bottom layer, there are 4 trains hidden in storage. Behind the mountain is a switchblock that controls the switches below the upper track. Below Default Layer (Train Storage) SW1 0 track 1 1 track 2 SW2 0 track 3 1 Track 4 SW3 0 track 3/4 1 track 1/2 The hidden yard has be eliminated, and simplified. Switches for this level are marked HYS. Destinations are indicated for each position. FPR is Frying Pan River (Marked as such on upper level) Outer is the outer track from by the mountain/ Inner is the inner track from same. Water is the exit close to the water tower. Snow Mass is the Mountain Default Layer HYS1 0 outer to HYS8 1 inner to FPR exit 2 outer to FPR Exit 3 Inner to HYS8 HYS3 Water to loop and diag 1 water to Sellar HYS7 0 to HYS1 1 to HYSA HYS8 0 Loopback or Water 1 loopback, storage, water HYS9 0 Storage and loopback 1 Watertower HYSA from watertower to 0 diagnal 1 loopback to HYS7 HYSC Water to Snow Mass water to HYS1 HYSD 0 to storage 1 to Loopback HYS8 upper level AT1 0 to snowmass 1 reverse switches on the upper level are still manual at this point. Still need some landscaping, but wanted to share/ there are 2 locomotives in the sheds. try sending a locomotive to the turntable Cmm.zip
-
Layouts (Pflanzen) muss genehmigt werden, bevor sie angezeigt werden.
-
I know this can be done, but not how. I want to read the current speed of a locomotive and store it as a variable, then later set the locomotive speed back to that speed after stopping. also, I have some steep grades on my layout, and the locomotive slows down. is there a way to keep the actual speed constant?