simonjackson1964
Mitglieder
-
Benutzer seit
-
Letzter Besuch
Alle erstellten Inhalte von simonjackson1964
-
 Sorry for the double post... Could this feature be expanded to allow the connection property on other objects to be accessed via EV? So for example, In the above situation the connection between the main and advance signal could be changed depending on the point setting?
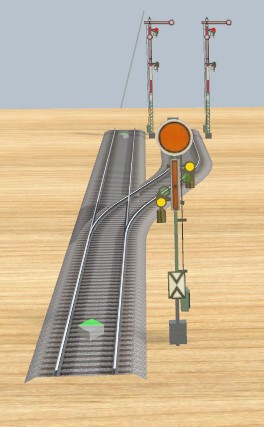
-
I see, this does look interesting. So for example, I could have a start portal with a V-depot feeding road vehicles to it, a list of end portals, indexed via a random number generator, and have the road vehicles go to a randomly selected entry-point on the layout? I had (at version 7) a layout that had almost every variant of almost every road vehicle (except a few I didn't like) loaded in a V-depot, and they would pick a random route down a hidden road with lots of junctions, to arrive at the portal that linked to the entrance point. But this new thing would be a lot more efficient. Sadly a computer failure means I no longer have that layout. And yes I know I should have backed them up. Lesson learned.
-
It doesn't open on V8, presumably needs an update?
-
Important note to all who download this: Take note of the WARNING on the Rotation button! It really does have a nasty effect!
-
80729089-83DD-4E94-85CA-D98B9BC8A5E1 Run that for a few minutes. But check the locations of the containers against their wagons first, before you take it off Pause. They should be identical. After running it for a while, pause and check again. Of course if it's been fixed, that's a moot question.
-
Ah, so it's the opposite of what I thought! Fair enough.
-
In fact just grouping objects doesn't keep them together if one is selected from inside the group! So setting a locomotive moving if the driver isn't linked, still leaves him behind even if they are grouped. Found that out the empirical way! But I have definitely noticed that objects linked to (for example) a flat car, such as (for example) pallet storage locations, will not always follow the exact movement of the wagon they are linked to. I don't know why, but you can set everything to the exact same height and location relative to the wagons, run the wagon around a few times, and it comes back with things slightly skewed, not enough to really notice unless you're specifically looking, but if the effect is cumulative, enough to eventually make things look wrong! I hope this can be fixed, but I suspect it's a rounding error and it's just the way things are. As I said I was hoping that grouping them might prevent the "creep".
-
Hi. I've noticed that if a vehicle (motorized or not) that is grouped with other objects (such as a driver, or a container floor) is sent into a virtual depot, when it is released from the virtual depot, the group has been removed. I'm guessing this is something to do with the way the vehicle is stored in the depot, and I'm also guessing there is nothing that can be done about it? It's a shame because I was hoping that grouping the objects would prevent them from moving independently of each other despite being linked, which is a bug others have noticed... Unfortunately I've not been able to duplicate the problem. Is there a way of re-grouping the objects from the EV?
-
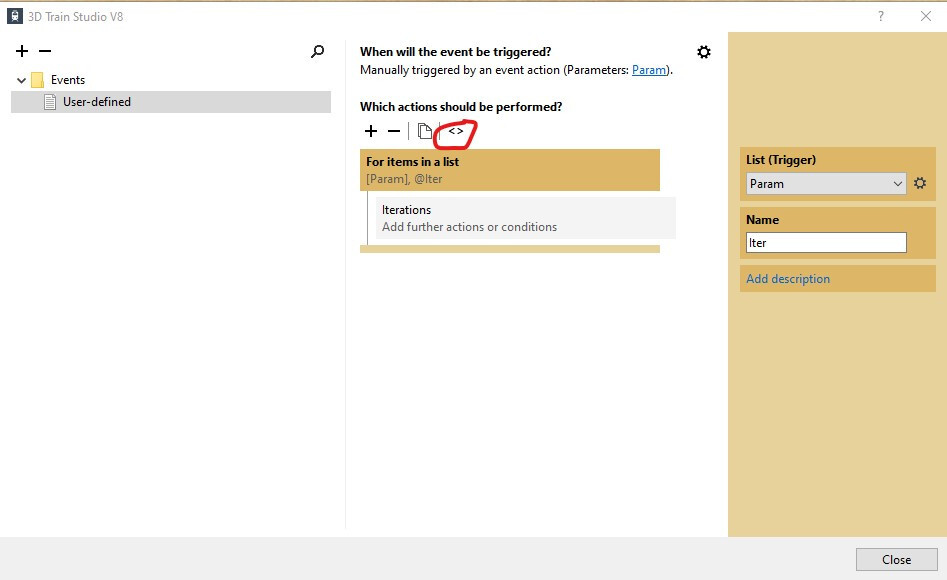
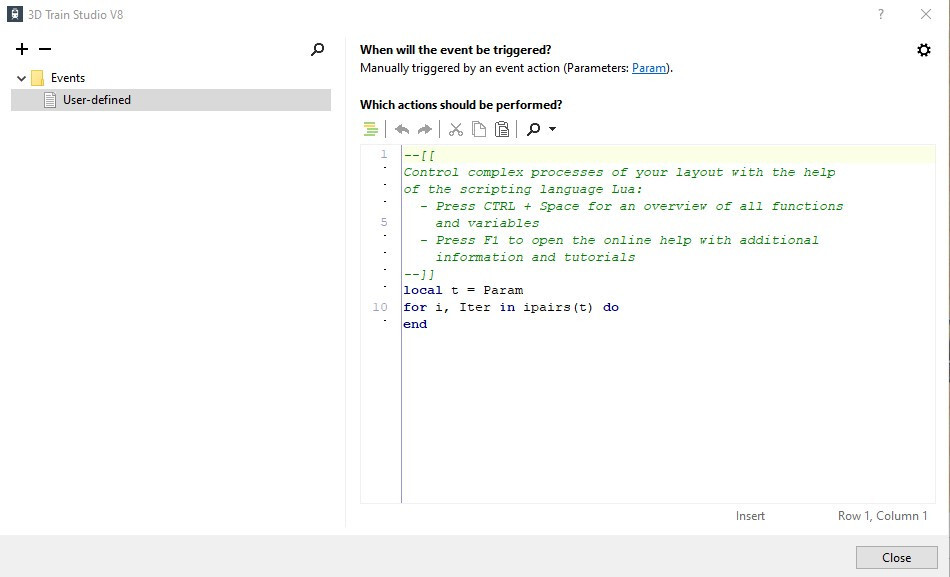
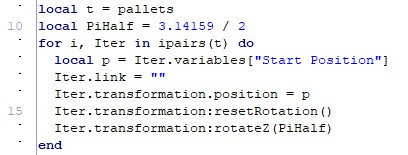
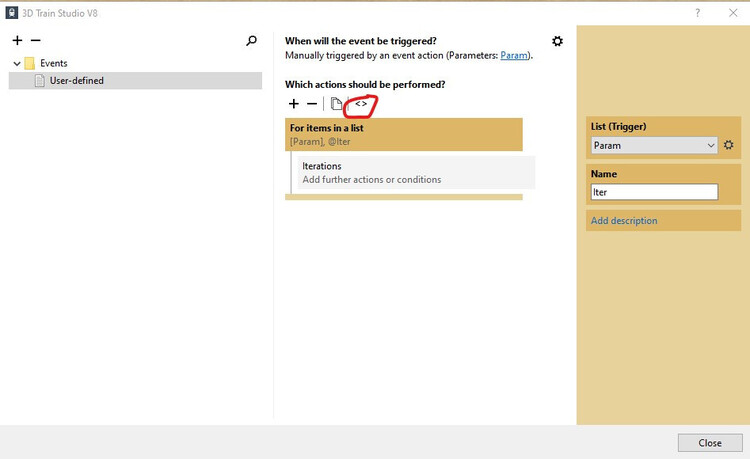
I went back and found it, because unloading a train full of pallets and moving them all back to their start points by any means other than magic seems like a nightmare scenario. It's odd, suddenly finding things that you assume other people already know, only to discover that they don't... This is the script I use to put all the pallets back in their assigned start locations so that they can be re-loaded on the next train: "pallets" is a list parameter passed to the user-defined event. Each pallet has an X, Y and Z in a table called "Start Position". For anyone new to MBS reading this: The angles in Lua are in radians, and there are 6.28318 radians in 360° (or 2 x π). π is therefore 180° so ½ x π is 90°. (Based on the mathematical truth that the circumference of a circle = 2 x π x the radius). The link function removes the link established between the pallet floor and the pallet by the crane, when it placed the pallet there. Transformation.position puts the pallet back at its start location. (Although I'm wondering if "resetPosition" might do that? I've got something that works, and "if it works, don't fix it".) Because the pallet has been moved and rotated and moved and rotated, by the fork lift, by the crane and by the train itself, I need to ensure that the pallet is facing the right way for the forklift to pick up again. As I hinted previously in a different thread, without reading the dire warning Herman gave, I tried using the "rotate(x,y,z,w)" function and this basically removes your ability to move the object at all. The only solution is to delete it and make a new one! But resetRotation() puts the object to (x=0, y=0, z=0). And then rotateZ(θ) where θ is the angle you want the object at in radians puts it exactly there. This saves trying to find the current angle of the object, subtracting that from the angle you want it at, to work out the angle to rotate it by. Incidentally the easiest way to get the For...End loop in Lua, is to define an empty iteration in the EV and then convert to script...

-
Nope, but I notice that there are other notifications about this, so hopefully someone who does will have noticed?
-
Just my 2p worth, but I have enjoyed figuring a lot of it out for myself, and the community is great for offering hints on things I can't get. I'm even starting to get the hang of some Lua code thanks to @Herman . Incidentally, Herman, why is your Transformation example layout not in the Tutorial Layouts section? It really should be! I also discovered (the hard way) that this note is serious. I discovered what it does. It disables your ability to move the object at all. I also figured a way to use RotateZ to put the object at an exact angle rather than a relative one - use "ResetRotation()". This puts the object back so it's z angle is 0°, and the relative angle to zero is the exact angle! So, yes, half the fun of this hobby is screaming and turning the air blue becaus the ********* thing ian't doing what you want and you have no idea why, closing it awearing you'll never open it again then half an hour later you're back in and suddenly spot that silly little mistake!
-
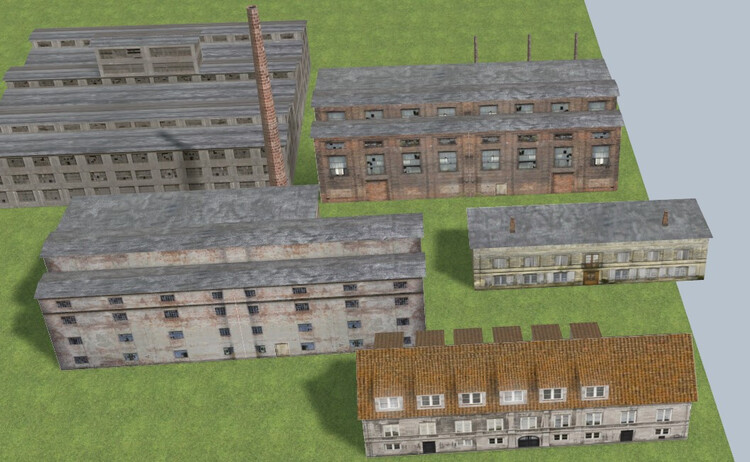
Thanks guys. So my first guess was closest, but doesn't explain the run-down state of the buildings. I'm still tempted to label them "Industrie Verurteiltes Gebäude". If it was an East German company, I suppose that would explain the uncared-for look. The English translation of the description on the building @streit_ross mentions is "The industrial administration building is built with lighting for switching on and off". Putting that into Google Translate gives "Das Industrieverwaltungsgebäude ist mit Beleuchtung zum Ein- und Ausschalten ausgestattet" Which explains that one. I'm still curious as to why the boiler house, factory and workshop are so beaten up...
-
Hi peoples. This is a somewhat random question, but what is "I.V.G."? The nearest I can find on the internet is "IVG Immobilien", formerly IndustrieVerwaltungsGesellschaft, or "Industry Management Company" in English. The reason I ask is that most of the buildings labelled "IVG" are pretty dilapidated. Broken windows, faded paint, discoloured brickwork... The three biggest need to have "Condemned Structure - Keep out" signs all over them! In fact sticking "Condemned Building" into Google Translate earned me a V.G. Very Good? Well yes but also "Verurteiltes Gebäude". That leaves an 'I' unaccounted for...?
-
Um... Okay maybe terminology is different here. When a signal is "on" it is at danger, and when "off" it's clear... So it would display Hp00 when "On".
-
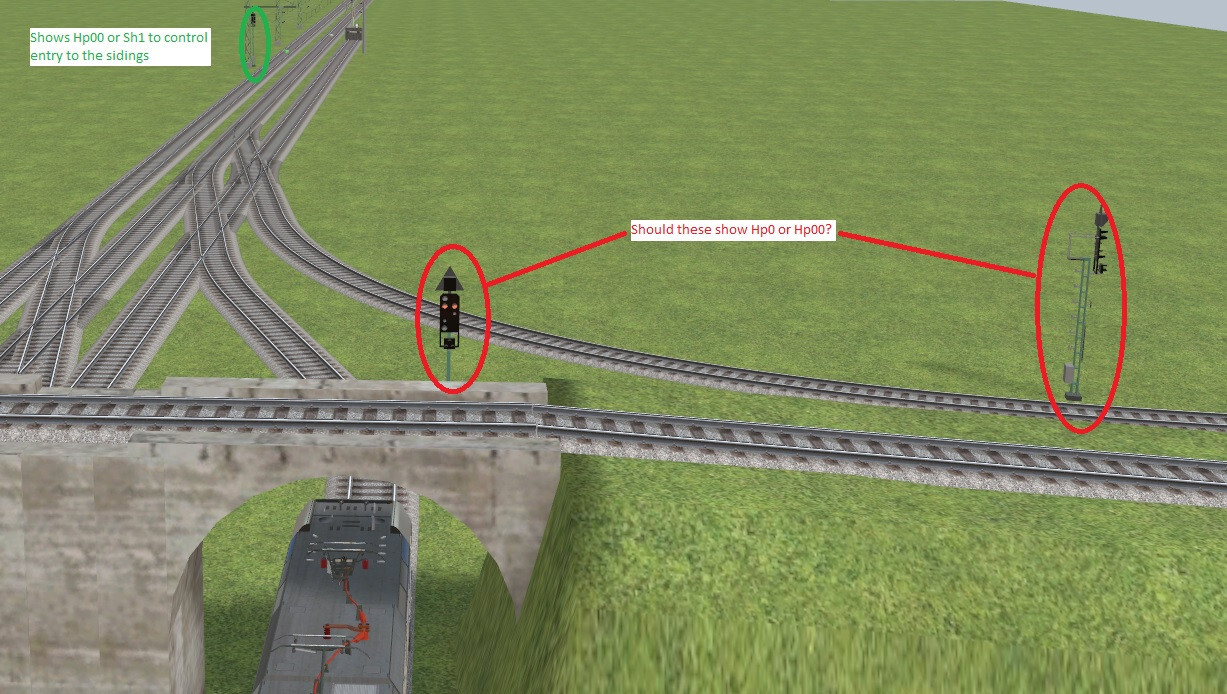
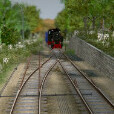
Once again, thank you for the information. So the signals ringed in red are correct, and will display Hp2 when "off". The signal I have ringed in green should show Hp00 if there is a trailing point on that track before the next signal. Which, as it happens, there is. I'm pretty sure that I want to hold a through-train at the signal before entering the complex of junctions, in the event that a train is already leaving the yard in that direction. Of course ideally the through-train would have priority but if the freight is already moving I definitely don't want the through-train passing that signal, even if there were another signal closer to the junction.
-
Thanks, Goetz You are extremely helpful as always. (If there were a "Customer Satisfaction survey" thing for this website you would have 10/10!) So, to be specific, I am working on an industrial layout where type 69 signals control a two-track main line and several industrial sidings for delivering raw materials and taking away finished product. Entry into the sidings from the main line is controlled by Hp00/Sh1. (I considered using Hp2, but that didn't feel right, as technically, entry into a yard is a shunting move even if it's with a main-line locomotive?) My question concerns the exit from the sidings back onto the main line. Is Hp0 sufficient to halt a train that has passed a Sh1 signal within the same block or is Hp00 required? Also, when exit from the yard is permitted, I am planning to use Hp2 - proceed slowly, due to the bends, points, crossings etc... But should that instead be Sh1? Is the entry to the mainline and departure on it a shunting move or a main-line move? If it's a shunting movement then the previous question becomes moot and I will swap the signals for the Sh ones. There is a main block entry signal just off the picture, which would be set to Hp1 (assuming the next block is clear). Thanks Simon

-
I have learned that SH0 overrides HP1 or HP2, and that SH1 overrides HP0. This for semaphore signals presumably also applies to the Type 69 light signals? (But not the KS signals that work on a different system). My question is twofold: First, is HP00 (two red lights) the equivalent of SH0 - where the type 69 Lock Signals also show two horizontal red lights, and the Man 69 blocking signal will show SH1 with two diagonal white lights and a single red light. Second, I read somewhere that SH1 permits a train to drive "until the end of the shunting movement". Does this mean that a single SH1 will override all following HP0 signals? But will presumably end at the next SH0 or HP00? (Our system here in the UK is a lot simpler!) Ich habe gelernt, dass SH0 Vorrang vor HP1 oder HP2 hat, und dass SH1 Vorrang vor HP0 hat. Dies gilt für Semaphor-Signale und vermutlich auch für Lichtsignale des Typs 69? (Aber nicht für KS-Signale, die nach einem anderen System arbeiten). Meine Frage ist eine doppelte: Erstens, ist HP00 (zwei rote Lichter) das Äquivalent zu SH0 - wobei Typ 69-Sperrsignale ebenfalls zwei waagerechte rote Lichter zeigen, und das Haupttyp 69-Sperrsignal zeigt SH1 mit zwei diagonalen weißen Lichtern und einem einzelnen roten Licht. Zweitens habe ich irgendwo gelesen, dass SH1 einem Zug erlaubt, "bis zum Ende der Rangierbewegung" zu fahren. Bedeutet das, dass ein einzelnes SH1 alle nachfolgenden HP0-Signale außer Kraft setzt? Endet die Bewegung dann aber vermutlich am nächsten SH0 oder HP00? (Unser System hier in Großbritannien ist viel einfacher!)
-
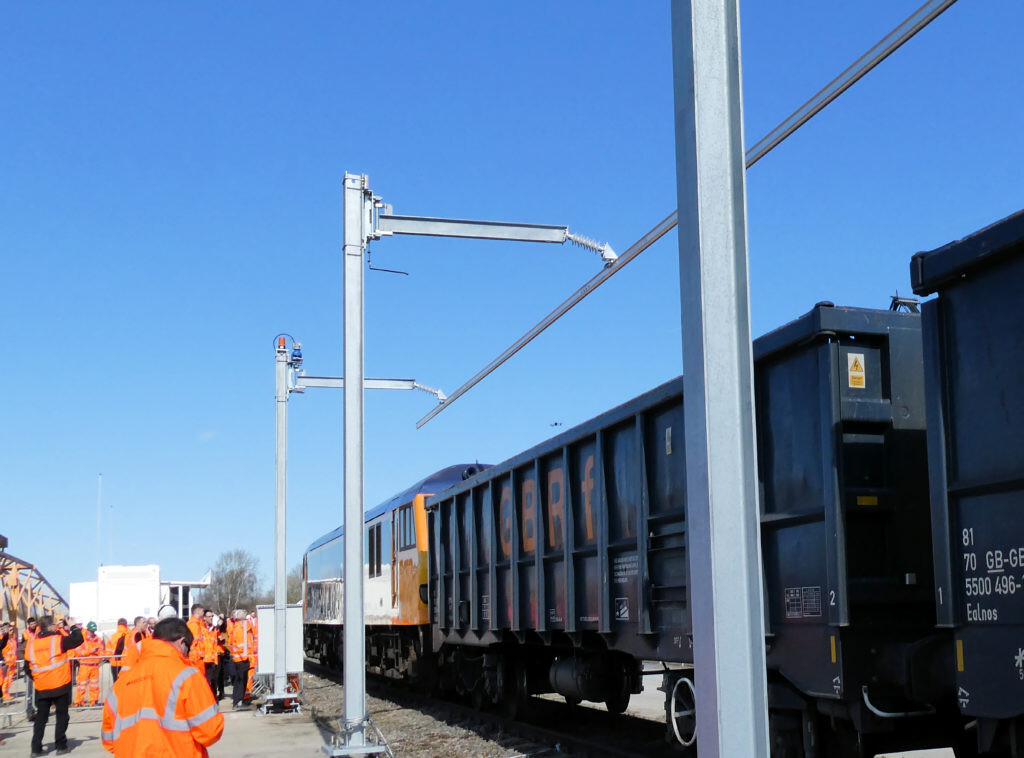
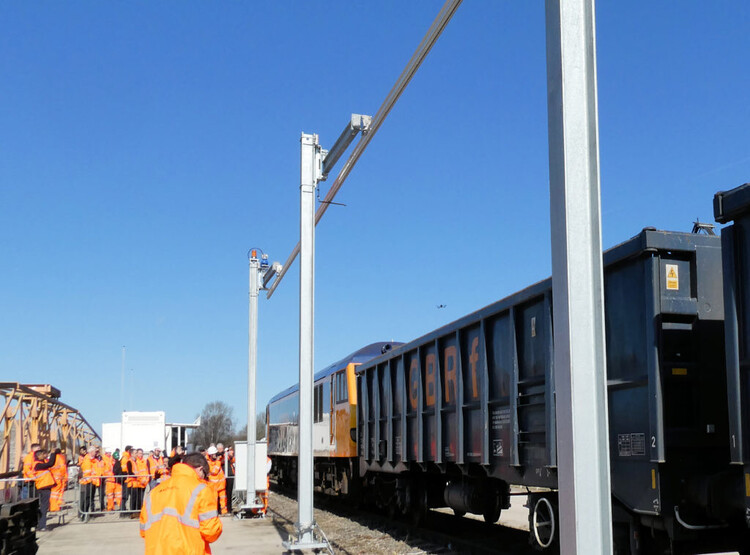
I've noticed that most containers are loaded onto wagons from above, dry powder goods are also usually dropped into the top of the hopper. Liquids, likewise are often poured into the tanker from the top. This causes a problem for electric trains that take power via a pantograph from overhead cables, obviously. And equally obviously the solution is to either use a diesel shunting loco to move the freight consist, or to reverse the train into the loading area so that the loco stays on the catenary, but the wagons are out from under it. Hhowever, I was doing some research and came across this article in "Railengineer" https://www.railengineer.co.uk/electrification-of-freight-terminals/ It looks like a cleaver idea and it would be interesting to have something similar on MBS.

-
Never mind, I have found a work-around.
-
851A9ACC-644E-43F0-8C5D-C6BA59E1D7A5 - draft upload. Please will the usual folks who are good at this stuff have a look at the code and the variables and see if you can figure it out? Many thanks Simon
-
By the way, I have also tried it this way: And this way: With the exact same result!
-
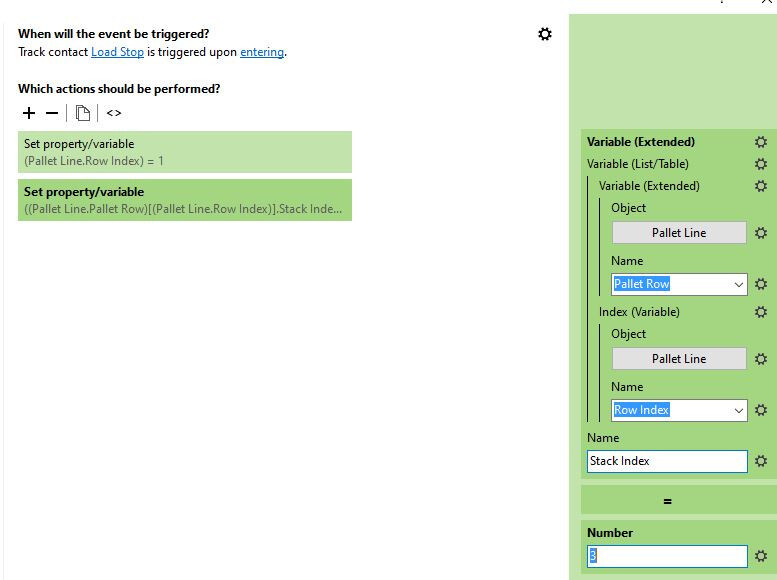
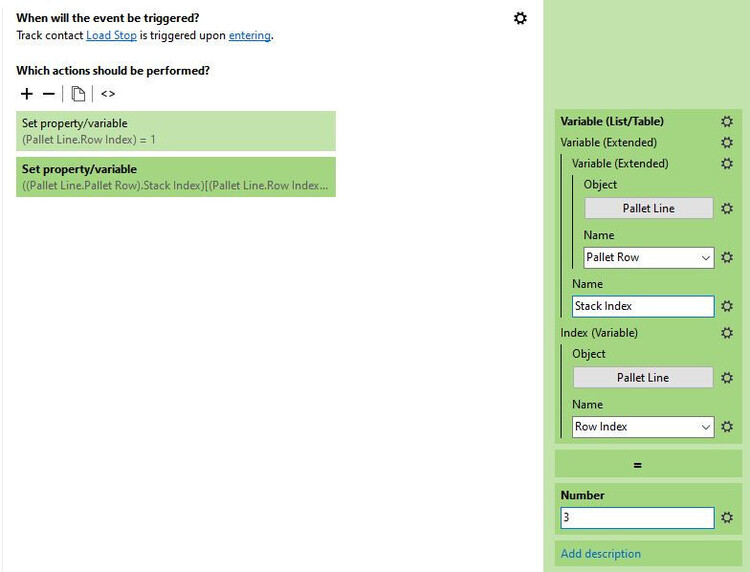
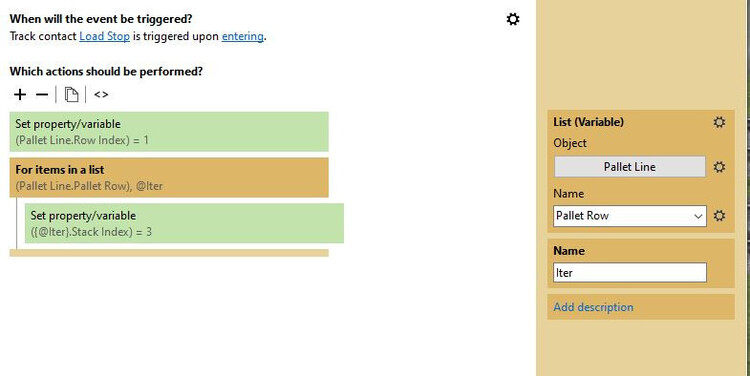
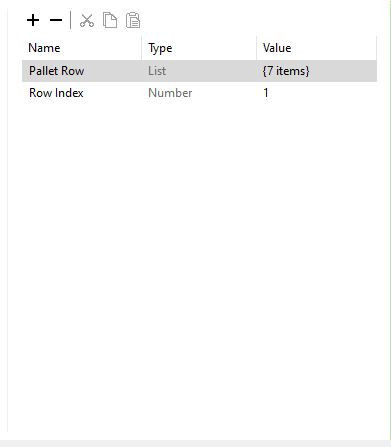
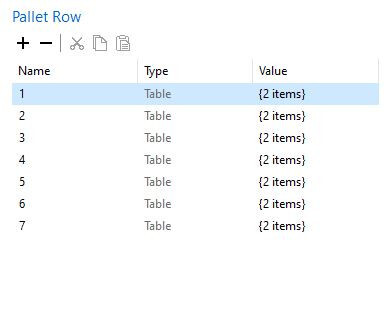
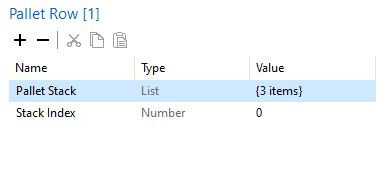
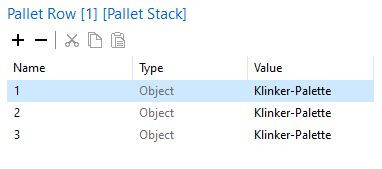
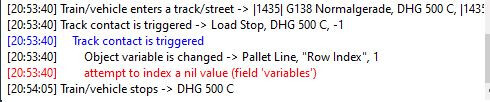
On the same subject, I have a row of seven stacks of three pallets. The virtual track the stacks are lined up on (so a fork-lift can place them) has the following variables: I am trying to do the very first step in moving the pallets from the stacks to a railway wagon, setting the two indexes to the values to select the first pallet as the target for a crane. Values 1 and 3 respectively. But no matter which way I try and code the event, I always get this message: I've tried it every way I can think of, I know I've done this before, but I can't get it to set the sub-index. Please can someone have a quick look at the above code and tell me what I've done wrong? I cannot see it to save my life, but I know it' something so obvious I'll kick myself!

-
@Klartexter Thank you for that, I may just use that in future. @Roter Brummer <Facepalm> For some reason I thought those were fork extensions... I mean the workshop equipment tab has everything else you could possibly imagine, so it's an understandable error! Thanks <Facepalm> Aus irgendeinem Grund dachte ich, das wären Gabelverlängerungen... Ich meine, die Registerkarte Werkstattausrüstung hat alles, was man sich vorstellen kann, also ist es ein verständlicher Fehler! Danke

-
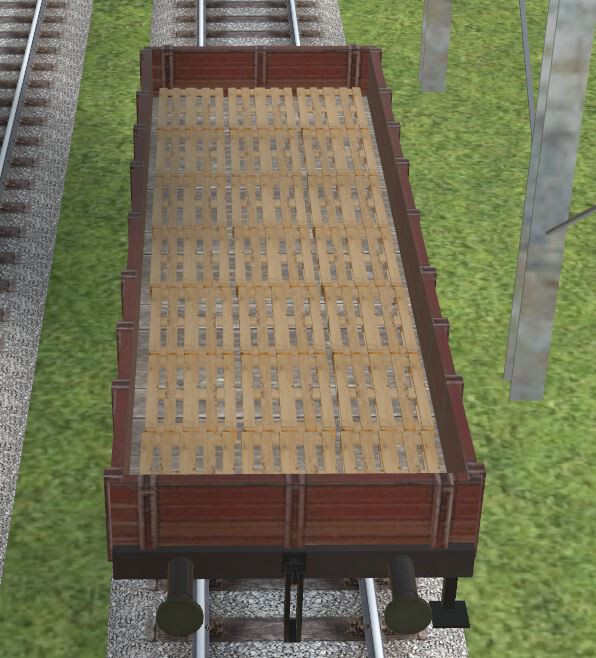
It seems that the only way to move pallets around with any degree of realism is to construct an artificial floor out of empty pallets, in any location that you want to stack them. This includes the wagons you want to load them in, unless you want to have them standing on the roof or floating mysteriously above the wagon bed. This is pretty much the same for containers, except with containers there are pre-made container floors in different sizes that even have the option of being invisible built in, just leaving the corner markers visible. This means that the container floor can be placed carefully on a flatbed wagon, linked and grouped and left with just the marks showing, and then the wagon group copied as many times as needed. And of course a nice big container storage area ca be constructed by laying the floors contiguously on the baseboard. It would be nice to have something similar for pallets. I realise that having something the size of a container floor that could hold (say) 21 pallets and have a built in array to control where the next pallet went would be asking a lot, but a Europallet sized version of the container floor would be a start? (By the way I tried to translate this to German but Google was playing silly-buggers so I gave up!) A wagon ready to be stacked with pallets.
-
I've given this a try, and I honestly cannot figure out what the values held in (Object).transformation.rotation represent... They are not consistent - it's as if the values are stored as text but held as real numbers (or vice versa), so when you retrieve the value you only get part of it. Try setting X, Y and Z rotations to 0, 90 and 180, and print the three different values, then change them to 90, 180 and 0 respectively and do it again. The values are totally inconsistent. Especially odd is the one that should be zero is in fact not zero!