simonjackson1964
Mitglieder
-
Benutzer seit
-
Letzter Besuch
Alle erstellten Inhalte von simonjackson1964
-
 Logically... Object 1 and object 346 are linked and moving. I'm not saying this is how it works, perhaps a member of the production/support team can confirm one way or the other? But assuming that the properties for each object get saved one a a time, it's going to take a while to get from object 1 to object 346. And depending on the frame rate you have, that interval could be several frames, during which your objects have moved. So when the program saves 346 it has different X and Y coordinates from when object 1 was saved. This makes sense as a logical cause, but it is just a guess. Logisch... Objekt 1 und Objekt 346 sind verbunden und bewegen sich. Ich sage nicht, dass es so funktioniert, vielleicht kann ein Mitglied des Produktions-/Supportteams die eine oder andere Weise bestätigen? Aber unter der Annahme, dass die Eigenschaften für jedes Objekt einzeln gespeichert werden, wird es eine Weile dauern, von Objekt 1 zu Objekt 346 zu gelangen. Und abhängig von der Bildrate, die Sie haben, kann dieses Intervall mehrere Bilder umfassen, während denen Ihre Objekte haben gerührt. Wenn das Programm also 346 speichert, hat es andere X- und Y-Koordinaten als beim Speichern von Objekt 1. Dies ist als logische Ursache sinnvoll, aber es ist nur eine Vermutung.
 -
If I do that something goes wrong elsewhere on the layout!
-
Or maybe not.... It works fine for aged and the when not being watched it all goes wrong! No idea why, nothing different is happening that time to all the other times, and because it only happens when not being watched I can't find the cause.
-
Actually I may have fixed that by fiddling with the trucks' auto-acceleration! I'll re-instate their salaries with back-pay!
-
I know, I'm really pleased with that bit, and the digger filling the trucks. The problem, aside from the cosmetic issue above, and the fact that sometimes a mainline train will divert into the yard, and the fact that the routes don't always clear themselves, and the buttons not disabling properly... is that when the train is full and being moved to the departure tracks, the four trucks get filled and then sit in a queue waiting for the next train. When it is ready to fill, the first two trucks move off together, and go to different transfer points, then the next two trucks do the same, but sometimes they get it wrong and go to the same transfer point. ... So yes, too much not working the way I expected and I gave up because fixing one thing caused another to go wrong Depends where you look but a quick google search has a Banksman earning between £26,000 and £43,000 per annum. I imagine that would depend on whether road or rail and experience etc... however, my three guys are just standing there and occasionally send the trucks the wrong way, so I'm not paying them!
-
Come to think of it I've had the exact same issue... Consists of empty wagons each having a rectangle primitive added, to represent the load. This rectangle is attached to a "Dummy Lok" item which sits on a short vertical length of virtual track that is attached to the wagon. In this way the load can be realistically filled. I have lost count of the number of times I have gone through all the consists and set the x and y coordinates of the load equal to those of the wagon, and yet somehow they seem to move randomly, by a tiny amount. This is a V7 layout that I gave up on because it refuses to work consistently. Like Herman I have tried to run the same wagons on a test track with lots of curves, and found no displacement. 36F2775A-5262-4DAE-AB3A-2DE1C34C6425 Draft upload
-
No, not that loop, my code loop. Because I had it coded to put one line at a time on the "Via" list, it had between 4 and 13 lines to display and was looping on a two-second timer. Changing it to display two lines at a time meant adding a blank 14th line, but I forgot to increment the index a second time on the initial call! All working now. (Now to get the other platform to work!)
-
Yes! It works, but I mucked up the loop
-
Oh! Would that work with the labels in the station departure boards?
-
Oh, also, you can't undo an action while you have the end widget of a spline object selected... just click on the baseboard and the undo option comes back.
-
Actually it greys out after 50 clicks! I just tested it. Easy to do, just create a forest using the new multiple place feature, put 60 trees in. Then try and undo them all. You will be left with 10 you have to delete! This could be due to what Goetz said: if you have the layout running then if a vehicle enters or exits a depot, it will clear the undo buffer. I just checked and it does it on both. I recommend pausing the layout in order to make changes. The drivers of vehicles moving... Could be something to do with them not being linked properly to the vehicle? Or just a thought it could be that they are somehow on a different scale.
-
I think there might be a physical (i.e. hard-coded) limit on the number of actions you can undo? I've noticed tat the undo button grays out after a certain number of clicks. There is an easy and obvious work-around - the Save button. Rule one for computers: When you have doe more than you want to do again, save! Rule two: Before doing a major edit that you might want to undo, save! In fact it's advisable to save as a different file name periodically so that you have a checkpoint to go back to if it all goes horribly wrong and you save by accident!
-
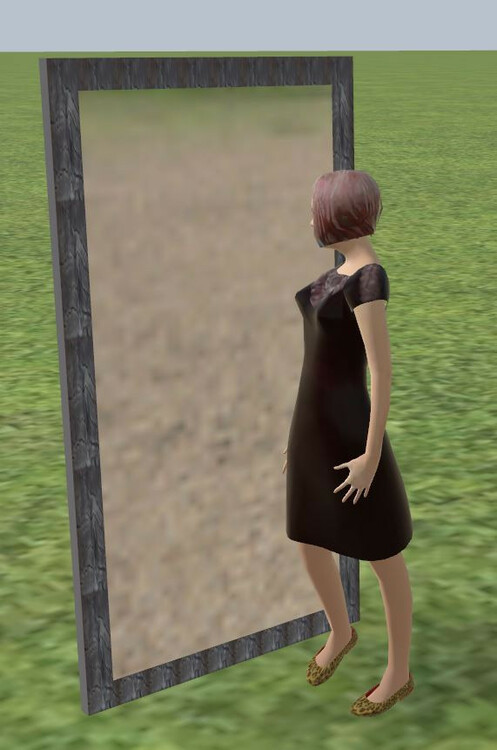
The mirror created by setting a rectangle 1m x 2m to 100% shininess and metallic. (the frame is just for aesthetics). Der Spiegel, der durch Einstellen eines 1 x 2 m großen Rechtecks auf 100 % Glanz und Metallic entsteht. (Der Rahmen dient nur der Ästhetik). But it's interesting to me that the "reflection" is always the same regardless of what is actually in front of the mirror, meaning poor Doro has joined the ranks of the Undead. Aber interessant finde ich, dass das "Spiegelbild" immer gleich ist, egal was sich gerade vor dem Spiegel befindet, was bedeutet, dass sich die arme Doro den Reihen der Untoten angeschlossen hat. I'm not complaining, just noticing. I am pretty sure that if the program were to produce realistic reflections, it would probably be too much for my ageing computer. But I can dream! Ich beschwere mich nicht, ich bemerke es nur. Ich bin mir ziemlich sicher, dass, wenn das Programm realistische Reflexionen erzeugen würde, es wahrscheinlich zu viel für meinen alternden Computer wäre. Aber ich kann träumen!
-
I down-loaded a football texture off the web a few years ago and incorporated it into a layout at V5. But yes I can see the problem!

-
I thought those two were deliberately centred on the landscape? If you want the cube sitting on the ground, use "Box". With the sphere it's easy enough to set the z coordinate to the radius...
-
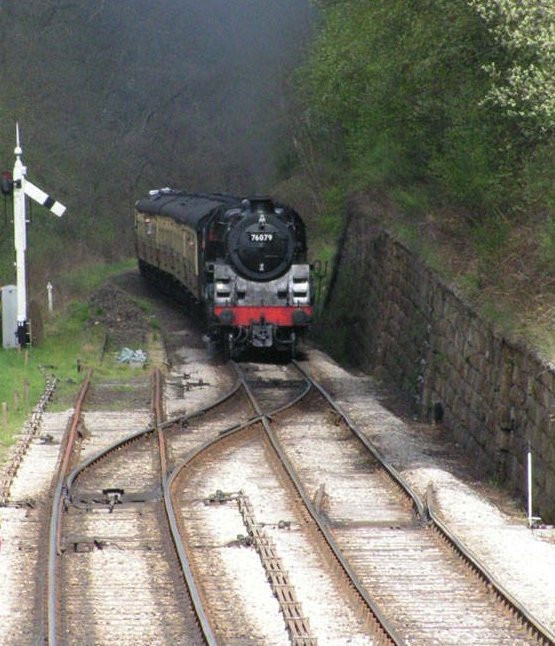
Just because, more as an exercise in doing the scenery...: It doesn't actually do anything, I just wanted to see f I could make a model that was a close to the photo as possible... I can still see a few things I could tweak to get it closer, but it's never going to be the same , so I'm happy.
-
A simple solution is to start the vehicle moving in the new direction, delay a quarter of a second and then assign the new target! Eine einfache Lösung besteht darin, das Fahrzeug in die neue Richtung zu fahren, eine Viertelsekunde zu verzögern und dann das neue Ziel zuzuweisen!
-
Thank you. I have no idea why I didn't work that out for myself as I managed to create the catch-point shown in the photograph easily, the same way (reduce the angle to 5°). Now to try it out!
-
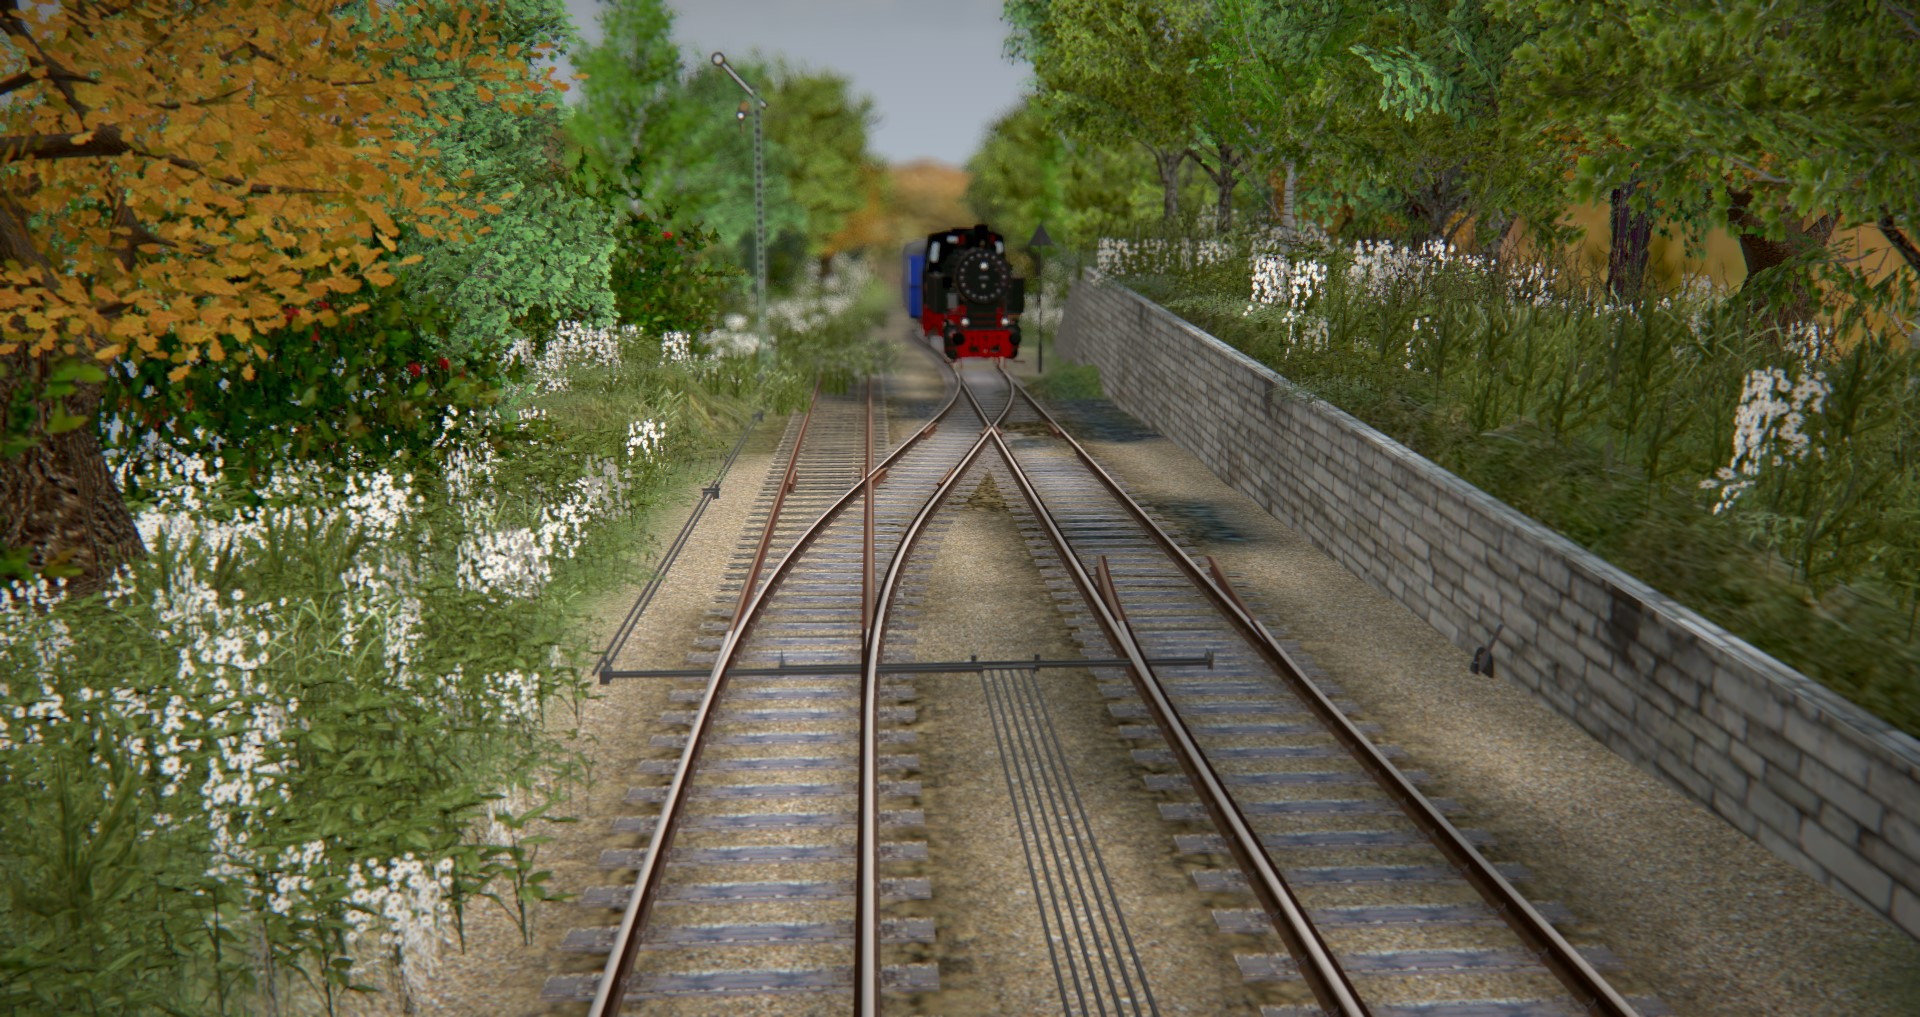
I'm not sure if this is possible or not, but something that would be nice to see is a gradual or partial change in track texture? See how on the prototype the the unused rails are a lot rustier than the ones that see regular traffic, and how that rust extends almost to the end of the blade? Would it be possible to make a texture for track that did the same thing? Or somehow separate the curved rails from the straight ones? The ballasting on the above snip, I did "manually", to see if I could. Lay track on the 0-height baseboard, without ballast, then raised the board by 16 cm (at 1:1 scale) and paint the ballast on. This saves the abrupt and "unrealistic" change in track texture that can clearly be seen in the prototype photo..... Er? Wait... Um? Never mind! Sehen Sie auf dem Prototyp, dass die unbenutzten Schienen viel rostiger sind als die, die dem normalen Verkehr ausgesetzt sind, und wie sich dieser Rost fast bis zum Ende der Klinge erstreckt? Wäre es möglich, eine Textur für eine Spur zu erstellen, die dasselbe tut? Oder irgendwie die gebogenen Schienen von den geraden trennen? Ich habe das Ballastieren auf dem obigen Ausschnitt "manuell" durchgeführt, um zu sehen, ob ich es tun könnte. Legen Sie die Gleise ohne Schotter auf die Grundplatte in Höhe 0, dann heben Sie die Platte 16 cm an (Maßstab 1:1) und färben Sie den Schotter ein. Dies erspart die abrupte und "unrealistische" Änderung der Streckentextur, die auf dem Prototypfoto deutlich zu sehen ist ... Äh? Warte... ähm? egal


-
Yes it works... The biggest snag was the fact that I had a list in a table in a list, and the indexing got tangled. Solved with a user-event, pass the inner list and the index to it down as parameters, and pop the correct item into the label. That also meant that the timer event controls the cycling of the index and calls the same user event! Now to fill in the rest of the trains, and make it work for more than one platform...!
-
Thanks Easy. Probably the easiest solution might be to split the label into two, one above the other? Something I have noticed on the layout I'm slowly trying to build (and might get finished before V12 is ready) is that there are trains that go a long way, all the way from the Baltic ports to practically to the Czech border, calling at over 30 stations on the way. Obviously there is no way 30 place names are going to fit in that little box. What I am planning to do is get as many in as I can. but have the table hold a list of place names, and a timed index to rotate through them, the same as on a lot of prototype stations I've seen. I'll let people know if it works.
-
I've almost got this sussed, but the "Bahnsteig Abschnitte" is defeating me. Translated as "Platform sections", I'm assuming the letters represent the coaches on the train and the numbers 1, 2 and X represent first class, second class and maybe a restaurant car? But what is beating me is getting the numbers under the letters. Obviosly when typing in manually one presses return at the end of the line. But I have a list of tables each holding a departure. Trying to get my table entry to split the text over two lines is failing. The same applies to the intermediate destinations. I think it may have to do with the "Format" box, but I have no idea what to put in there. Please help?
-
@Goetz that sounds really useful! @hb.resing In the mean time on V7, the ET420 power car has an animation that changes the destination board between two different values depending on which of the variations is selected. Another option is to create a sign board by attaching a text label to a rectangle primitive of the right size, position it over the destination board on the vehicle and have an event that makes it invisible or visible. Of course this is a crude and temporary thing, but it will give the desired effect with a little care an attention.
-
That makes sense, yes. (both answers). Having messed around for half an hour it is possible to get a straight contact wire between two hangers using two start-tunnel catenaries, but it's a pain! Either you pit one at each end and meet them in the middle, which if the track is not straight puts a kink in the wire that basically would not be there without a support, or what I did was stretch a single catenary for the correct length, check it's "width" (y-distance, which for some reason is the length) and halve it, then move the catenary away from everything and line it to z=0°. Then add another one to the end using the + icon. Change both to "Tunnel Anfang" and set whichever one is the wrong way around to z=180°. Then group them together. With auto-align turned off I put it on the track and with trial and error and a technique known as binary-chop searching (learned from my days as a programmer) I managed to line it up correctly
-
Addendum: By placing two "Tunnel end" catenaries end to end it is possible to get 79.46m and by adding "tunnel" lengths, one can extend the span indefinitely.... Nachtrag: Indem zwei "Tunnelend"-Oberleitungen Ende an Ende platziert werden, ist es möglich, 79,46 m zu erhalten, und durch Hinzufügen von "Tunnel"-Längen kann man die Spannweite unbegrenzt verlängern ....