simonjackson1964
Mitglieder
-
Benutzer seit
-
Letzter Besuch
Alle erstellten Inhalte von simonjackson1964
-
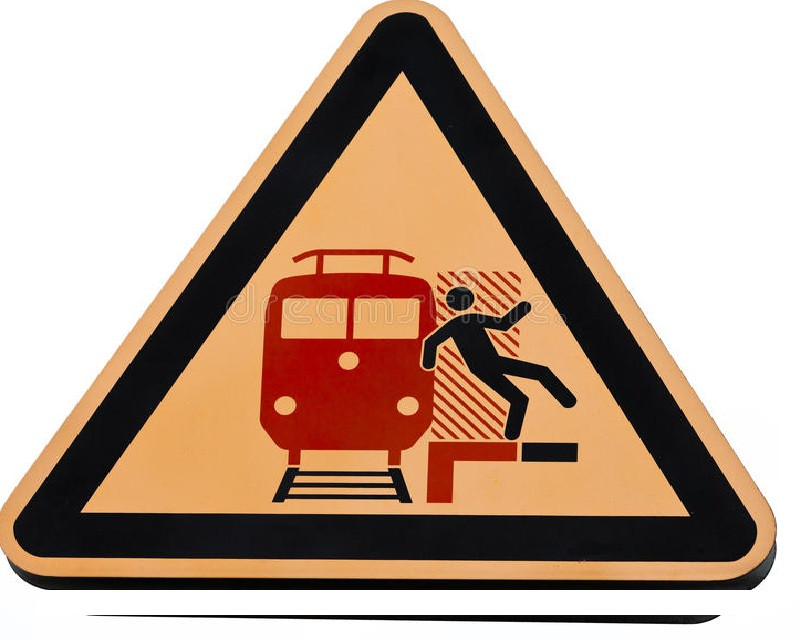
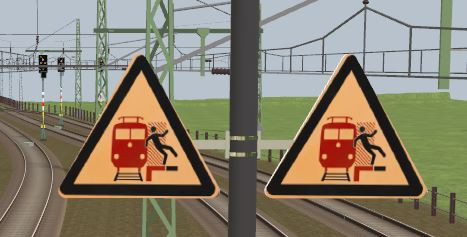
 Okay, rewind, reset... "Let's start from the very beginning, A very good place to start. When you read you begin with, A, B, C. When you sing you begin with Do, Re Me. The first three notes just happen to be... Do Re Me...." I have a .jpg file of the sign that is not the Dutch one that forbids the use of magic outside of school, which I am pretty sure was a joke. Seriously, next time anyone is at a railway station in Germany, have a look at the lamp posts or roof supports and I am 99% certain that you will see that orange triangle with the red train hitting the man... But I cannot find this sign anywhere in the MBS catalogue, which I think is something of an omission, as the sign would appear to be ubiquitous in present day Germany, so if one is plannig to make a modern day layout, one needs to include this sign, for realism. There are so many other little details for things that only might be needed in a layout, that I find it hard to understand why this mandatory detail has been forgotten? (Perhaps it's just so common that it got overlooked, because people don't notice it? Which if you think about what the sign is for, is actually dangerous!) So, I have found a .jpg file of the sign, and used it as the texture on a standard triangular road sign. What I want to know is, how do I make sure that when I upload the finished layout, the sign does not revert back to the blank white and red triangle that I applied the texture to? I have attached the texture file. It's slightly off skew, but it fits the road sign as best I can get it. If someone with Photoshop Pro can do a better job, please do.
-
Okay try this one? 3B7194FC-3D4A-4B2F-910C-0508F4FB9078
-
So... I rename the the file that holds the texture as '_Custom.jpg' and re-upload the model? Seems almost too easy?
-
Ah... That's what I was afraid of. How do I get the texture uploaded?
-
I've uploaded the sign I made, if anyone with the know-how wants to add it to the catalogue that would be great. Ich habe das von mir erstellte Schild hochgeladen, wenn jemand mit dem Know-how es dem Katalog hinzufügen möchte, wäre das großartig. 3B7194FC-3D4A-4B2F-910C-0508F4FB9078
-
<facepalm> Of course! Thanks, Easy. <Gesichtspalme> Natürlich! Danke, Easy.
-
Interestingly enough, pinning the layers does prevent the highlight in simulation mode, for everything except: Signals Turnouts/points Vehicles Signs However, it might be something worth looking at, that virtual depots are not included in that list - of course they are invisible in Simulation mode, but my thought here is that you might want to manually release a train from a virtual depot in Simulation mode? I mean obviously it's possible to achieve that by adding a button to the control panel that activates the event that releases a train, but it seems a bit Heath-Robinson!
-
Ah. Another advantage of using layers! It's something I'm actually still learning, because I never used them before. I have found that they can be handy if (for example) I want to get the trees out of the way to paint the forest floor, or remove the catenary while I muck about with the track... But I didn't know what those little pins did! So thanks. that's really helpful!
-
True, and I'd forgotten that. But I am pleased that this is something being worked on. Because as useful as it is, it can be really annoying at times!
-
I love the feature where each object gets a faint white outline as the mouse passes over it, as it makes it a lot easier to pick out a individual object, say an animal that is hiding in a forest, or an invisible object like a smoke emitter. But is there a way of turning it off? Sometimes you just want to look at the layout without the outline highlight following the mouse around. I thought going into "Simulation mode" might turn it off but it doesn't. Ich liebe die Funktion, bei der jedes Objekt einen schwachen weißen Umriss erhält, wenn die Maus darüber fährt, da es viel einfacher ist, ein einzelnes Objekt auszuwählen, beispielsweise ein Tier, das sich in einem Wald versteckt, oder ein unsichtbares Objekt wie einen Rauch Emitter. Aber gibt es eine Möglichkeit, es auszuschalten? Manchmal möchten Sie einfach nur das Layout betrachten, ohne dass die Umrissmarkierung der Maus folgt. Ich dachte, in den "Simulationsmodus" zu wechseln, könnte es ausschalten, aber das tut es nicht.
-
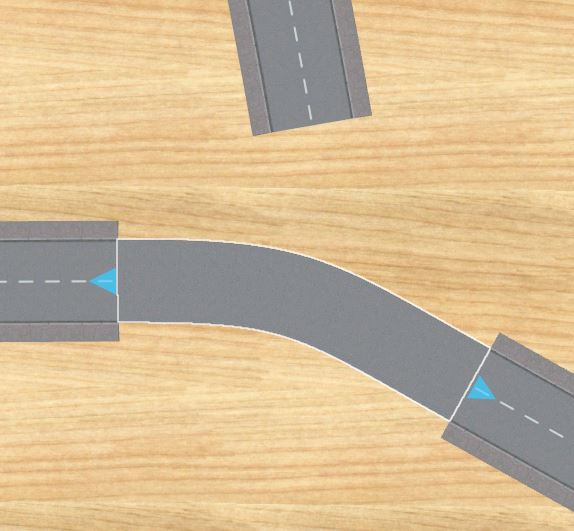
The downside is that vehicles will "cut the corner", which may be realistic if there's nothing else there, but otherwise it might be better to move the ends of the roads closer to the junction. With single track roads it's less important. Or use single tracks as the junctions on the side road.
-
And yes I know I put the stop line on the left. I drive on the left.
-
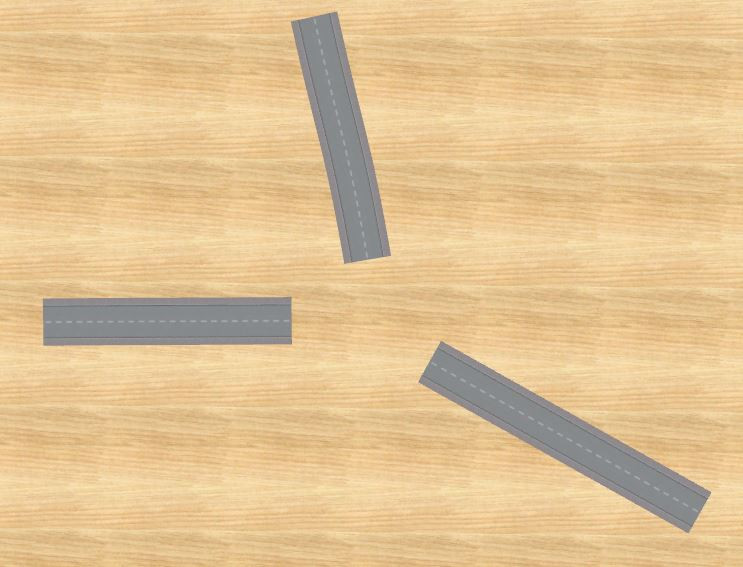
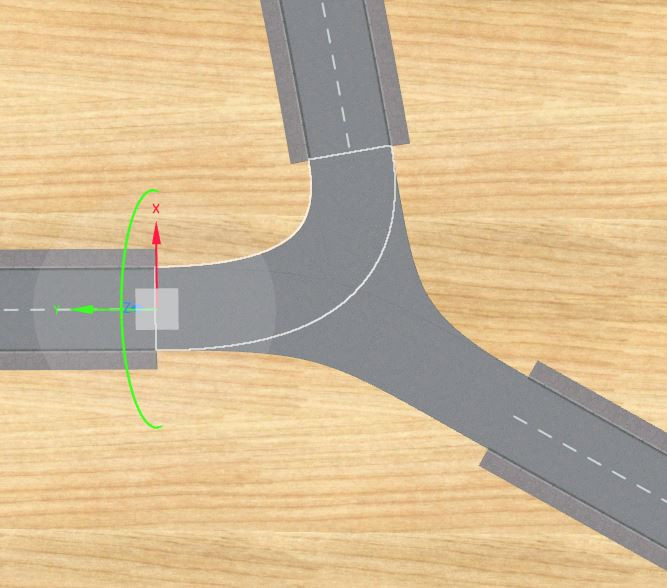
I'm not sure if this is supposed to work, but it does...! Suppose I have three roads that are joining at strange angles like this: How to create a junction: Using the tarfet system a road vehicle can be sent from any route to any other route. And to finish it off... Just add road signs!


-
Moral of the story: Don't delete the baseboard!
-
Oddly, Google Translate doesn't have any Belgian languages or dialects, but it translates correctly from Afrikaans!
-
Hi Eric As a way of stopping it happening again and also to make sure that you have the track aligned on the baseboard correctly, make sure that the Automatic Height Adjustment on the positioning tool is set to "Terrain", then move the track without using the Gizmo, it should automatically align itself to the top of the baseboard. Make sure this state is also set when laying new track, unless you actually want it at a different height. It's really easy to forget to set that and end up with things at random heights.
.jpg.29c6b4e17026c577fe494facee088d6f.jpg)
-
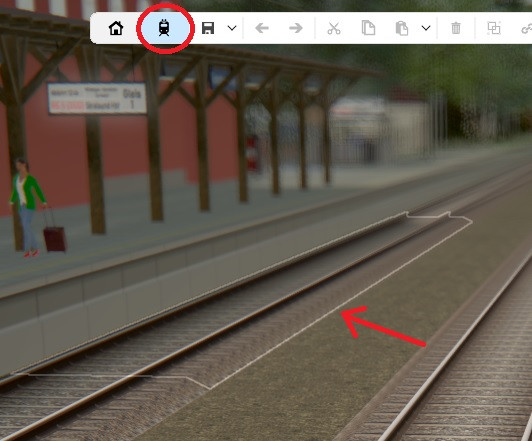
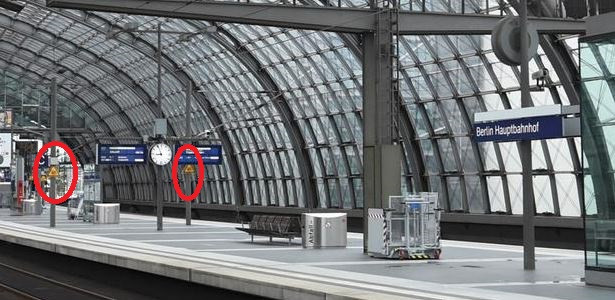
Hi guys The sign below, which isn't a road-sign per se but appears on station platforms as a warning to stay away from the edge, is not in the catalogue. Or if it is, I can't find it. Hallo Leute Das unten stehende Schild, das an sich kein Straßenschild ist, aber auf Bahnsteigen als Warnung erscheint, sich vom Rand fernzuhalten, ist nicht im Katalog enthalten. Oder wenn ja, ich kann es nicht finden. I managed to put it together, but it isn't quite centred because the above file isn't quite straight. Ich habe es geschafft, es zusammenzusetzen, aber es ist nicht ganz zentriert, weil die obige Datei nicht ganz gerade ist. As the sign seems to be on every platform including Berlin Hbf, I would have thought it was an essential item? Da das Schild auf jedem Bahnsteig zu sein scheint, einschließlich Berlin Hbf, hätte ich gedacht, dass es ein wesentlicher Gegenstand ist? Just a thought... By the way if it is there and I missed it, please will someone show me? Thanks Simon Nur ein Gedanke... Übrigens, wenn es dort ist und ich es verpasst habe, kann es mir bitte jemand zeigen? Vielen Dank Simon

-
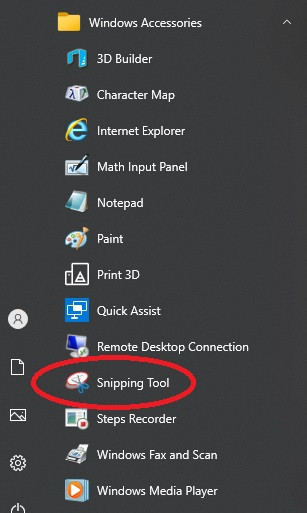
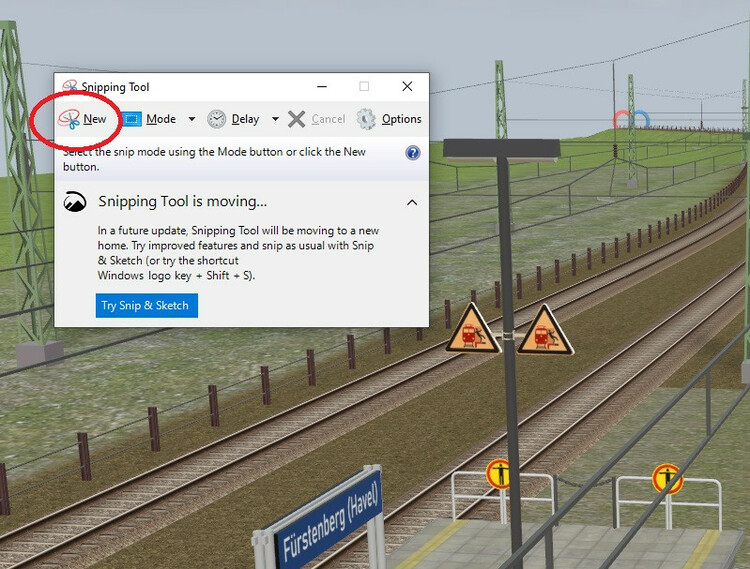
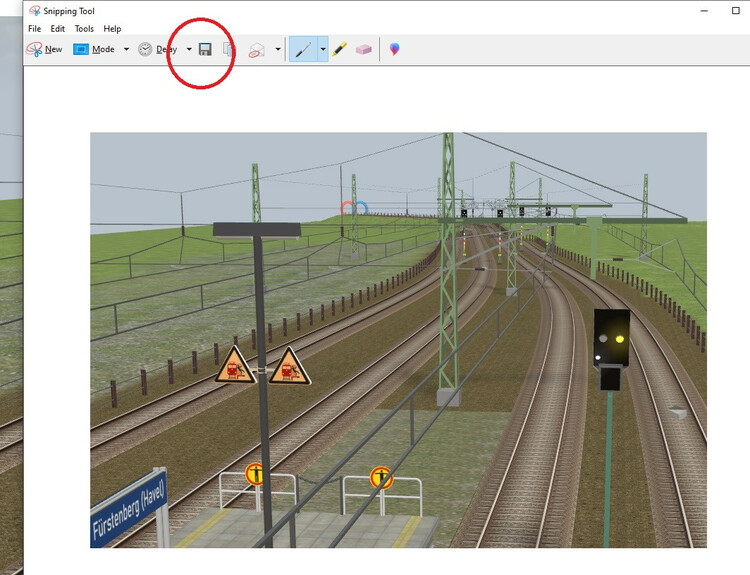
Best guess, your new baseboard isn't level. Assuming you are using Windows 10 or later, in the start menu, under "Windows Accessories", you should have a "Snipping Tool" - a pair of scissors overlaid on a white ellipse with a red border. This tool will allow you to "snip" a portion of your screen and save it to a file (default name is "Capture" but can be changed) Click "New", then select the area of the screen you wish to "snip" - The snipping tool automatically disappears as you do (I did these screen-shots the old fashioned way). If you miss the bit you want, just click "New" again and keep trying until you have what you want. Once you have your image: Click the save icon. Remember where you saved it and insert the image here using the attachment box below. This will make it much easier for Goetz, and te others (even me) to help figure out what is wrong. Cheers Simon
-
Thank you ever so much! That is really helpful..
-
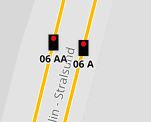
Hi and thanks for the info. I had figured most of that out, but it;s good to have it confirmed. The fact that there used to be a lot more tracks is clear from the wide flat area of overgrown ballast beyond P3 and the fact that the catenary towers and supports cover the entire width of that area. It also looks like an area that used to be sidings a little further North was given over to solar panels! I assume that the extra "wrong-facing" signals were there because of the shunting required for the extra tracks? I'm still confused by the snip below, of the multi-block signals further South... O6 A is the Northbound Block section signal and being KS-Multiblock I assume would repeat the status of 06N1 or 06N3 (or neither) depending upon the settingd of the intervening points. Given that there is a forest area just south of the signals the short distance repeater makes sense on this track. But if 06 AA on the other track is the Southbound block signal, why is there a short distance repeater on the same track to the South? The only logical explanation is still that both tracks are (or were) used for Northbound traffic, and 06 AA faced south as well as 06 A. It doesn't actually make a difference as the signals are well beyond the end of the layout, I'm just curious. Also, I'm wondering if you know when the station building changed to it's current form from the one depicted by the Kibri model? They are nothing alike! Thanks for the help Simon
-
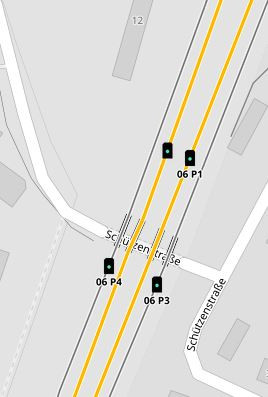
Thank you for that it has positively identified the distant signal as what I thought. But it hasn't helped with the rest of the signals. So far as I can tell all four tracks are used for Northbound traffic and there is no southbound traffic at all, which makes no sense as the Deutsch Bahn timetable website has all Northbound trains on Platform 1, and most Southbound trains on Platform 3 except two that depart Platform 1. There is no indication whatever of which direction the signals face! The other end --->
-
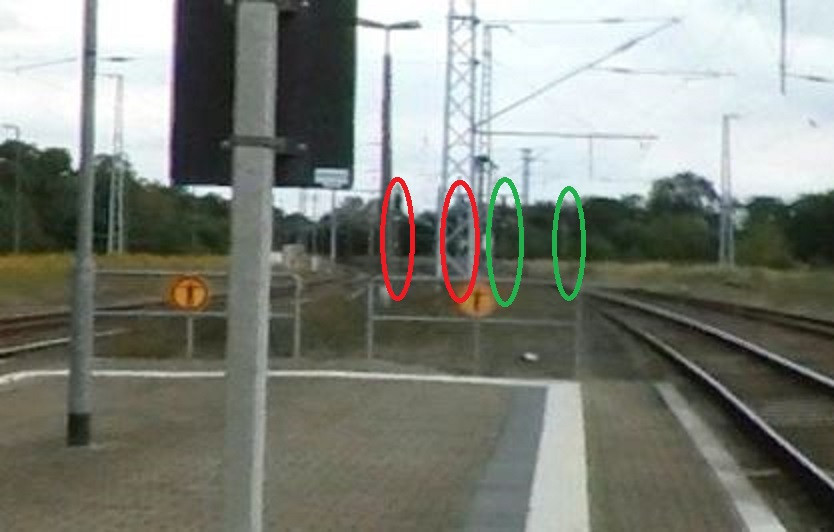
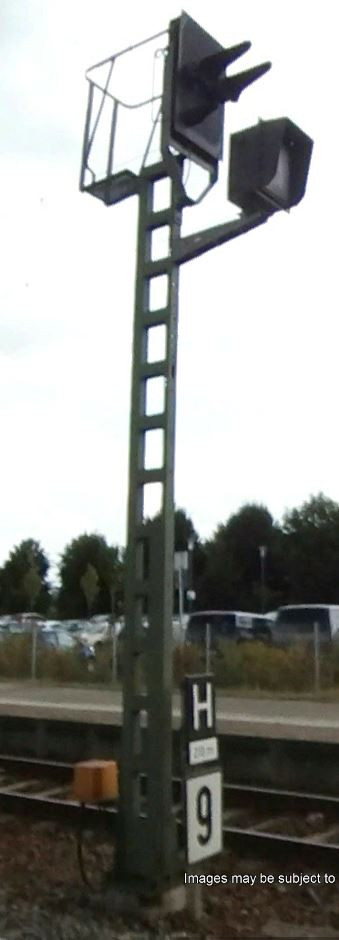
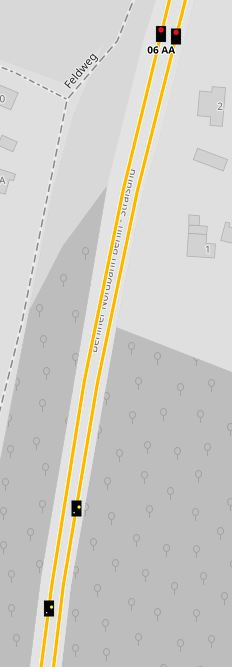
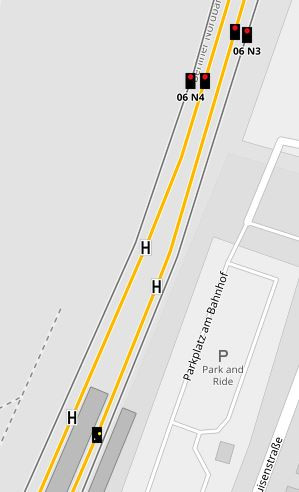
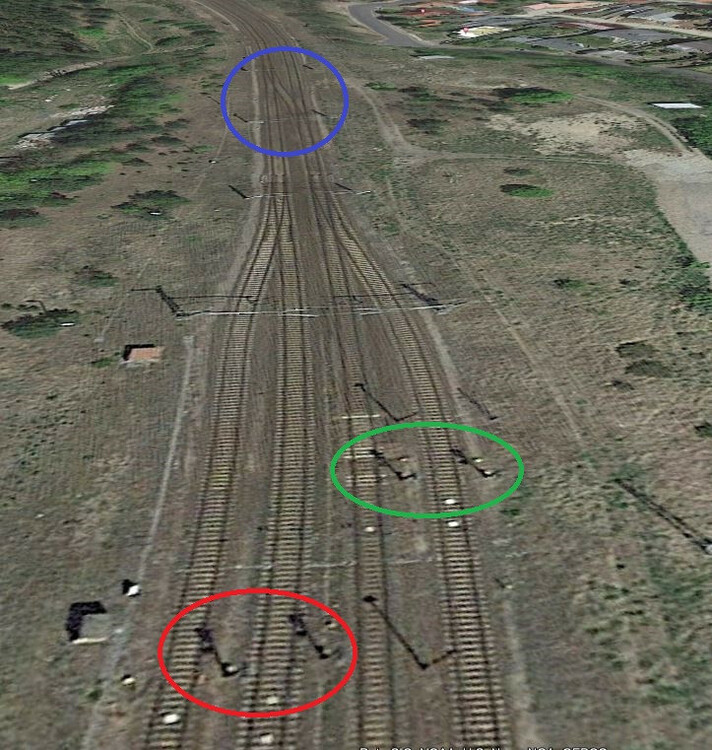
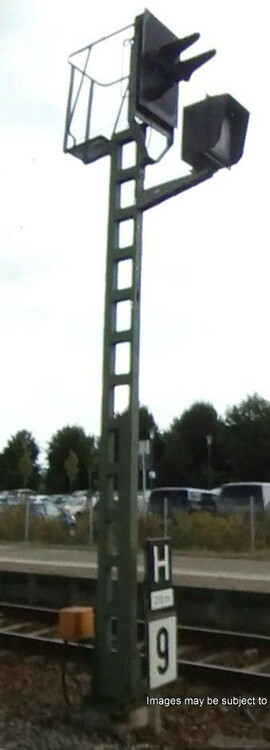
Hi folks. I'm wondering if someone could help me out please? For reasons best left undisclosed, I decided to build a model of the above station and its surroundings, using Google Earth as a guide. It's coming on nicely if slowly with some nice little additions at V8. But I have a problem with the signals, in that they don't seem to male any sense. Hallo Leute. Ich frage mich, ob mir bitte jemand helfen könnte? Aus Gründen, die am besten nicht bekannt gegeben werden, beschloss ich, ein Modell der obigen Station und ihrer Umgebung zu bauen, wobei ich Google Earth als Leitfaden verwendete. Es kommt gut voran, wenn auch langsam mit einigen netten kleinen Ergänzungen bei V8. Aber ich habe ein Problem mit den Signalen, da sie keinen Sinn zu machen scheinen. There is a lack of street view pictures, so I'm limited to using the satellite view, and identifying things by their shadows. The two ringed green above are the starter signals for the Northbound tracks 1 and 2 (Down, by UK convention as they are heading away from Berlin). The two shadows ringed in red would appear to be starter signals Northbound for tracks 3 and 4, but this would mean trains run Northbound on the Southbound (Up) main line as the only crossover in that direction for 10 Km is facing in the normal direction of travel (ringed blue above). Es fehlt an Straßenansichtsbildern, daher beschränke ich mich auf die Satellitenansicht und erkenne Dinge anhand ihrer Schatten. Die beiden grünen Ringe oben sind die Startsignale für die Gleise 1 und 2 in Richtung Norden (unten, nach britischer Konvention, da sie von Berlin wegfahren). Die beiden rot umrandeten Schatten scheinen Startsignale für die Gleise 3 und 4 in Richtung Norden zu sein, aber dies würde bedeuten, dass Züge auf der Hauptstrecke in Richtung Süden (nach oben) in Richtung Norden fahren, da die einzige Kreuzung in diese Richtung für 10 km ist in die normale Richtung weist der Reise (oben blau umrandet). It's as clear as I can get it, and I've runged in the same colour what I think are the four signals. On the one furthest left you can definitely see the white rectangle under the signal, meaning I am pretty sure it's not a home signal for Southbound trains on platform 3. Es ist so klar, wie ich es machen kann, und ich habe in der gleichen Farbe eingekreist, die meiner Meinung nach die vier Signale sind. Ganz links sieht man auf jeden Fall das weiße Rechteck unter dem Signal, was bedeutet, dass ich mir ziemlich sicher bin, dass es kein Heimsignal für Züge in Richtung Süden auf Gleis 3 ist. Would these perhaps be shunting signals? Signals no longer in use but not removed? Wären das vielleicht Rangiersignale? Signale nicht mehr verwendet, aber nicht entfernt? And then we have this: Und dann haben wir das: The H above the 9 is the platform length - "Stop here wth 9 or more coaches" - I think. But the signal itself is a puzzle. It doesn't have a post plate at all. Is it a repeater signal? Das H über der 9 ist die Bahnsteiglänge - "Halte hier mit 9 oder mehr Autos" - denke ich. Aber das Signal selbst ist ein Rätsel. Es hat überhaupt keine Pfostenplatte. Ist es ein Repeater-Signal? Any help would be grealy appreciated. Jede Hilfe wäre sehr willkommen. Thaks Simon

-
Thanks for the reply, Neo.
-
Bypassed the problem with two identical primitives and "Visibility", but I'd still like to know?
-
Is there a way to access the "Glow" property of a primitive, either from Lua or the EV? Gibt es eine Möglichkeit, auf die "Glow"-Eigenschaft eines Primitivs zuzugreifen, entweder von Lua oder dem EV?