


Dad3353
-
Benutzer seit
-
Letzter Besuch
Beiträge erstellt von Dad3353
-
-
I know they've been available for quite some time now, but this is my first attempt to understand and use them, on road layouts. To this end, I have a simple test layout, attached below...
I have not found much information at all on this subject, as most is based on rail use, so my questions may be rather ignorant, so apologies in advance. Here's my first issue...
I have set up a series of destinations for a Bus on my layout; each contact point (CP...) sends the Bus to its next Waypoint (WP...). Once at the End, the Bus is sent to the Start, to start the whole train of events again. From the Start, the first destination (WP 1...) is reached by passing over the CP for WP 3, which is triggered, and sends the Bus to End. I've tried to make the CP understand that there is a Condition, that if the Bus is on its way to WP1, let it continue, otherwise, set to End. It doesn't seem to work; I obviously have not understood something.
How may the Bus pass over a CP and not have its Route changed if the condition is not met, please..?Ich weiß, dass sie schon seit geraumer Zeit verfügbar sind, aber dies ist mein erster Versuch, sie zu verstehen und auf Straßenplänen anzuwenden. Zu diesem Zweck habe ich ein einfaches Testlayout, das unten beigefügt ist ...
Ich habe zu diesem Thema überhaupt nicht viele Informationen gefunden, da sich die meisten auf die Nutzung der Schiene beziehen, sodass meine Fragen möglicherweise eher unwissend sind. Ich entschuldige mich daher im Voraus. Hier ist meine erste Ausgabe...
Ich habe auf meiner Anlage eine Reihe von Zielen für einen Bus eingerichtet; Jeder Kontaktpunkt (CP...) sendet den Bus zu seinem nächsten Wegpunkt (WP...). Am Ende angekommen wird der Bus zum Start geschickt, um den gesamten Ablauf der Ereignisse erneut zu starten. Vom Start aus wird das erste Ziel (WP 1...) erreicht, indem der CP für WP 3 überfahren wird, der ausgelöst wird und den Bus zum Ende sendet. Ich habe versucht, dem CP klarzumachen, dass es eine Bedingung gibt: Wenn der Bus auf dem Weg zu WP1 ist, soll er weiterfahren, andernfalls wird er auf Ende gesetzt. Es scheint nicht zu funktionieren; Ich habe offensichtlich etwas nicht verstanden.
Wie kann der Bus über einen CP fahren, ohne dass seine Route geändert wird, wenn die Bedingung nicht erfüllt ist?Douglas
-
-
Bearbeitet von Dad3353
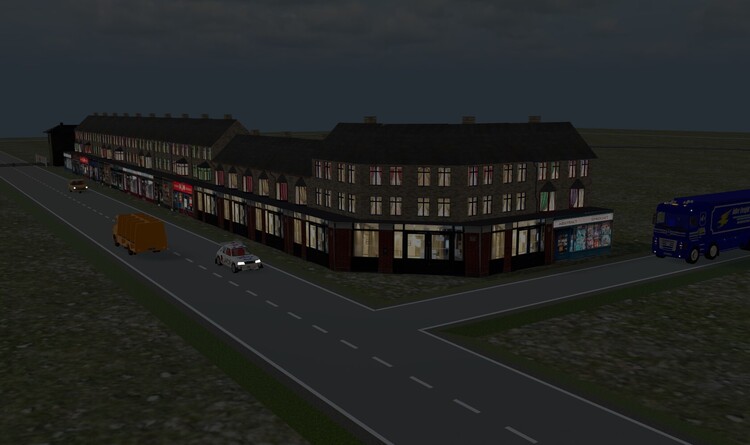
She's heading for an unprotected level crossing, but has forgotten how to brake.

Sie ist auf dem Weg zu einem ungesicherten Bahnübergang, hat aber vergessen, wie man bremst.
-
1 hour ago, Klartexter said:
Hallo Dad3353,
gibt es in England noch keine Rollatoren? Die Gehhilfe in Deinem Video kenne ich eigentlich nur aus dem Krankenhaus. Der Link führt zu einem Bild, auf dem man sieht, was ich meine. Aber Du hast die Animation sehr gut hingebracht!Hello Dad3353,
are there no rollators in England yet? I only know the walking aid in your video from the hospital. The link leads to a picture where you can see what I mean. But you did a great job with the animation!Walter
-
-
1 hour ago, Goetz said:
Good evening Douglas
a wonderful animation!
")
You can use the "set vehicle speed" command from the "vehicle" section of actions in the EV to assign low speeds like 0.5 or 0.2
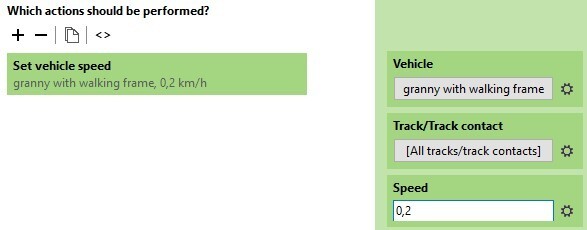
Please note that my Windows Settings are German. This includes the comma as the separator for fractions.
You may want to use the period instead. When I tried the period, my number turned red.
Yours will probaly turn red when you use the comma (like I did in this screenshot).Greets
GoetzMany thanks for the swift response, and a welcome solution (admittedly to a very minor problem, but still...). Here in France I'm quite used to using a decimal comma; it shouldn't be an issue for me. Thanks again, old chum.
Douglas
-
Good evening...
I have an animation (treated as a vehicle by MBS...) which would be best at the original speed, to be more realistic. Here's a video, with the 'vehicle' speed set to its minimum of 1 km/h. Can this be reduced to 0.5 Km/h, by code, for instance..? Thanks in advance for thoughts...
Guten Abend...
Ich habe eine Animation (von MBS als Fahrzeug behandelt ...), die am besten mit der Originalgeschwindigkeit funktioniert, um realistischer zu sein. Hier ist ein Video, in dem die Fahrzeuggeschwindigkeit auf mindestens 1 km/h eingestellt ist. Kann dies z. B. per Code auf 0,5 km/h reduziert werden? Vielen Dank im Voraus für Gedanken ...
Douglas
-
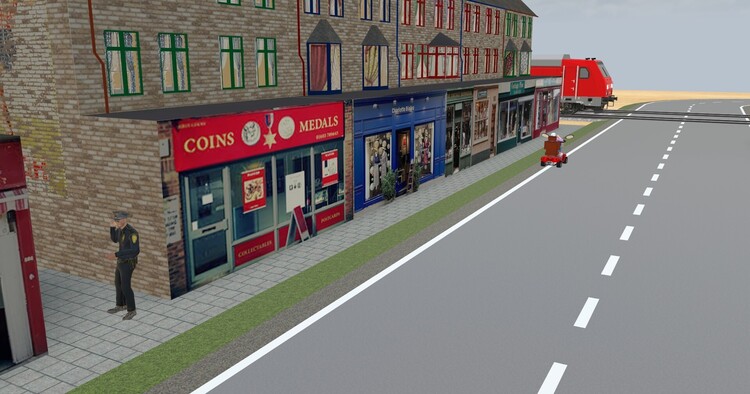
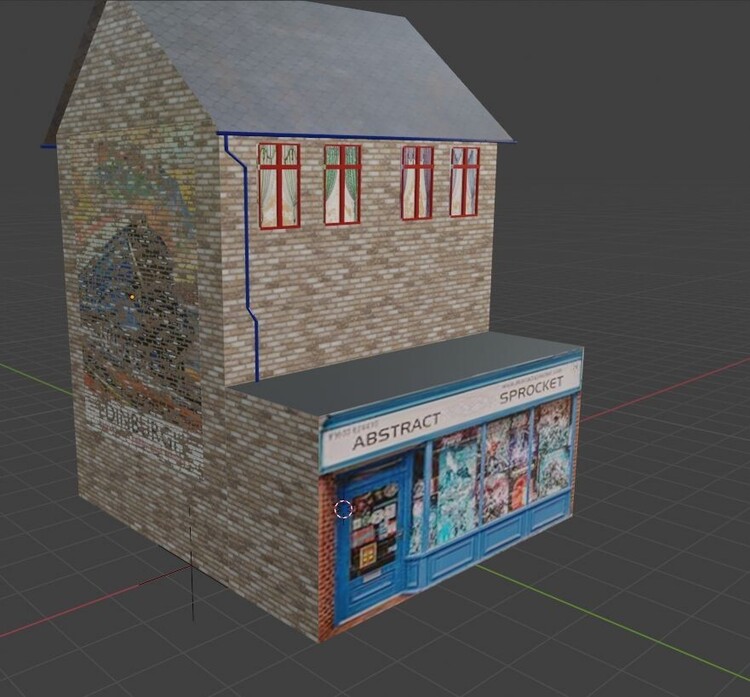
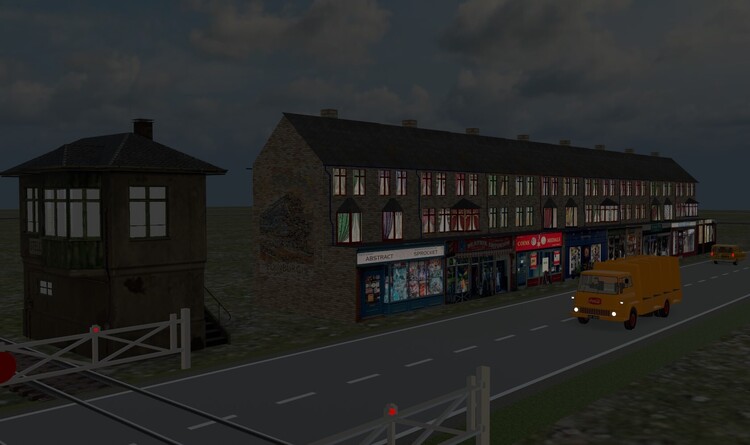
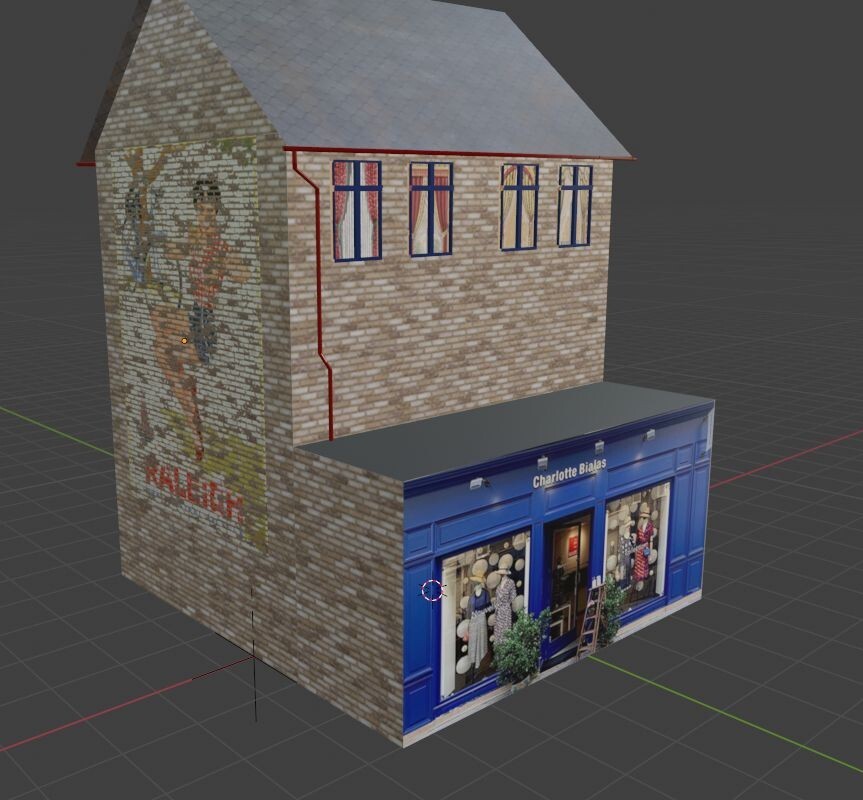
Teaser : now with single-story shops, and a corner shop...
Teaser: Jetzt mit einstöckigen Geschäften und einem Tante-Emma-Laden ...
Douglas
-
1 hour ago, 220hotwheels said:
... Will you ever consider these for the catalogue ...
Any form that these shops take for inclusion in the Catalogue depends somewhat on any reply received concerning my request here. The difference between using, or not, Exchange Textures is considerable, and makes these, and any future models of the same type, more or less useful and interesting.
The locos are of a different nature, and their acceptance is more a matter of permissions from eventual copyright holders, over which I have little or no control. If anyone is able to obtain, or waive, these permissions, then there is no reason on my part to not share them. It's a simple matter that has complicated solutions, it would appear, and I'm rather too simple myself to undertake such work, even if I had the competence. The jury is out on that one, I'm afraid. Hoping this helps; meanwhile...Have a splendid day.
Welche Form diese Shops für die Aufnahme in den Katalog annehmen, hängt in gewissem Maße von der Antwort ab, die ich auf meine Anfrage hier erhalten habe. Der Unterschied zwischen der Verwendung oder Nichtverwendung von Exchange-Texturen ist erheblich und macht diese und alle zukünftigen Modelle desselben Typs mehr oder weniger nützlich und interessant.
Die Lokomotiven sind anderer Natur und ihre Akzeptanz hängt eher von den Genehmigungen eventueller Urheberrechtsinhaber ab, über die ich kaum oder gar keine Kontrolle habe. Wenn jemand in der Lage ist, diese Berechtigungen einzuholen oder darauf zu verzichten, gibt es für mich keinen Grund, sie nicht weiterzugeben. Es scheint, dass es sich um eine einfache Angelegenheit handelt, für die es komplizierte Lösungen gibt, und ich bin selbst eher zu einfach, um eine solche Arbeit zu übernehmen, selbst wenn ich die nötige Kompetenz hätte. Ich fürchte, die Jury ist sich noch nicht sicher. Ich hoffe, das hilft; in der Zwischenzeit...Ich wünsche Ihnen einen wunderschönen Tag.
Douglas
-
1 hour ago, 220hotwheels said:
Thanks Douglas, the tradesman's entrance will do just fine. The guys will still keep hold of their wands, just in case they need to make a quick entrance or exit through the front door though!!
Cheers
Pete
Shop N° 9, with its 24 variants and animated back door, is available as an 'mbe" file on my Google Drive, here ...
Shop Nr. 9 mit seinen 24 Varianten und animierter Hintertür ist als „mbe“-Datei auf meinem Google Drive verfügbar, hier ...
Enjoy.
-
Pete...
Any good for you..?
One door, or both, may be selected. Yes, the door handle turns..!
-
14 minutes ago, 220hotwheels said:
Thanks Douglas, yes it does, so for now all personnel will still have to be equipped with a Harry Potter wand so that they can enter and exit buildings at will. Not a problem, it all adds to the magic!!!
Cheer
Pete
Pete...
If you're happy with having all deliveries 'round the back', I can easily give the rear door animation. Maybe even do a double door, as a variant...

-
8 minutes ago, 220hotwheels said:
Hi Douglas
Love the models, they look amazing, not so sure about the explanation though, that part is beyond me, you might as well be speaking mandarin!!
One question I do have, the answer to which is not apparent from the screenshot, do any of the doors open? If they do then I would be a very happy bunny, so to speak.
Cheers
Pete
Alas, Pete, it doesn't work that way. Here's a 'naked' shop...
... and a 'dressed' one ...
Now with another Texture, we see that there is no 'Door' in the model, all is illusion...

Here we see what happens if the Emissive file is wrong (the shop front and windows are mashed together...)...

Not good, eh..? No such problem if I forget about Emissive lighting, but it works so well, and costs MBS nothing..!
It's, of course, possible, and indeed easy, to have opening doors in any one model with a fixed shop front, or that have compatible Textures. Hope this explains things a little...
Douglas
-
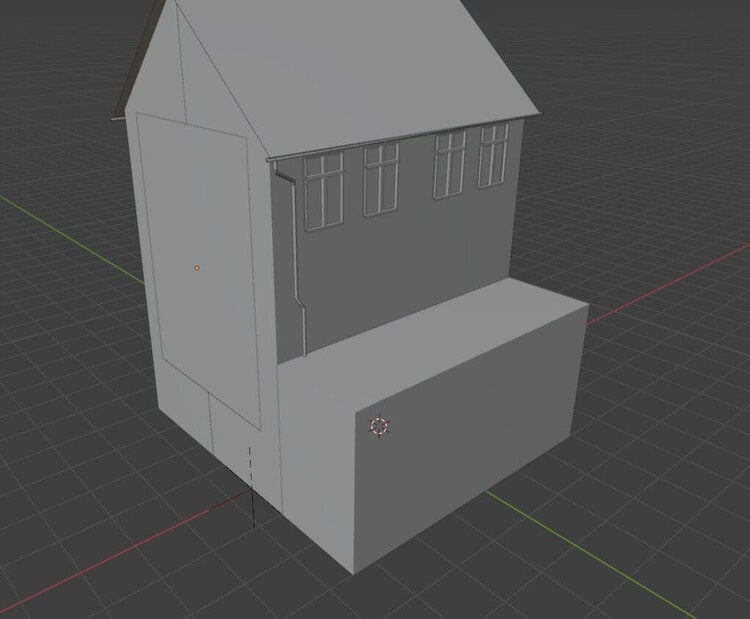
Further explanation...
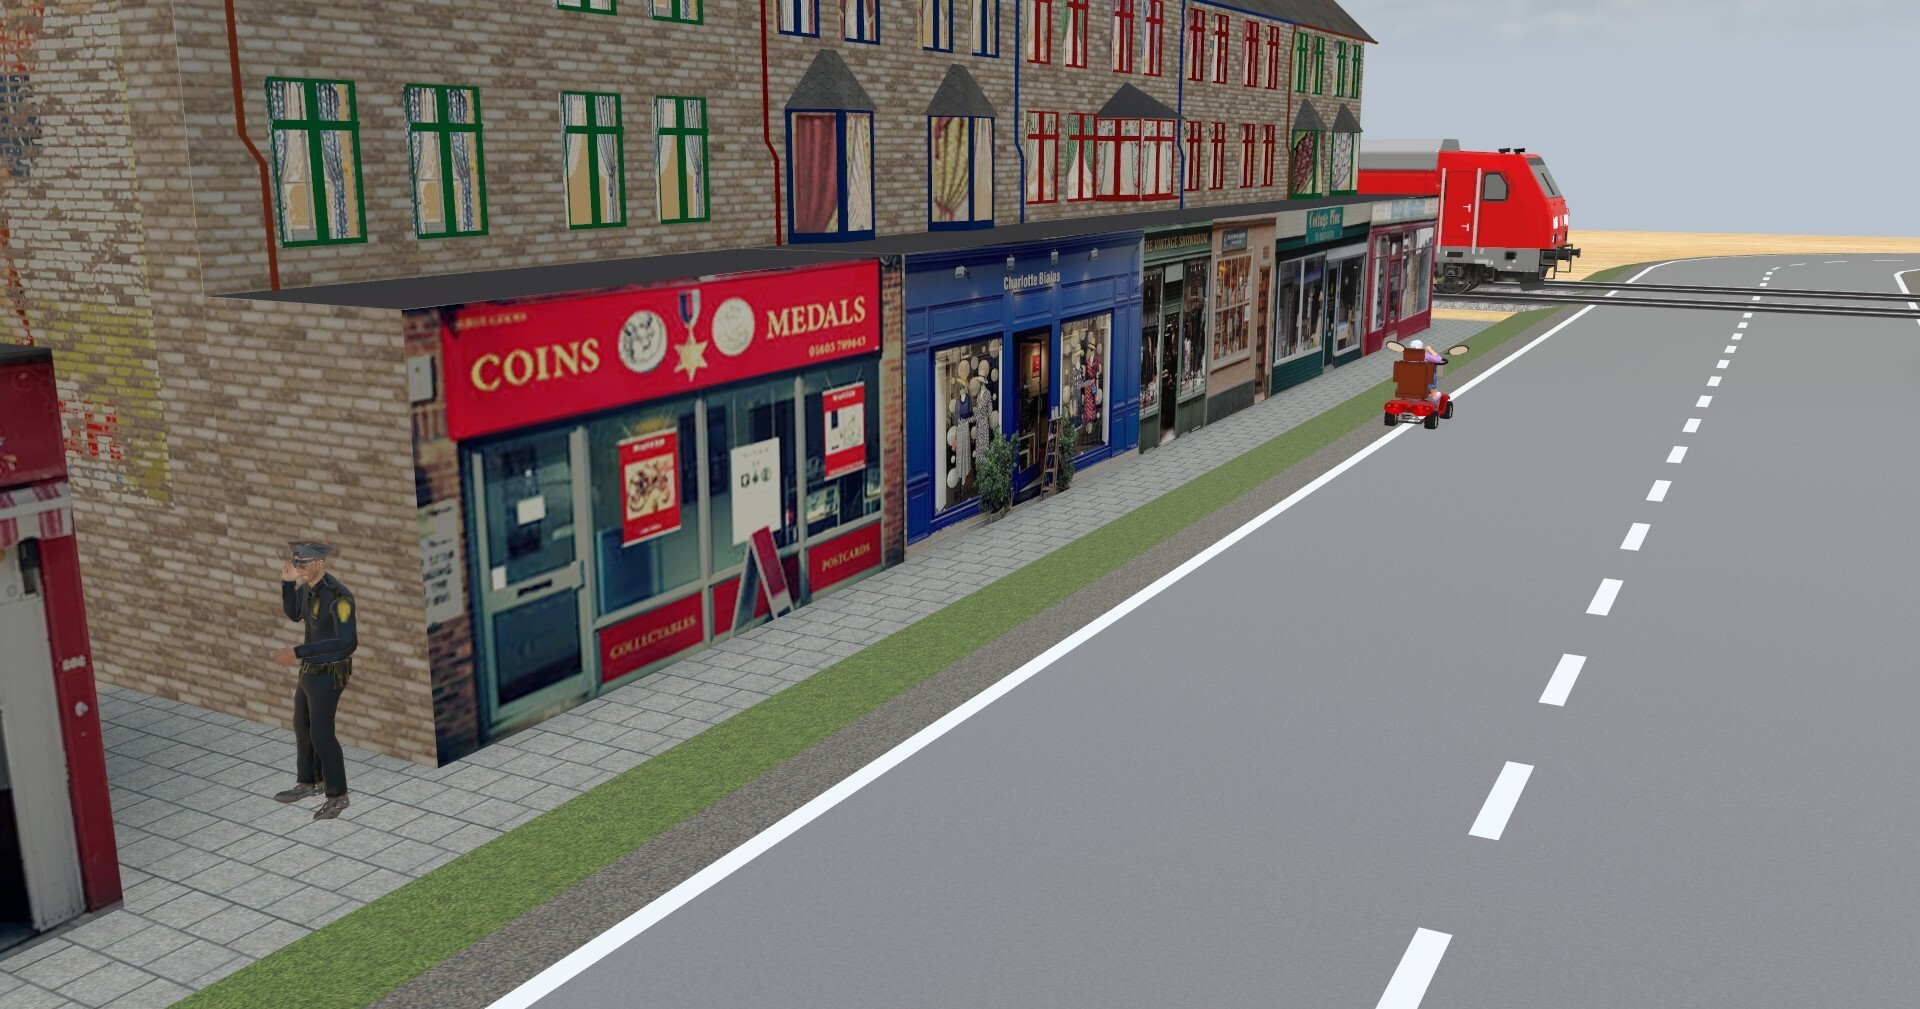
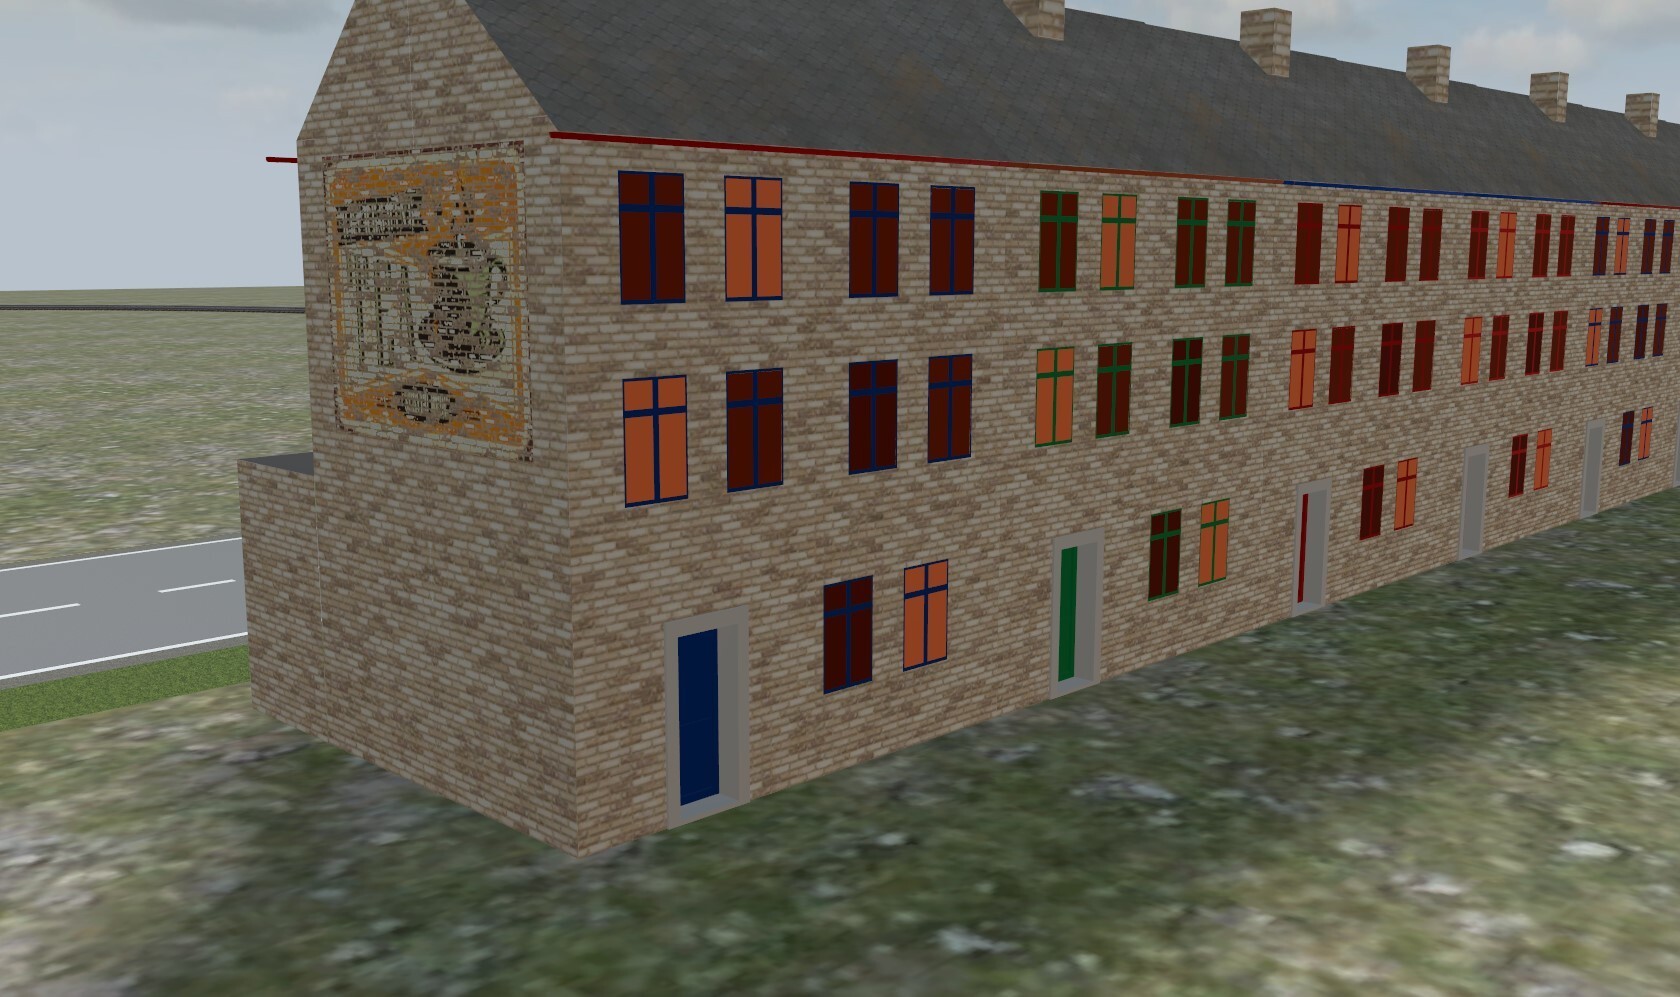
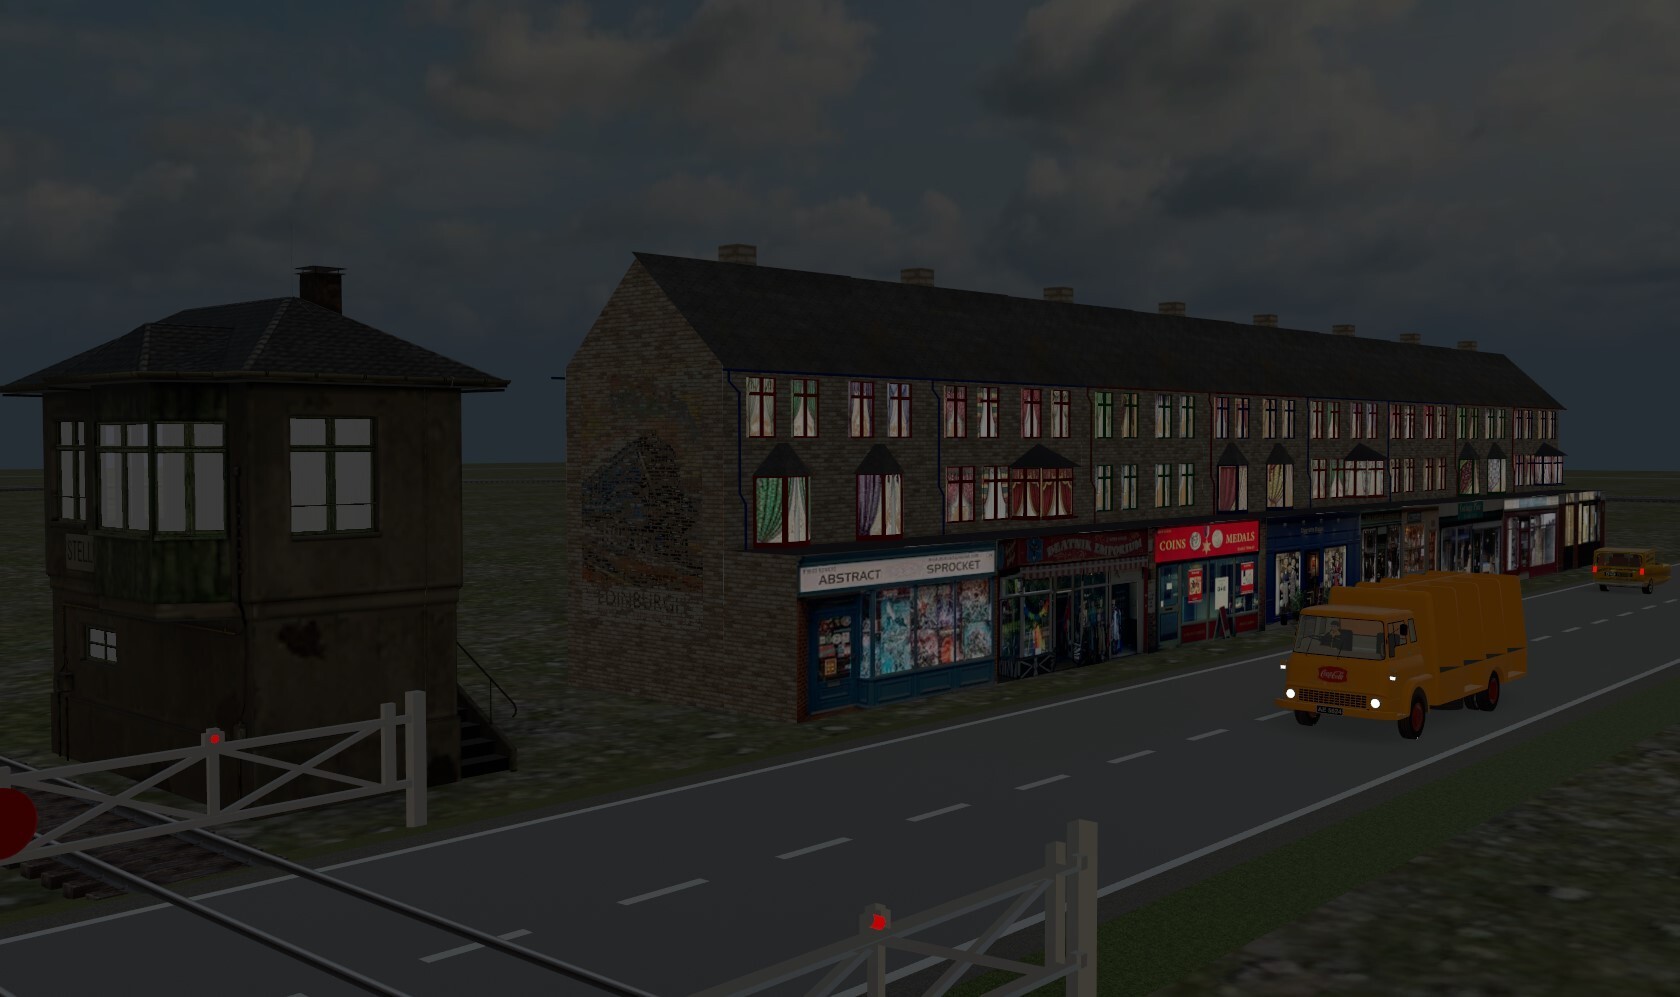
I am making models of terraced shops, often seen on UK streets. I have one base model, with three variants (different windows...), which all use common Textures, made with Photoshop, for Colour, Metallic, Roughness and Emissive. With Photoshop, I use Layers to have different parts available, like a construction kit, to compose base Colour, Shop Front, the Curtains, Wall style, Roof style, and faded 'ghost' wall Posters. I can 'dial in' any combination, to give hundreds of different buildings, with either common features (all the same brickwork, for example...) or all different, simply by selecting the combination of Photoshop layers. This works well, and I have a stock of fifty or so different shop fronts.
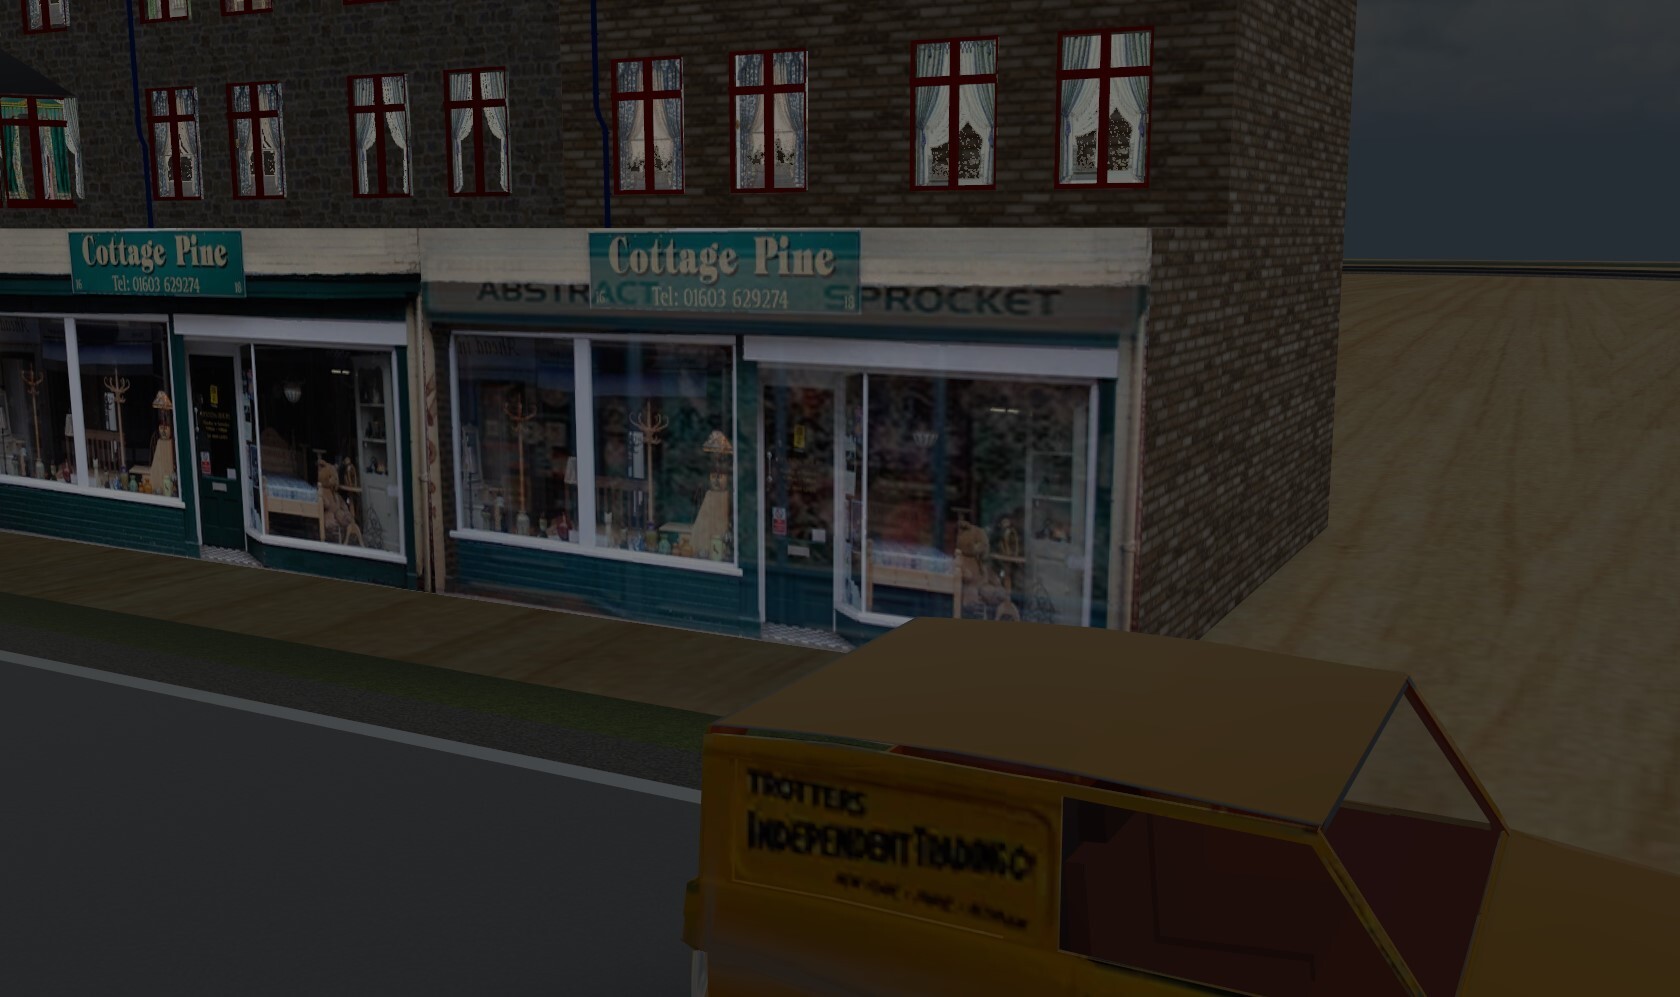
These Textures could be used as '_Custom' Exchange textures, so that one model, with the three window variants, could have many different textures, by Exchange. This works well, too, except for the Emissive Texture, which remains constant, whatever Exchange Texture is imported. As I use the Emissive to light up the Shop Front and the curtained Windows, this can't work, as the Shop Front and Curtains will mix, badly, and the effect is lost.
A simple solution is to forego the use of Emissive, and use Exchange Textures with no night lighting. I think that a better solution could be to have Exchange Texture import to include Metallic, Roughness and Emissive files, if they are present. Without this, I have to create many variants (the model in the screenshot is only one Brick/Roof version, but already has twenty-four variants, to have eight shop fronts. Is the importing of all the Material files really impossible, or could it be implemented in a future version, please..?
Thanks in advance for a reply; meanwhile...Have a wonderful day.
Weitere Erklärung...
Ich mache Modelle von Reihenhäusern, die oft auf britischen Straßen zu sehen sind. Ich habe ein Basismodell mit drei Varianten (verschiedene Fenster ...), die alle gemeinsame, mit Photoshop erstellte Texturen für Farbe, Metallisch, Rauheit und Emissiv verwenden. In Photoshop verwende ich Ebenen, um verschiedene Teile wie einen Bausatz zur Verfügung zu haben, um die Grundfarbe, die Ladenfront, die Vorhänge, den Wandstil, den Dachstil und verblasste „Geister“-Wandplakate zusammenzustellen. Ich kann jede Kombination „einwählen“, um Hunderte verschiedener Gebäude zu erstellen, entweder mit gemeinsamen Merkmalen (z. B. alle das gleiche Mauerwerk ...) oder mit völlig unterschiedlichen Merkmalen, indem ich einfach die Kombination der Photoshop-Ebenen auswähle. Das funktioniert gut, und ich habe einen Bestand von etwa fünfzig verschiedenen Ladenfronten.
Diese Texturen könnten als „_Custom“ Exchange-Texturen verwendet werden, sodass ein Modell mit den drei Fenstervarianten viele verschiedene Texturen per Exchange haben könnte. Dies funktioniert auch gut, mit Ausnahme der Emissive Texture, die unabhängig von der importierten Exchange Texture konstant bleibt. Da ich das Emissive verwende, um die Ladenfront und die mit Vorhängen versehenen Fenster zu beleuchten, kann dies nicht funktionieren, da sich die Ladenfront und die Vorhänge schlecht vermischen und der Effekt verloren geht.
Eine einfache Lösung besteht darin, auf die Verwendung von Emissive zu verzichten und Exchange Textures ohne Nachtbeleuchtung zu verwenden. Ich denke, dass eine bessere Lösung darin bestehen könnte, Exchange-Texturen zu importieren, um metallische, raue und emittierende Dateien einzubeziehen, sofern diese vorhanden sind. Ohne dies muss ich viele Varianten erstellen (das Modell im Screenshot ist nur eine Brick/Roof-Version, hat aber bereits vierundzwanzig Varianten, um acht Ladenfronten zu haben. Ist der Import aller Materialdateien wirklich unmöglich, oder könnte Bitte implementieren Sie es in einer zukünftigen Version.
Vielen Dank im Voraus für eine Antwort; in der Zwischenzeit...Ich wünsche Ihnen einen wundervollen Tag.
Douglas

-
Good evening...
When a model is added to MBS, its Texture files are read. Colour, Metallic, Roughness and Emissive are all used, if present, by MBS. When a _Custom material is used, however, only the Colour file is read and used. I use the Emissive file for lighting windows at night, for instance; if I use an Exchange texture with different curtains, the corresponding Emissive file is ignored, and the windows are not displayed correctly. Would it be very difficult to have the other files read and used (if they are present, naturally...)..?
Thanks in advance for offering a solution; meanwhile...Have a splendid day.
Guten Abend...
Wenn ein Modell zu MBS hinzugefügt wird, werden seine Texturdateien gelesen. Farbe, Metallisch, Rauheit und Emissiv werden, sofern vorhanden, von MBS verwendet. Bei Verwendung eines _Custom-Materials wird jedoch nur die Farbdatei gelesen und verwendet. Ich verwende die Emissive-Datei zum Beispiel zum Beleuchten von Fenstern bei Nacht; Wenn ich eine Exchange-Textur mit unterschiedlichen Vorhängen verwende, wird die entsprechende Emissive-Datei ignoriert und die Fenster werden nicht korrekt angezeigt. Wäre es sehr schwierig, die anderen Dateien lesen und verwenden zu lassen (sofern sie vorhanden sind, natürlich ...)?
Vielen Dank im Voraus für das Angebot einer Lösung. in der Zwischenzeit..Ich wünsche Ihnen einen wunderschönen Tag.
Douglas

-
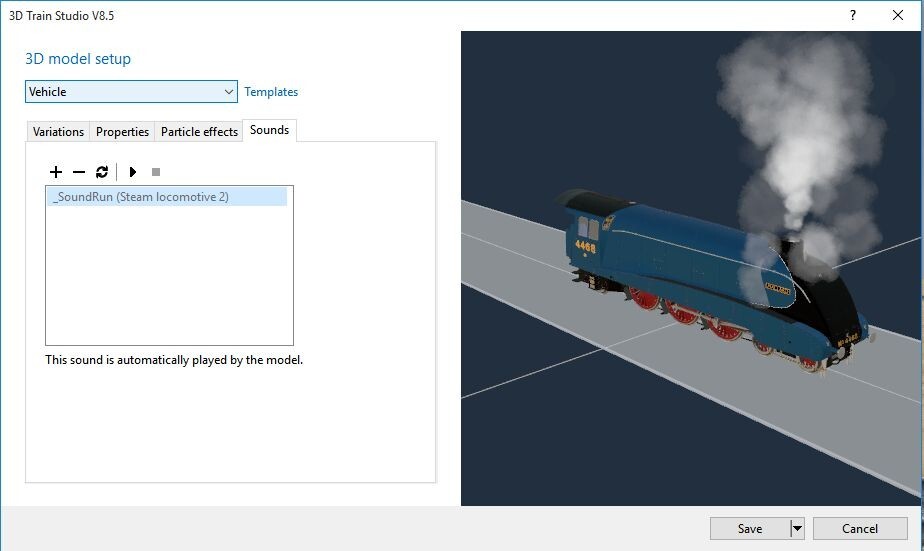
Hermann...
I think I see what's happening. The volume of the sound reduces as the speed falls below 20 km/h, but the pitch, or 'beat' of the 'chuff-chuff-chuff' remains constant, whatever the speed above 0. Here's one from the web (Pixabay...) to show what I mean by the sound speeding up, and a screenshot of my MBS...
Ich glaube, ich sehe, was passiert. Die Lautstärke des Tons verringert sich, wenn die Geschwindigkeit unter 20 km/h fällt, aber die Tonhöhe oder der „Beat“ des „chuff-chuff-chuff“ bleibt konstant, unabhängig von der Geschwindigkeit über 0. Hier ist einer aus dem Internet (Pixabay). ..) um zu zeigen, was ich mit der Beschleunigung des Tons meine, und einen Screenshot meines MBS ...

steam-engine-speeding-up-28760.zip
Douglas
-
4 hours ago, HWB said:
Hello Dad,
You should change that with the noise like this...
Hermann...
This what I have (but I don't see the bar beneath as in your screenshot...). The sound is fine, but doesn't vary with the loco speed. Have I missed something..? Not reading German doesn't make it easier, of course..!
Das habe ich (aber ich sehe die Leiste darunter nicht wie in Ihrem Screenshot ...). Der Klang ist gut, variiert aber nicht mit der Geschwindigkeit der Lok. Habe ich etwas verpasst? Wenn man kein Deutsch kann, wird es natürlich nicht einfacher..!
Douglas
-
Bearbeitet von Dad3353
14 minutes ago, 220hotwheels said:Thanks Douglas, how quick you are at problem solving.
Pete
I've added extra steam from the valve gear; bonus..! I only wish the sound file could be played back varying with the vehicle speed, for more realistic entry and exit from stations etc. Still, mustn't grumble, eh..?
Ich habe zusätzlichen Dampf vom Ventiltrieb hinzugefügt; Bonus..! Ich wünschte nur, dass die Sounddatei abhängig von der Fahrzeuggeschwindigkeit abgespielt werden könnte, um eine realistischere Ein- und Ausfahrt aus Bahnhöfen usw. zu ermöglichen. Trotzdem darf man nicht meckern, oder?
Douglas
-
1 hour ago, 220hotwheels said:
... Only just noticed that there is the same wheels issue with The Flying Scotsmen...
Both fixed; may be downloaded from the Google Drive. Cheers.
Beide behoben; kann von Google Drive heruntergeladen werden. Prost.
Douglas
-
28 minutes ago, 220hotwheels said:
... there is the same wheels issue with The Flying Scotsmen...
... and maybe the same solution, then, as they are the same wheel set (just a slight advance for the forward bogie for the Mallard, that's all...)..! I haven't looked at the cause yet; soon, though.
Douglas
-
Bearbeitet von Dad3353
The Mallard is now ready, animated, with its tender, and can be found in 'mbe' format on my Google Drive, i the same way as the Flying Scotsman.
Die Stockente ist jetzt fertig, animiert, mit ihrem Tender und kann im „mbe“-Format auf meinem Google Drive gefunden werden, genau wie der Flying Scotsman.
Douglas

-
I just happened to have a spare body lying around; seemed a shame to waste it, so...
Ich hatte zufällig einen Ersatzkörper herumliegen; Es schien mir eine Schande, es zu verschwenden, also...
I'll say again : the original file is from SketchFab, created by one 'Timblewee'. I have tried to contact this person in the past, but have not had any reply. He does some really splendid models, which are a delight to convert. The trial above is simply popping the Mallard basic body over the Flying Scotsman running gear, as a test. I shall clean it up to get a better-detailed Mallard, with its correct tender, shortly.
Ich sage es noch einmal: Die Originaldatei stammt von SketchFab und wurde von einem gewissen „Timblewee“ erstellt. Ich habe in der Vergangenheit versucht, diese Person zu kontaktieren, habe aber keine Antwort erhalten. Er macht einige wirklich großartige Modelle, deren Umbau eine Freude ist. Der obige Versuch besteht einfach darin, die Mallard-Grundkarosserie testweise über das Flying Scotsman-Fahrwerk zu stülpen. Ich werde es in Kürze aufräumen, um eine detailliertere Stockente mit dem richtigen Tender zu erhalten.
Douglas
-
Bearbeitet von Dad3353
1 hour ago, 220hotwheels said:... Any chance of you emailing me the *.mbe files. I notice the carriages seem to have grey doors. Is this for any specific reason or could they be in the same matching green as the rest of the carriage?...
Pete...
Here's the link to my Google Drive, with the loco, tender and coach...
Hier ist der Link zu meinem Google Drive, mit Lok, Tender und Wagen ...
Let me know if there are issues..? The doors in the photos I consulted, for GWS livery, seem to be mostly this pale grey. Of course, any colour could be used; the doors do stand out more like this, though. It could be changed, or I could make a variant..?
Meanwhile, here's a screenshot of some passengers 'snapped' to the seats. There are basically two in the Catalogue that fit well : those for the Unimog, and those for the Jaguar. Both of these have variants, so it's possible to have a reasonable passenger load, I think.Lassen Sie mich wissen, wenn es Probleme gibt.? Die Türen auf den Fotos, die ich für die GWS-Lackierung herangezogen habe, scheinen größtenteils dieses blasse Grau zu haben. Natürlich könnte jede Farbe verwendet werden; Die Türen fallen jedoch eher so auf. Es könnte geändert werden, oder ich könnte eine Variante erstellen.?
In der Zwischenzeit ist hier ein Screenshot einiger Passagiere, die auf den Sitzen „geschnappt“ sind. Grundsätzlich gibt es zwei im Katalog, die gut passen: die für den Unimog und die für den Jaguar. Für beide gibt es Varianten, daher ist es meiner Meinung nach möglich, eine angemessene Passagierlast zu erreichen.Douglas

Edit : I've added and all-green variant to the coach.Bearbeiten: Ich habe dem Trainer eine komplett grüne Variante hinzugefügt.
-
A couple of tiny details that I've noticed, to be rectified, but it's not going to get much better than this...
Ein paar kleine Details, die mir aufgefallen sind, müssen korrigiert werden, aber viel besser wird es nicht werden ...
I shall incorporate a few contact points in the carriage, to make the placing of seated passengers easier. I looked in the Catalogue, but only found a couple of compatible seated passengers; I have a fair number myself, but without the necessary CP, so I'll bring these up to date and make them available, if they could be useful. I have taken the choice of placing the seat CP in the middle of the seat, at the level of the top of the seat squab, and the CP for the passengers is in the middle, at the base of the body.
Anyway, that's just details; here's the loco with animated valve gear. I doubt that any 'real' loco made like this would run, but it's the best I could do with the method compatible with MBS.Ich werde einige Kontaktpunkte in den Wagen einbauen, um das Platzieren sitzender Passagiere zu erleichtern. Ich habe im Katalog nachgeschaut, aber nur ein paar kompatible sitzende Passagiere gefunden; Ich habe selbst eine ganze Menge, aber ohne die nötigen CP, also werde ich diese auf den neuesten Stand bringen und zur Verfügung stellen, wenn sie nützlich sein könnten. Ich habe mich dafür entschieden, den Sitz-CP in der Mitte des Sitzes, auf Höhe der Sitzoberkante, zu platzieren, und den CP für die Passagiere in der Mitte, an der Unterseite der Karosserie.
Wie auch immer, das sind nur Details; Hier ist die Lok mit animiertem Ventiltrieb. Ich bezweifle, dass eine so gebaute „echte“ Lok funktionieren würde, aber es ist das Beste, was ich mit der mit MBS kompatiblen Methode erreichen konnte.Douglas


Testing Road Routes (they're new to me...)...
in [International] Problems and solutions
Geschrieben
Pete...
I see that your solution has worked, in that the offending CP is no longer triggered, but, firstly, I have no idea how you got that new route to come into being, and, secondly, it would all be for nothing if that CP was, for any reason, triggered later. I don't really need the Bus to get to WP1; I really need to understand why the CP didn't obey what I thought was a valid instruction. Our friend Goetz has replied, with an explanation and a cure, which works well, but stimulates further questions which I'll bother him with.
I'd like to know, just the same, what you did (in words of less than one syllable, please...) to establish that new route, and wonder what, if anything, those extra CP that have appeared are for. I knew that there would be a 'learning curve' to this 'Routes' novelty; I didn't expect it to be quite so opaque, though. More stuff to ruminate; it's all good for the little grey cells, I'm told. Thanks; onward and upward...
Ich sehe, dass Ihre Lösung funktioniert hat, da der betreffende CP nicht mehr ausgelöst wird, aber erstens habe ich keine Ahnung, wie Sie diese neue Route zustande gebracht haben, und zweitens wäre alles umsonst, wenn dieser CP wurde aus irgendeinem Grund später ausgelöst. Ich brauche den Bus nicht wirklich, um zu WP1 zu gelangen; Ich muss wirklich verstehen, warum der CP einer meiner Meinung nach gültigen Anweisung nicht Folge geleistet hat. Unser Freund Goetz hat geantwortet, mit einer Erklärung und einem Heilmittel, was gut funktioniert, aber weitere Fragen anregt, mit denen ich ihn belästigen werde.
Ich würde trotzdem gerne wissen, was Sie getan haben (bitte in Worten mit weniger als einer Silbe ...), um diese neue Route zu etablieren, und frage mich, wozu die zusätzlichen CP, die aufgetaucht sind, wenn überhaupt, dienen. Ich wusste, dass es bei dieser „Routen“-Neuheit eine „Lernkurve“ geben würde; Allerdings hätte ich nicht erwartet, dass es so undurchsichtig ist. Mehr Dinge zum Grübeln; Es sei alles gut für die kleinen grauen Zellen, wurde mir gesagt. Danke; vorwärts und aufwärts...
Douglas