Dad3353
Mitglieder
-
Benutzer seit
-
Letzter Besuch
Alle erstellten Inhalte von Dad3353
-
 Here's the Coaches 1 and 2 ... Coac_1_2.zip
 -
@arnyto : Here's some 'zip' files with the three Palette files, and the Blender file for the Front, and the other Vehicles, to play around with... Sent in three posts; too big for only one... Enjoy... Fron_Rear_Pale.zip
-
I've attached a Pdf file, which (I hope...) will show how I go about applying Materials to models from a Palette file. All English, I'm afraid; if that poses problems I could Google-translate if required. There may be questions; I'll try to reply as best I can. There are other methods; this is (one of...) mine... Blen_Pale_For MBS.pdf
-
Yes, I mentioned that in my post. They were working correctly before I got the coupling to work, so I'll have to go back and check what I've done wrong with the pivots when fixing the coupling. I think it's the _Wheelset0 which is wrong, as I moved it back; I should have kept it in the centre of the bellows. As for textures : I will have to explain how I do my UV material; it doesn't lend itself easily to material swapping. I can't do the 'wrapping' technique, to apply a whole skin to a vehicle. I use instead a file with multi-coloured squares, one for each colour, and drag the UV maps to the square I need. I'll do a separate post, with pictures, to illustrate. Back later... Ja, das habe ich in meinem Beitrag erwähnt. Sie haben richtig funktioniert, bevor ich die Kupplung zum Laufen gebracht habe, also muss ich zurückgehen und überprüfen, was ich beim Befestigen der Kupplung mit den Drehpunkten falsch gemacht habe. Ich denke, es ist das _Wheelset0, das falsch ist, als ich es zurückgeschoben habe; Ich hätte es in der Mitte des Balgs halten sollen. Was Texturen betrifft: Ich muss erklären, wie ich mein UV-Material mache; es eignet sich nicht leicht für Materialaustausch. Ich kann die Wickeltechnik nicht anwenden, um eine ganze Haut auf ein Fahrzeug aufzutragen. Ich verwende stattdessen eine Datei mit mehrfarbigen Quadraten, eines für jede Farbe, und ziehe die UV-Karten auf das gewünschte Quadrat. Ich werde einen separaten Beitrag mit Bildern verfassen, um dies zu veranschaulichen. Ich bin später zurück... Oui, je l'ai mentionné dans mon message. Ils fonctionnaient correctement avant que l'accouplement ne fonctionne, je vais donc devoir revenir en arrière et vérifier ce que j'ai mal fait avec les pivots lors de la fixation de l'accouplement. Je pense que c'est le _Wheelset0 qui est faux, car je l'ai reculé; J'aurais dû le garder au centre du soufflet. Quant aux textures: je devrai expliquer comment je fais mon matériau UV; il ne se prête pas facilement à l'échange de matériaux. Je ne peux pas faire la technique du «wrapping», pour appliquer une peau entière sur un véhicule. J'utilise à la place un fichier avec des carrés multicolores, un pour chaque couleur, et je fais glisser les cartes UV vers le carré dont j'ai besoin. Je ferai un article séparé, avec des photos, pour illustrer. Revenir plus tard...
-
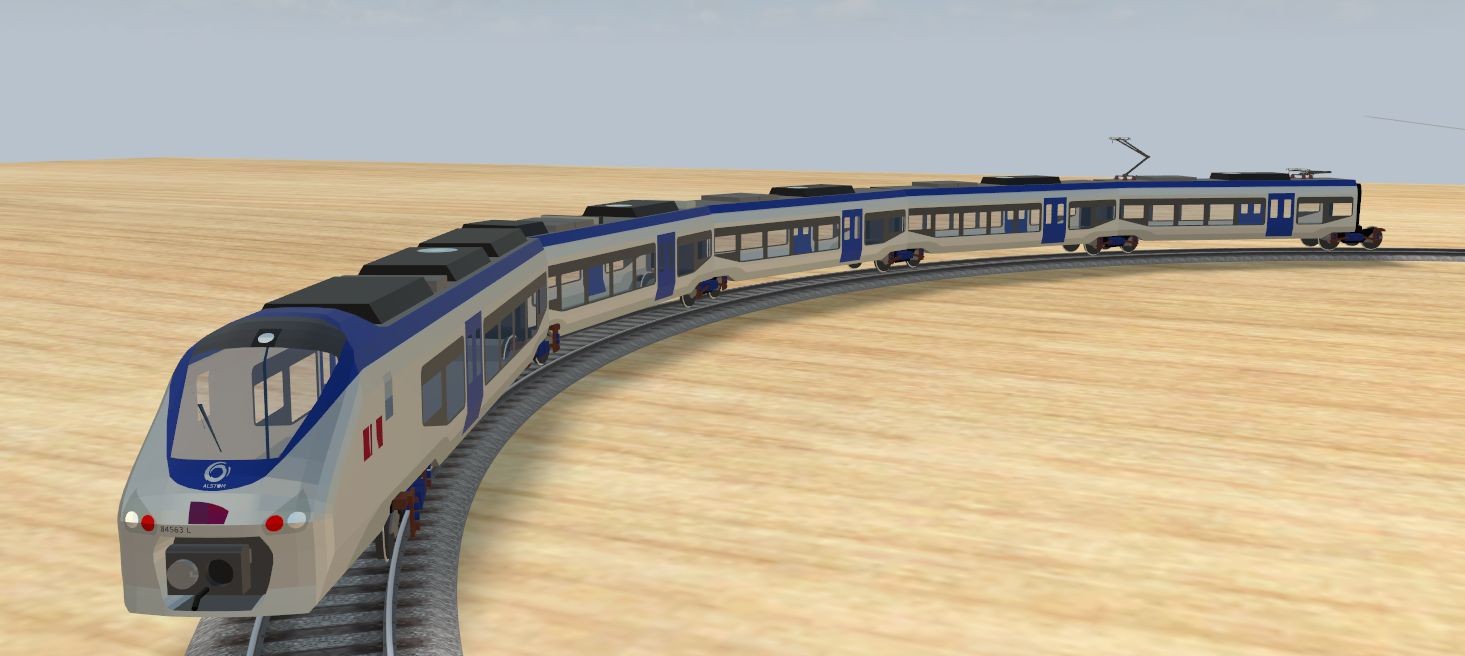
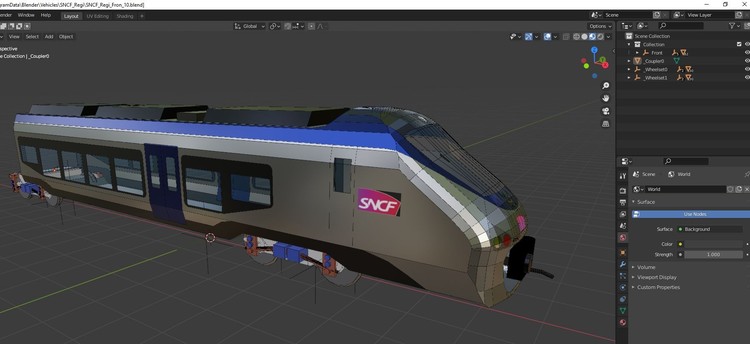
The couplings work correctly now (thanks again, @BahnLand...). Still more work on the bogie pivot points, but it's getting better. Only the loco has seats (and passengers from the Catalogue...) for now, but I now know how to do the seating. I've lowered the bodywork, following the suggestions, but don't look too closely at all the scale details, as they are not there, nor likely to be..! There are two Vehicles : the Loco, with the rear loco as its Variant, and a Coach, with three more variants. Die Kupplungen funktionieren jetzt korrekt (nochmals vielen Dank, @BahnLand ...). Noch mehr Arbeit an den Drehpunkten des Drehgestells, aber es wird besser. Im Moment hat nur die Lok Sitzplätze (und Passagiere aus dem Katalog ...), aber ich weiß jetzt, wie man die Sitzplätze macht. Ich habe die Karosserie gemäß den Vorschlägen abgesenkt, aber die Details der Waage nicht zu genau betrachtet, da sie nicht vorhanden sind und wahrscheinlich auch nicht ..! Es gibt zwei Fahrzeuge: die Lok mit der hinteren Lok als Variante und einen Reisebus mit drei weiteren Varianten. Les accouplements fonctionnent correctement maintenant (merci encore, @BahnLand ...). Encore plus de travail sur les points de pivot du bogie, mais ça va mieux. Seule la locomotive a des sièges (et des passagers du catalogue ...) pour l'instant, mais je sais maintenant comment faire les sièges. J'ai abaissé la carrosserie, en suivant les suggestions, mais ne regardez pas de trop près tous les détails de l'échelle, car ils ne sont pas là, ni susceptibles de l'être ..! Il existe deux véhicules: la Loco, avec la locomotive arrière comme variante, et un Coach, avec trois autres variantes.
-
Well..! If after all that I still get it wrong, I'll deserve the title of Jackass..! Thanks for the details; often enough it's these little things that have me scratching my head for hours. As for the coupling 'outside' the vehicle : maybe useful for a water-skier..? Gut..! Wenn ich es nach all dem immer noch falsch verstehe, verdiene ich den Titel Jackass ..! Danke für die Details; oft genug sind es diese kleinen Dinge, die mich stundenlang am Kopf kratzen lassen. Was die Kupplung "außerhalb" des Fahrzeugs betrifft: Vielleicht nützlich für einen Wasserskifahrer ..?
-
Good evening, @BahnLand I'm editing this post as, after careful scrutiny of your rich explanation above, I've found the problem with my couplings. Stupidly simple, too, of course; I had reversed the numbering, having, wrongly, '0' for the tractor and '1' for the trailer. Once I'd put the correct name for the Couplers (and assured that they were at the same position in space...), the vehicles couple precisely. I liked the method of getting better geometry on the curves, but, for now at least, will stick to the simple method, and spend more time fitting seats to the train. It's good to know that it can be improved, though, and may well serve in the future. Thanks again, then; meanwhile... Keep well, stay safe. Guten Abend, @BahnLand Ich bearbeite diesen Beitrag, da ich nach sorgfältiger Prüfung Ihrer ausführlichen Erklärung oben das Problem mit meinen Kupplungen gefunden habe. Natürlich auch dumm; Ich hatte die Nummerierung umgekehrt und fälschlicherweise '0' für den Traktor und '1' für den Anhänger. Sobald ich den richtigen Namen für die Kupplungen eingegeben hatte (und versicherte, dass sie sich an derselben Position im Weltraum befanden ...), koppelten die Fahrzeuge genau. Ich mochte die Methode, um eine bessere Geometrie in den Kurven zu erzielen, aber ich werde mich zumindest vorerst an die einfache Methode halten und mehr Zeit damit verbringen, Sitze an den Zug anzupassen. Es ist jedoch gut zu wissen, dass es verbessert werden kann und möglicherweise in Zukunft eingesetzt wird. Nochmals vielen Dank. inzwischen... Bleib gut, bleib sicher. Douglas
-
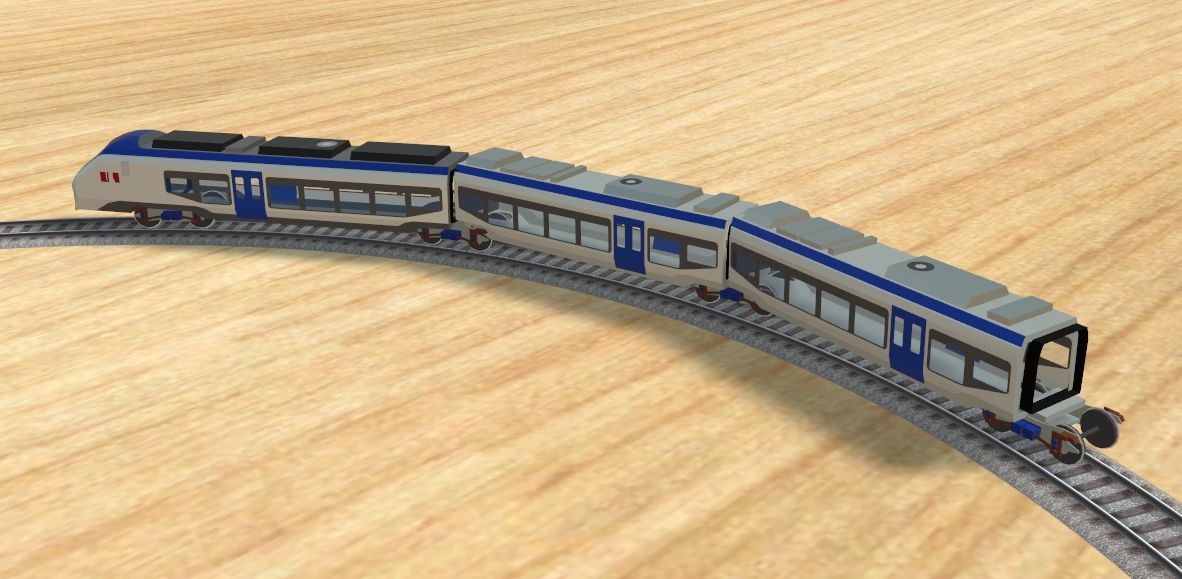
Getting there, slowly ... Langsam dorthin gelangen ...

-
I've not had any luck with the 'SNCF' logos, either. They show correctly in Blender, but MBS seems to not understand the scale of them, and I don't know why. I'll start a separate topic on the subject of Palettes, maybe... Ich hatte auch kein Glück mit den 'SNCF'-Logos. Sie werden in Blender korrekt angezeigt, aber MBS scheint deren Umfang nicht zu verstehen, und ich weiß nicht warum. Ich werde ein separates Thema zum Thema Paletten beginnen, vielleicht ...
-
I'll try a dummy _Wheelset0 object at the same spot as the present _Coupler0 at the front of the Coach. I shouldn't need _CP's, except for seats, if I get around to installing seats..! I've been consulting the Wiki pages quite a lot of late..! Ich werde ein Dummy-_Wheelset0-Objekt an derselben Stelle wie das aktuelle _Coupler0 an der Vorderseite des Coach versuchen. Ich sollte keine _CPs brauchen, außer für Sitze, wenn ich dazu komme, Sitze zu installieren ..! Ich habe die Wiki-Seiten in letzter Zeit ziemlich oft konsultiert ..!
-
Thanks, Max, but, as can be seen, this train has shared bogies. The _Wheelset1 of the loco is also the _Wheelset0 of the coach, and there will be three more behind to do, with the same 'shared bogie' principle. Maybe a 'virtual' _Wheelset0 for the coach, invisible..? I don't know how to do that yet. I'll try a 'dummy' bogie, to try to fool the System. Hmm... Danke, Max, aber wie man sehen kann, hat dieser Zug Drehgestelle geteilt. Das _Wheelset1 der Lok ist auch das _Wheelset0 des Wagens, und es werden drei weitere dahinter stehen, mit dem gleichen "Shared Bogie" -Prinzip. Vielleicht ein 'virtuelles' _Wheelset0 für den Trainer, unsichtbar ..? Ich weiß noch nicht, wie ich das machen soll. Ich werde ein "Dummy" -Bogie versuchen, um das System zu täuschen. Hmm ...
-
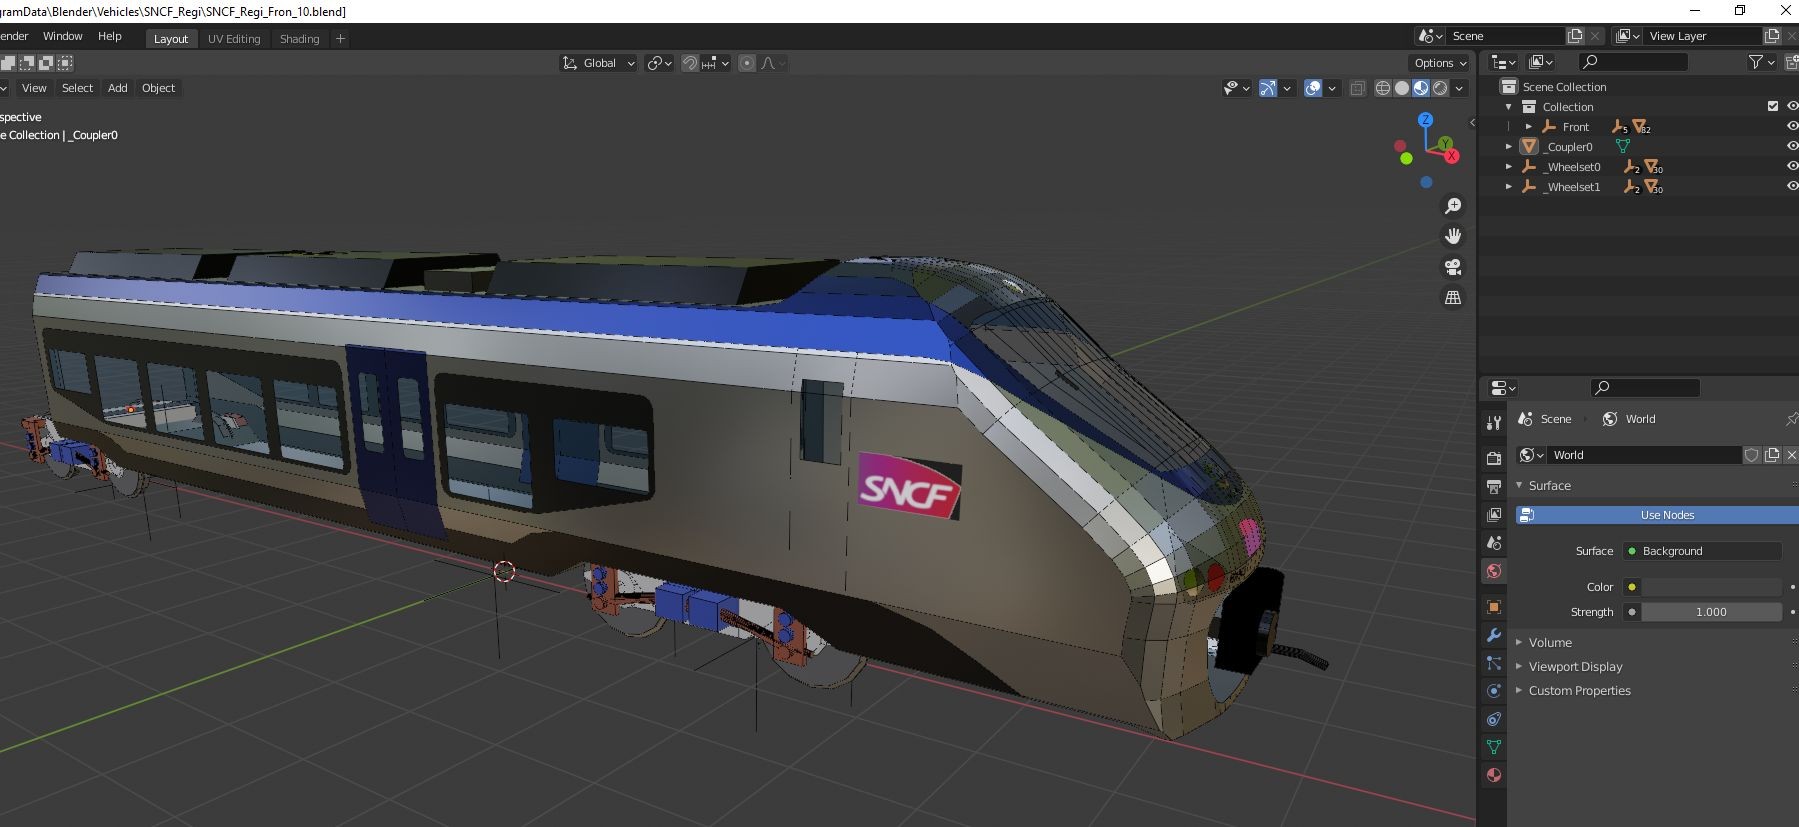
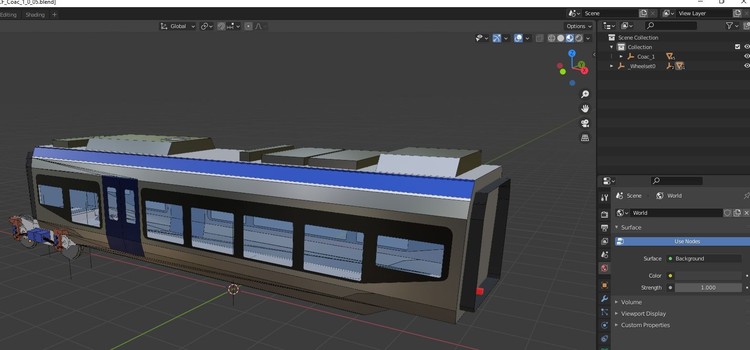
Another question, please..? The Front of the train works, with pivoting bogies, and the coupling works, albeit a bit approximative. The Coach has the same bogie, but this does not pivot. The Front and the Coach have the same hierarchy; I've tried naming the Coach bogie as _Wheelset0, _Wheelset1 and _Wheelset2, but it makes no difference. Something stupid is missing, but what..? Here's pictures of the phenomenon and the hierarchies. Any clues, please..? Noch eine Frage, bitte ..? Die Vorderseite des Zuges funktioniert mit schwenkbaren Drehgestellen, und die Kupplung funktioniert, wenn auch etwas ungefähr. Der Coach hat das gleiche Drehgestell, das sich jedoch nicht dreht. Die Front und der Coach haben die gleiche Hierarchie; Ich habe versucht, das Coach-Drehgestell als _Wheelset0, _Wheelset1 und _Wheelset2 zu bezeichnen, aber es macht keinen Unterschied. Es fehlt etwas Dummes, aber was ..? Hier sind Bilder des Phänomens und der Hierarchien. Irgendwelche Hinweise bitte ..?

-
Please excuse the interruption, and ignore if I've not fully understood, but I think I would approach this differently. I assume that there's a start point for this incline, and an end, apparently 3.8° from the start. I would place my flat-to-the-board start rail, then my flat-in-the-air end rail, then join them with the inclined rail. If the start doesn't move, nor the end, the joining rail will be at 3.8°, I think. Is this any use, or have I not understood..? Bitte entschuldigen Sie die Unterbrechung und ignorieren Sie sie, wenn ich sie nicht vollständig verstanden habe, aber ich denke, ich würde dies anders angehen. Ich gehe davon aus, dass es einen Startpunkt für diese Steigung und ein Ende gibt, anscheinend 3,8 ° vom Start entfernt. Ich platzierte meine flache Startschiene, dann meine flache Endschiene und verband sie mit der geneigten Schiene. Wenn sich weder der Anfang noch das Ende bewegen, liegt die Verbindungsschiene bei 3,8 °, denke ich. Ist das irgendein Nutzen oder habe ich nicht verstanden ..?
-
Yes, it's with that, and other stuff found here and there, that I managed to get a handle on it. The Blender screens threw me, but it's working now, albeit in primitive fashion and after an evening's worth of trial and error, so thanks for the head-start. Still more questions, of course..! Ja, damit und mit anderen Dingen, die hier und da gefunden wurden, habe ich es geschafft, es in den Griff zu bekommen. Die Blender-Bildschirme haben mich umgehauen, aber es funktioniert jetzt, wenn auch primitiv und nach einem abendlichen Versuch und Irrtum. Vielen Dank für den Vorsprung. Noch mehr Fragen natürlich ..!
-
Progress, just the same. Here's the current version. Not very pretty (yet...), but rotating wheels, pivoting bogies, transparent glass, and just about to scale... Fortschritt trotzdem. Hier ist die aktuelle Version. Nicht sehr hübsch (noch ...), aber rotierende Räder, schwenkbare Drehgestelle, transparentes Glas und kurz vor dem Maßstab ... Next will be the second coach, roughed out like the loco, just to see how they can couple. Question : with their shared bogies, do these trains uncouple at all..? I'll have to see about some sort of interior, too. Just a jpg..? Scale seats..? Folks looking through the windows..? Hmm... Als nächstes kommt der zweite Trainer, der wie die Lok aufgeraut ist, um zu sehen, wie sie koppeln können. Frage: Entkoppeln sich diese Züge mit ihren gemeinsamen Drehgestellen überhaupt? Ich muss mich auch um eine Art Interieur kümmern. Nur ein JPG ..? Sitze skalieren ..? Leute, die durch die Fenster schauen ..? Hmm ...
-
Next question a bit later on this evening, probably..! Nächste Frage etwas später an diesem Abend, wahrscheinlich ..!
-
@maxwei ... Is this correct..? Ist das richtig..?
-
Thanks for that. I'll re-arrange and post another screenshot; we're getting close. Dank dafür. Ich werde einen weiteren Screenshot neu arrangieren und veröffentlichen. wir kommen näher.
-
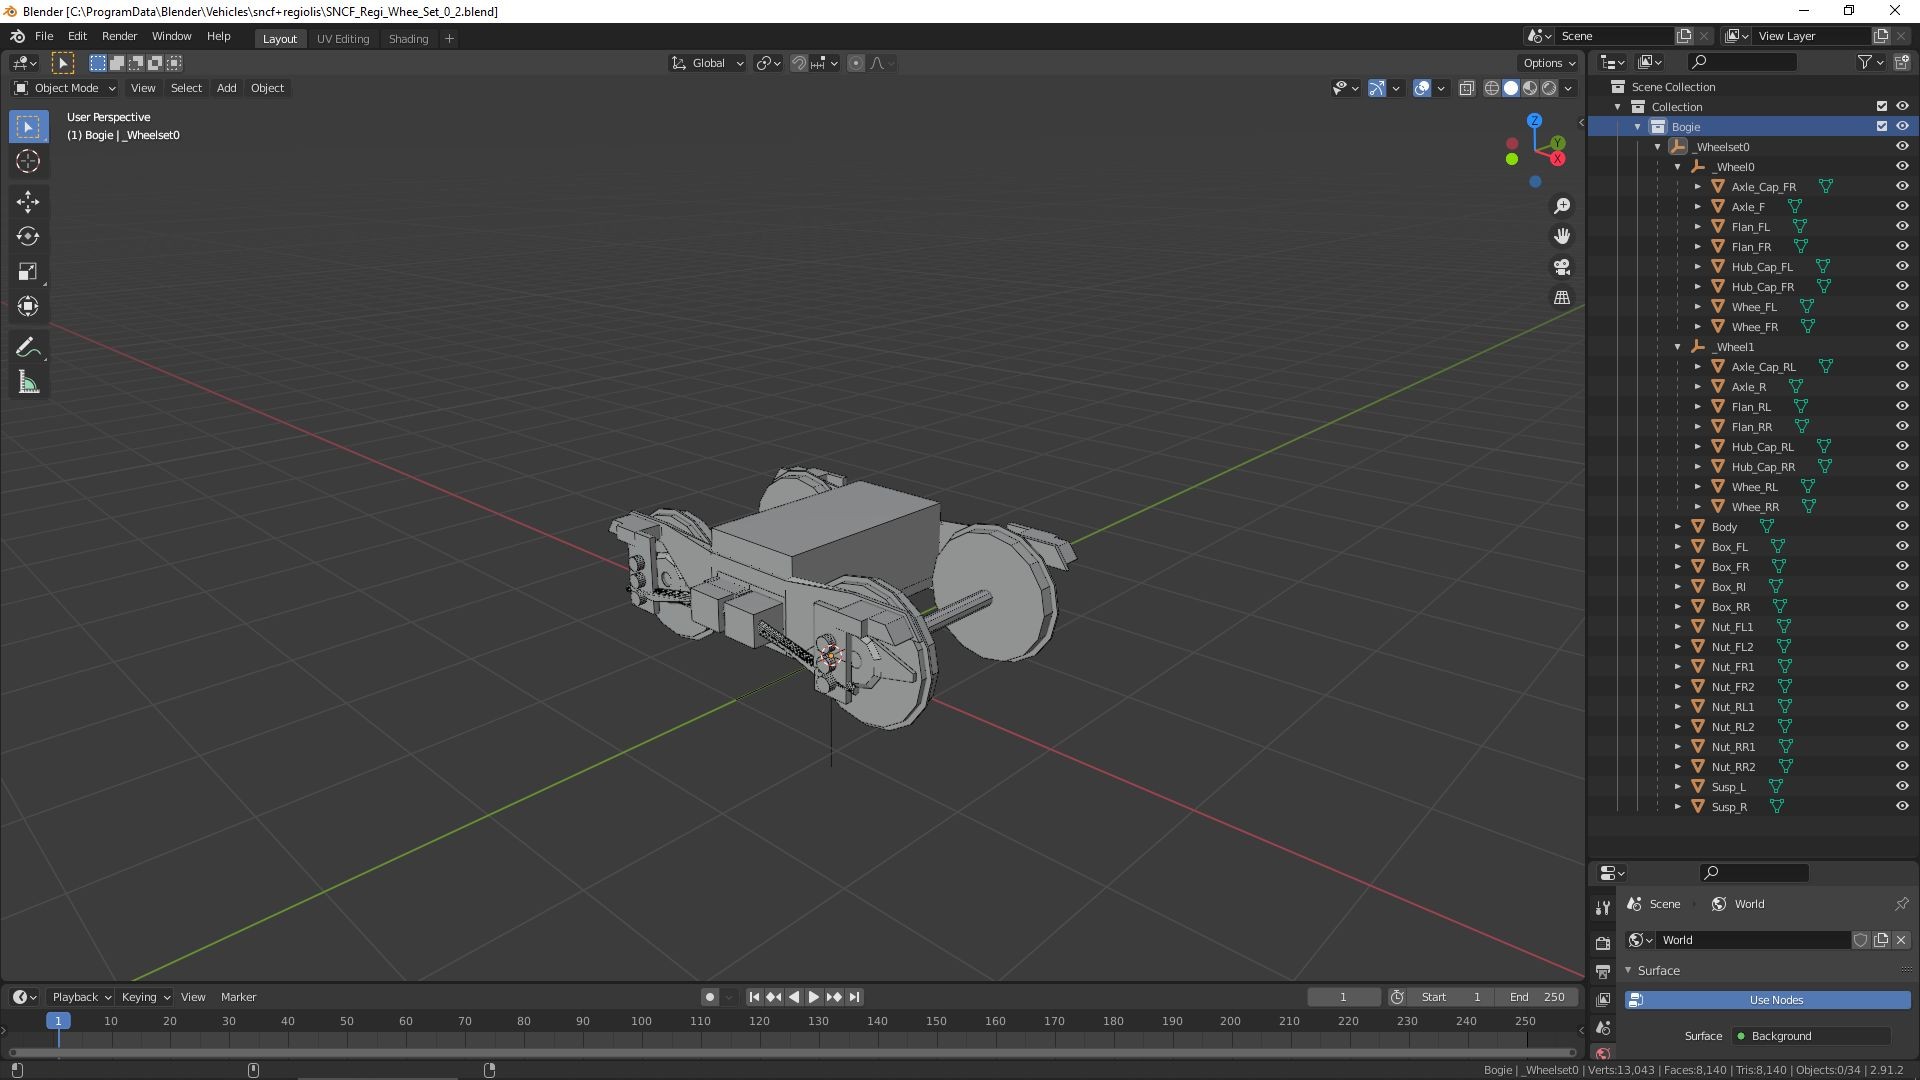
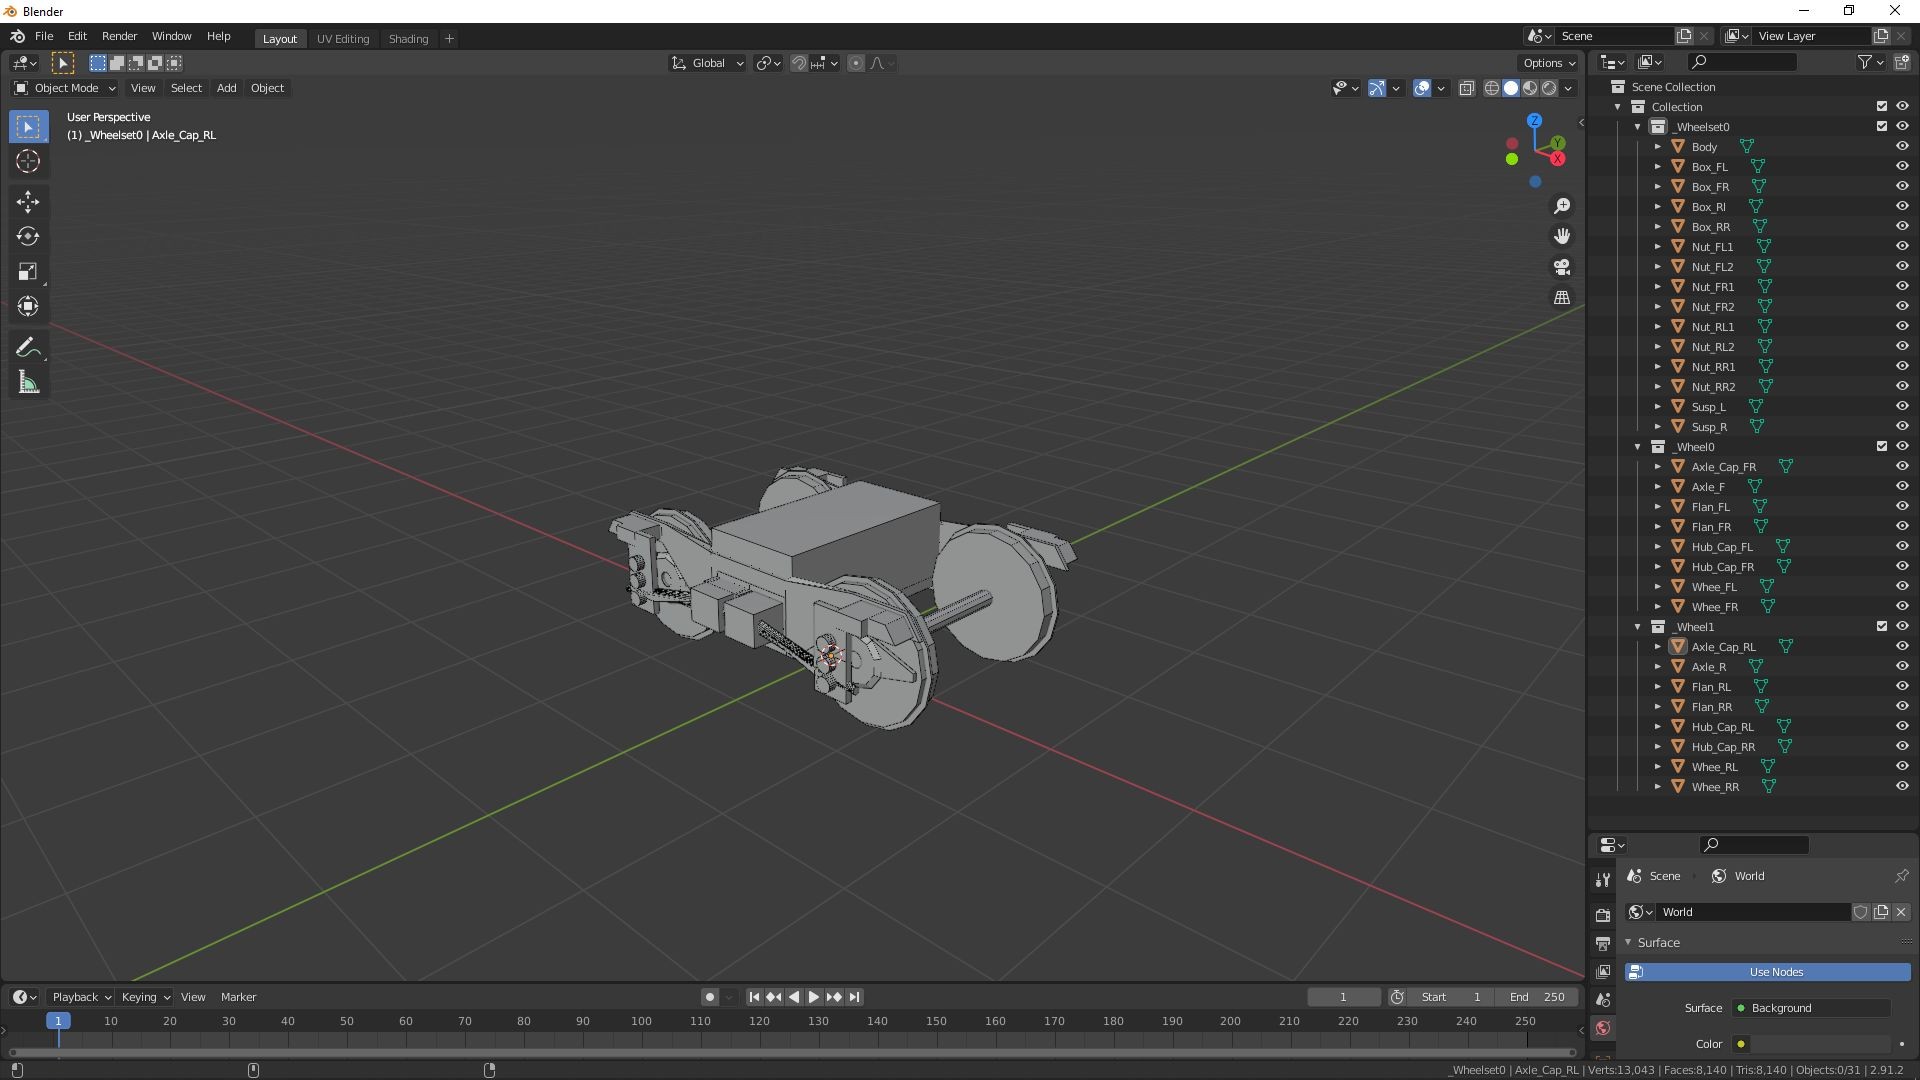
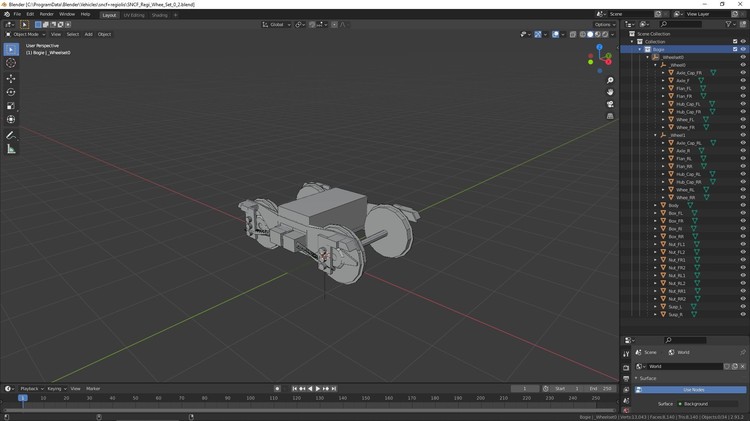
Good afternoon... I've been studying the Wiki and other documents concerning Wheelsets and the like, but have some doubts applying this to the version of Blender I'm using (2.91...). The screenshots I've seen are for an older version, and fuzzy. I see the general principle (I think...), but would like confirmation or correction in my interpretation. Here's a screenshot of my bogie, in which I hope one may see the hierarchy (on the right...). Do I have to forget the 'Collection' notion in Blender and make the _Wheel0 and _Wheel1 simply subservient to the _Wheelset body..? Warning : Other questions will follow once I have this element in place..! Guten Tag... Ich habe das Wiki und andere Dokumente zu Radsätzen und dergleichen studiert, habe aber einige Zweifel, dass dies auf die von mir verwendete Version von Blender (2.91 ...) angewendet wird. Die Screenshots, die ich gesehen habe, sind für eine ältere Version und unscharf. Ich sehe das allgemeine Prinzip (ich denke ...), möchte aber eine Bestätigung oder Korrektur in meiner Interpretation. Hier ist ein Screenshot meines Drehgestells, in dem ich hoffe, dass man die Hierarchie sehen kann (rechts ...). Muss ich den Begriff 'Sammlung' in Blender vergessen und _Wheel0 und _Wheel1 einfach dem _Wheelset-Körper unterwerfen? Warnung: Weitere Fragen werden folgen, sobald ich dieses Element installiert habe ..!

-
I'm doing much the same, using the Regiolis as a base, but, as you say, it's not simple. I would recommend starting with very basic models, just to get started with the modelling software. A simple flat-bed truck with a pair of axles is already an achievement. Add little parts, making a cubic box van, then try to have a curved roof, for instance. The detailed models you've found are not constructed in an 'MBS-friendly' manner; it's quicker, for those already experienced, to start again. I'm learning much about Blender from the Regiolis, but not so much about modelling. Ich mache das Gleiche mit der Regiolis als Basis, aber wie Sie sagen, ist es nicht einfach. Ich würde empfehlen, mit sehr einfachen Modellen zu beginnen, um mit der Modellierungssoftware zu beginnen. Ein einfacher Tieflader mit zwei Achsen ist bereits eine Leistung. Fügen Sie kleine Teile hinzu, machen Sie einen kubischen Kastenwagen und versuchen Sie dann zum Beispiel, ein gekrümmtes Dach zu haben. Die detaillierten Modelle, die Sie gefunden haben, sind nicht "MBS-freundlich" konstruiert. Für diejenigen, die bereits Erfahrung haben, ist es schneller, von vorne zu beginnen. Ich lerne viel über Blender von der Regiolis, aber nicht so viel über das Modellieren. Je fais à peu près la même chose, en utilisant la Regiolis comme base, mais, comme vous le dites, ce n'est pas simple. Je recommanderais de commencer avec des modèles très basiques, juste pour commencer avec le logiciel de modélisation. Un simple camion plateau avec une paire d'essieux est déjà une réussite. Ajoutez de petites pièces, faites un fourgon cubique, puis essayez d'avoir un toit incurvé, par exemple. Les modèles détaillés que vous avez trouvés ne sont pas construits de manière «compatible MBS»; c'est plus rapide, pour ceux déjà expérimentés, de recommencer. J'apprends beaucoup sur Blender du Regiolis, mais pas tellement sur la modélisation.
-
Merci pour des photos; je les ai stockées pour l'instant. Ils seront utile plus tard (beaucoup plus tard..! ) Thanks for the photos; I've tucked them away for now, but they'll be useful later (much, much later..! ) Danke für die Fotos; Ich habe sie vorerst verstaut, aber sie werden später nützlich sein (viel, viel später ..! )
-
Thanks, Herman; I wish that that was all there was left to do ..! The 'dae' format that Blender has imported has brought a whole lot of 'groups' and other objects which, for me, are difficult to manipulate. Getting to grips with these objects, to know what is useful and what is not, is a major task in itself (and very instructive ...); adding new functionality can only begin once the present puzzle has been unraveled. There are sure to be questions later; that's when the fun really starts ..! Danke, Herman; Ich wünschte, das wäre alles, was noch zu tun wäre ..! Das 'dae'-Format, das Blender importiert hat, hat eine ganze Reihe von' Gruppen 'und anderen Objekten hervorgebracht, die für mich schwer zu manipulieren sind. Sich mit diesen Objekten auseinanderzusetzen, zu wissen, was nützlich ist und was nicht, ist eine große Aufgabe an sich (und sehr lehrreich ...); Das Hinzufügen neuer Funktionen kann erst beginnen, wenn das vorliegende Rätsel gelöst wurde. Es wird sicher später Fragen geben; Dann fängt der Spaß erst richtig an ..! Thanks, but hold your horses, this is going to be a succession of baby steps, and this is just the first. I was very pleased to have found a means of exporting the materials from SKU2017 in a format I can use as a palette for UV in Blender. Getting more textures will come later; firstly get this one mastered ..! If you've a color photo or two, it might give me food for thought as I continue, but there will be no instant miracle. Danke, aber halten Sie Ihre Pferde, dies wird eine Folge von kleinen Schritten sein, und dies ist nur der erste. Ich war sehr erfreut, ein Mittel gefunden zu haben, um die Materialien von SKU2017 in einem Format zu exportieren, das ich als Palette für UV in Blender verwenden kann. Weitere Texturen erhalten Sie später. erstmal diesen meistern lassen ..! Wenn Sie ein oder zwei Farbfotos haben, gibt es mir vielleicht Anlass zum Nachdenken, aber es wird kein sofortiges Wunder geben.
-
@arnyto ... Not very elegant, but it's a start. I managed to separate the front from the rest, with its bogies, and get it into MBS. Here it's sharing a small oval with a catalogue 'ICE', just for comparison. Much left to be done (get the scale right, pivoting bogies, transparent glass, better livery...), but I'm pleased with my evening's effort, in which I learned much. Nicht sehr elegant, aber es ist ein Anfang. Ich habe es geschafft, die Front mit ihren Drehgestellen vom Rest zu trennen und sie in MBS zu bringen. Hier wird zum Vergleich ein kleines Oval mit einem Katalog 'ICE' geteilt. Es bleibt noch viel zu tun (die Waage richtig einstellen, Drehgestelle schwenken, transparentes Glas, bessere Lackierung ...), aber ich bin zufrieden mit der Anstrengung meines Abends, in der ich viel gelernt habe.
-
I'm familiar enough with the TGV (I'm in France...), but I'm a beginner with Blender, and worse still with SketchUp. I like to learn through challenges, though. For an expert (or even someone competent...) it'd be much faster to create from scratch. I'll see how it goes... Ich bin mit dem TGV vertraut genug (ich bin in Frankreich ...), aber ich bin ein Anfänger mit Blender und noch schlimmer mit SketchUp. Ich lerne jedoch gerne durch Herausforderungen. Für einen Experten (oder sogar jemanden, der kompetent ist ...) wäre es viel schneller, von Grund auf neu zu erstellen. Ich werde sehen, wie es geht ...
-
A good question. I've downloaded this, in both skp and dae format, In Sketchup 2017 it looks splendid, but goodness knows how one manipulates it, to separate the coaches for instance, so as to have the train flexible in its length. Using Blender for the dae format, it comprises 347 'objects', named Sketchup001 to Sketchup347. Hmm... Very helpful. I'll have a look, just as an exercise, but it's not a simple task for an imbecile like me to enable this to run on MBS tracks. OK for a long straight, but at the first curve, catastrophe..! Eine gute Frage. Ich habe dies sowohl im skp- als auch im dae-Format heruntergeladen. In Sketchup 2017 sieht es großartig aus, aber meine Güte weiß, wie man es manipuliert, um beispielsweise die Busse zu trennen, damit der Zug in seiner Länge flexibel ist. Unter Verwendung von Blender für das dae-Format umfasst es 347 'Objekte' mit den Namen Sketchup001 bis Sketchup347. Hmm ... Sehr hilfreich. Ich werde es mir nur als Übung ansehen, aber für einen Idioten wie mich ist es keine einfache Aufgabe, dies auf MBS-Tracks laufen zu lassen. OK für eine lange Gerade, aber in der ersten Kurve Katastrophe ..!