


Dad3353
Mitglieder
-
Benutzer seit
-
Letzter Besuch
Alle erstellten Inhalte von Dad3353
-
 My latest conversion of a SketchFab model, created by gtw6039u1c. I've rearranged the textures into a single multi-texture file, and animated the wheels and piston linkages, using the '_AnimWheel' method. A fine model, for which I will now look for trucks. The re-modelling has taken two days over Christmas, whilst I have a heavy cold, so it has been a welcome distraction. Meine neueste Konvertierung eines SketchFab-Modells, erstellt von gtw6039u1c. Ich habe die Texturen in einer einzigen Multi-Textur-Datei neu angeordnet und die Räder und Kolbenverbindungen mit der '_AnimWheel'-Methode animiert. Ein feines Modell, für das ich jetzt LKWs suchen werde. Der Umbau hat über Weihnachten zwei Tage gedauert, während ich stark erkältet bin, also eine willkommene Ablenkung. Douglas
 -
It works, and works well. Thanks for the tip. Es funktioniert und funktioniert gut. Danke für den Tipp. Douglas
-
Klaus... You can put any word you like to define the animation. I chose 'Mixing' (from the verb : to mix...), but you would doubtless prefer the equivalent in German. It can be any word, and is only used in the display list of animations. Probably best to choose a short word, though; German words tend to extend beyond the capacity of IT systems..! I'm glad it's working as you wanted; well done for having worked it all out. Meanwhile : Best wishes for the festivities, and for the New Year. Sie können ein beliebiges Wort eingeben, um die Animation zu definieren. Ich habe 'Mixing' gewählt (vom Verb : to mix...), aber Sie würden zweifellos das Äquivalent auf Deutsch bevorzugen. Es kann ein beliebiges Wort sein und wird nur in der Anzeigeliste von Animationen verwendet. Wahrscheinlich ist es jedoch am besten, ein kurzes Wort zu wählen; Deutsche Wörter übersteigen in der Regel die Kapazität von IT-Systemen..! Ich bin froh, dass es so funktioniert, wie Sie es wollten. Gut gemacht, dass du alles geklappt hast. Inzwischen: Die besten Wünsche für die Feierlichkeiten und für das neue Jahr. Douglas
Be careful what you wish for... Sei vorsichtig mit deinen Wünschen...
Klaus... Here's another set of pictures, to illustrate the few steps to finish off your cement mixer... There are still some superfluous animation channels which would be best deleted (we are not animating 'scale' nor 'location' in this case...), so we select those channels and delete them. To have a smooth transition from end of animation to begin again, the last key-frame has to be a multiple of 360 (I've chosen 720, as it's close to the present 741...). We cannot simply change this value, we must place the cursor at this key-frame, select this key-frame and delete it. We then compose '720' is the 'Z' rotation box, and add this as a new 'Rotation' key-frame. The 'X' and 'Y' channels created are not needed; we select them and delete them. Just a personal choice, but I like to separate the models built from the scene items, such as Camera and Lights. Here, I've created a new Folder ('_Scene'...), which I place at the top of the list of Scenes, and drag the Camera and Lights into it. I can then hide the entire Scene items, which will then no longer be selected. I can reveal these items if I want to render the scene, but, until then, they can remain hidden. The next step would have been better taken right at the start, but, by coincidence, it's not too late. I select all the objects, with the shortcut 'A' (the '_Scene' items are not included, as they are hidden...), then, with 'Ctrl-A', I apply the 'Scale' transformation. This sets the Scale of each object selected to '1.0'. It doesn't have any effect in this case, but it's very important when there are other animation channels being used, and it's very difficult to remedy if the scale is wrong. It's best to do this step at the very beginning, once the objects are created and before creating an animation. If we look at the Normals of the Mixer, we see that some faces are coloured Red. These faces will be invisible to MBS; they are the hidden inside faces that a graphics card does not need to display. This is fine for a sealed box, for instance, but causes strange effects if the object can be seen from both sides. In this case, it's the bottom of the mixer bowl that will be invisible when seen from below, and the inside of the spout, too, will disappear. The remedy for this is to make any faces that may be seen from both side 'solid'. We select the objects concerned, in Edit mode, and use the Menu 'Face/Solidy Faces'. I have modified a little the Materials, to be consistent, but otherwise all is ready for final use..! Here's a video of the Mixer, and links to the Blender file on my Google Drive. One last thing... To have the animation properly controlled by MBS, we have to include an '.anim' file when we create the model in MBS. In this case, it's a simple one-line statement, giving the name and the start and end points. If we had multiple, separate, animations, there would be a line for each. More on that when we have multiple animations; I've included the relevant '.anim' file. I would recommend using shorter names, in general; in IT, it's not the poesy that counts, but the comprehension, which is aided by concision. Hope this helps... I forgot to add : The '.anim' file must be in the same folder as the '.gltf' file when creating the model in MBS, and must have the same name. Hier ist eine weitere Reihe von Bildern, um die wenigen Schritte zur Fertigstellung Ihres Betonmischers zu veranschaulichen ... Es gibt immer noch einige überflüssige Animationskanäle, die am besten gelöscht werden sollten (wir animieren in diesem Fall weder 'Maßstab' noch 'Ort' ...), also wählen wir diese Kanäle aus und löschen sie. Um einen reibungslosen Übergang vom Ende der Animation zum Neubeginn zu haben, muss der letzte Key-Frame ein Vielfaches von 360 sein (ich habe 720 gewählt, da es nahe an den aktuellen 741 liegt ...). Wir können diesen Wert nicht einfach ändern, wir müssen den Cursor auf dieses Schlüsselbild setzen, dieses Schlüsselbild auswählen und löschen. Dann erstellen wir „720“ als „Z“-Rotationsfeld und fügen dies als neuen „Rotation“-Keyframe hinzu. Die erstellten 'X'- und 'Y'-Kanäle werden nicht benötigt; wir selektieren sie und löschen sie. Nur eine persönliche Entscheidung, aber ich trenne gerne die gebauten Modelle von den Szenenelementen wie Kamera und Lichter. Hier habe ich einen neuen Ordner ('_Scene'...) erstellt, den ich oben in der Liste der Szenen platziere und die Kamera und die Lichter hineinziehe. Ich kann dann die gesamten Szenenelemente ausblenden, die dann nicht mehr ausgewählt werden. Ich kann diese Elemente sichtbar machen, wenn ich die Szene rendern möchte, aber bis dahin können sie verborgen bleiben. Der nächste Schritt wäre besser gleich zu Beginn gegangen, aber zufälligerweise ist es noch nicht zu spät. Ich wähle alle Objekte mit der Tastenkombination „A“ aus (die „_Scene“-Elemente sind nicht enthalten, da sie ausgeblendet sind …) und wende dann mit „Strg-A“ die Transformation „Scale“ an. Dadurch wird die Skalierung jedes ausgewählten Objekts auf „1,0“ gesetzt. Es hat in diesem Fall keine Wirkung, ist aber sehr wichtig, wenn andere Animationskanäle verwendet werden, und es ist sehr schwierig, eine falsche Skalierung zu beheben. Führen Sie diesen Schritt am besten gleich zu Beginn aus, nachdem die Objekte erstellt wurden und bevor Sie eine Animation erstellen. Wenn wir uns die Normals des Mixers ansehen, sehen wir, dass einige Gesichter rot gefärbt sind. Diese Gesichter sind für MBS unsichtbar; Sie sind die verborgenen Innenflächen, die eine Grafikkarte nicht anzeigen muss. Das ist zum Beispiel für eine versiegelte Schachtel in Ordnung, führt aber zu seltsamen Effekten, wenn das Objekt von beiden Seiten gesehen werden kann. In diesem Fall ist der Boden der Rührschüssel von unten unsichtbar und auch das Innere des Auslaufs verschwindet. Die Abhilfe dafür ist, alle Gesichter, die von beiden Seiten gesehen werden können, "fest" zu machen. Wir wählen die betreffenden Objekte im Bearbeitungsmodus aus und verwenden das Menü „Fläche/Solid Faces“. Ich habe die Materialien ein wenig modifiziert, um konsistent zu sein, aber ansonsten ist alles bereit für die endgültige Verwendung..! Hier ist ein Video des Mixers und Links zur Blender-Datei auf meinem Google Drive. Eine letzte Sache... Damit die Animation richtig von MBS gesteuert wird, müssen wir eine '.anim'-Datei einschließen, wenn wir das Modell in MBS erstellen. In diesem Fall ist es eine einfache einzeilige Anweisung, die den Namen und die Start- und Endpunkte angibt. Wenn wir mehrere separate Animationen hätten, gäbe es für jede eine Zeile. Mehr dazu, wenn wir mehrere Animationen haben; Ich habe die relevante '.anim'-Datei beigefügt. Ich würde generell empfehlen, kürzere Namen zu verwenden; In der IT zählt nicht die Poesie, sondern das Verständnis, das durch Prägnanz unterstützt wird. Hoffe das hilft... Ich habe vergessen hinzuzufügen: Die '.anim'-Datei muss sich beim Erstellen des Modells in MBS im selben Ordner wie die '.gltf'-Datei befinden und denselben Namen haben. Ceme_Mixe.zip Link to Blender files on Google Drive ... Douglas
Klaus... Excellent. There are only a few details to make it more efficient; it works well. I'll be busy this evening and tomorrow, but will be able to give a full explanation tomorrow evening, I hope. Meanwhile, here are a few things that you may like to note... The Materials for the mixer are too numerous, and are very similar. Is this intentional..? May I suggest, for the moment, using only one Material (grey colour...), and deleting all the others..? We can turn to the subject of Materials later, if the parts are to be coloured differently. To be incorporated into MBS, we will need, in the end, a simplified version, with less detail (an LOD1 or LOD2...). LOD stands for 'Level Of Detail', and allows MBS to display athe simplified version when it's further away from our vision, thus saving work for the graphics card of our PC. Not important right now, but, again, we'll come back to it later. I notice that there are Animations on all of the objects, not just the mixer blade. These are not required, and should be deleted. Similarly, for the mixer itself, there are animation channels that serve no purpose; we only want the 'Z' rotation, that's all. The other channels should be deleted. I'll explain how tomorrow. Once the animation finished, we want it to resume, in a loop. This implies that the last key-frame of the animation and the first key-frame have the object in the same position. Without this, there is a jump when the animation starts again. I saw that your last key-frame had a value of 741°; it works better if this value is changed to at least a multiple of 360. I set it to 720, and there's no longer a jump when looping. My last remark : I don't know if the rotation is at the speed that you require. It works well, but only you can say if it's the right speed for your needs. If it's right, that's fine; if the speed needs changing, we'll see how to do that. That's all for now; details tomorrow. Well done..! Exzellent. Es gibt nur ein paar Details, um es effizienter zu machen; Es funktioniert gut. Ich werde heute Abend und morgen beschäftigt sein, aber ich hoffe, morgen Abend eine vollständige Erklärung geben zu können. In der Zwischenzeit sind hier ein paar Dinge, die Sie vielleicht anmerken möchten ... Die Materialien für den Mischer sind zu zahlreich und sehr ähnlich. Ist das Absicht..? Darf ich für den Moment vorschlagen, nur ein Material (graue Farbe...) zu verwenden und alle anderen zu löschen...? Dem Thema Materialien können wir uns später zuwenden, wenn die Teile anders eingefärbt werden sollen. Um in MBS integriert zu werden, benötigen wir am Ende eine vereinfachte Version mit weniger Details (ein LOD1 oder LOD2 ...). LOD steht für „Level Of Detail“ und ermöglicht es MBS, eine vereinfachte Version anzuzeigen, wenn sie weiter von unserer Sicht entfernt ist, wodurch Arbeit für die Grafikkarte unseres PCs eingespart wird. Im Moment nicht wichtig, aber wir werden später noch einmal darauf zurückkommen. Ich bemerke, dass es Animationen auf allen Objekten gibt, nicht nur auf dem Mischerblatt. Diese sind nicht erforderlich und sollten gelöscht werden. Ebenso gibt es für den Mixer selbst Animationskanäle, die keinen Zweck erfüllen; wir wollen nur die 'Z'-Rotation, das ist alles. Die anderen Kanäle sollten gelöscht werden. Wie das geht, erkläre ich morgen. Sobald die Animation beendet ist, möchten wir, dass sie in einer Schleife fortgesetzt wird. Dies impliziert, dass das letzte Schlüsselbild der Animation und das erste Schlüsselbild das Objekt an derselben Position haben. Ohne dies gibt es einen Sprung, wenn die Animation erneut beginnt. Ich habe gesehen, dass Ihr letzter Keyframe einen Wert von 741° hatte; es funktioniert besser, wenn dieser Wert auf mindestens ein Vielfaches von 360 geändert wird. Ich stelle ihn auf 720 und es gibt keinen Sprung mehr beim Schleifen. Meine letzte Bemerkung: Ich weiß nicht, ob die Rotation mit der Geschwindigkeit ist, die Sie benötigen. Es funktioniert gut, aber nur Sie können sagen, ob es die richtige Geschwindigkeit für Ihre Bedürfnisse ist. Wenn es richtig ist, ist das in Ordnung; Wenn die Geschwindigkeit geändert werden muss, werden wir sehen, wie das geht. Das ist jetzt alles; Details morgen. Gut gemacht..! Douglas
Lessons in English, now..? I like it. Unterricht in Englisch, jetzt..? Ich mag das. Here's a series of American locos I've converted to MBS. Five liveries, automatic lights, 'snap-in' driver's seat. Not my own original 3D files of course (source: Insya, on SketchFab...), but an interesting project to make swivelling bogies and Exchange textures etc. Just for fun, because I can... Hier ist eine Reihe amerikanischer Loks, die ich auf MBS umgebaut habe. Fünf Lackierungen, automatische Beleuchtung, einrastbarer Fahrersitz. Natürlich nicht meine eigenen Original-3D-Dateien (Quelle: Insya, auf SketchFab...), aber ein interessantes Projekt, um schwenkbare Drehgestelle zu machen und Texturen auszutauschen usw. Nur zum Spaß, weil ich es kann ...
Klaus... I'm just back from collecting family for their Christmas stay here. Give me a day or so and I'll set out the steps. It's not complicated; a little patience, please..? Ich bin gerade zurück von der Abholung der Familie für ihren Weihnachtsaufenthalt hier. Geben Sie mir einen Tag oder so und ich werde die Schritte darlegen. Es ist nicht kompliziert; etwas geduld bitte..?
In my case, that's usually my starting point. 'Professional', I don't know (I always manage to find interesting models that cost nothing...) and I like to take them apart and adapt them to my needs. There are certainly some very clever people, creating wonderful models of all sorts. All credit to them, and even more so if they are then shared for all to use. I doubt if I will ever be able to create anything original of such quality, but every exercise I undertake enables me to understand more, and improve my own modest techniques. In meinem Fall ist das normalerweise mein Ausgangspunkt. 'Profi' weiß ich nicht (ich finde immer wieder interessante Modelle, die nichts kosten...) und ich nehme sie gerne auseinander und passe sie meinen Bedürfnissen an. Es gibt sicherlich einige sehr schlaue Leute, die wunderbare Modelle aller Art erschaffen. Alle Ehre gebührt ihnen, und noch mehr, wenn sie dann für alle zur Nutzung freigegeben werden. Ich bezweifle, dass ich jemals in der Lage sein werde, etwas Originales von solcher Qualität zu schaffen, aber jede Übung, die ich unternehme, ermöglicht es mir, mehr zu verstehen und meine eigenen bescheidenen Techniken zu verbessern. Douglas
I have a similar Jaguar (a very elegant car...), and managed to get down to 35000 polygons. Much is in the wheels, with every spoke detailed finely. Once the wheels are reduced to a photo disc texture, the poly count falls dramatically. Same for the dashboard; a photo for the instruments saves a lot. The curves of the mudguards, however, make it impossible to reduce too far without losing the lovely line of the car. It's easy, too, to make an LOD2 version, as it's so small in the distance, the curves can be less detailed. These are the kinds of models that interest me, with or without any railway context (but they do look splendid when parked in a layout..!). Ich habe einen ähnlichen Jaguar (ein sehr elegantes Auto ...) und es geschafft, auf 35000 Polygone herunterzukommen. Viel steckt in den Rädern, jede Speiche ist fein detailliert. Sobald die Räder auf eine Foto-Disc-Textur reduziert sind, sinkt die Poly-Anzahl dramatisch. Gleiches gilt für das Armaturenbrett; ein Foto für die Instrumente spart viel. Die Rundungen der Kotflügel machen es jedoch unmöglich, zu stark abzusenken, ohne die schöne Linie des Autos zu verlieren. Es ist auch einfach, eine LOD2-Version zu erstellen, da sie in der Entfernung so klein ist, dass die Kurven weniger detailliert sein können. Das sind die Modelle, die mich interessieren, mit oder ohne Eisenbahnkontext (aber sie sehen toll aus, wenn sie in einer Anlage geparkt sind..!). Douglas
Klaus... Here's a 'zip' file with a series of screenshots. They are in order; do they help to show the steps required..? Hier ist eine ZIP-Datei mit einer Reihe von Screenshots. Sie sind in Ordnung; helfen sie, die erforderlichen Schritte zu zeigen? Douglas Screenshots.zip
Klaus... I see that you've already seen how to get the paddle to rotate; well done..! Just a few comments, then... It's important, before starting to animate, to ensure that all the objects concerned are at Scale 1.0. It's also important to animate the parameters required, but only the parameters required, and no more. In this instance, the scale was 0.030; I set it to 1.0 at each stage of the animation. Here, we have only three stages (key-frames...), so it's easy. Not so easy when there are hundreds or more..! The simple method is to open the animation to see the parameters (at the left of the animation data...), and delete the 'Scale' lines. The Location, too, was included in the animation. It's much better, for a 'solo' object such as this, to have the location set to '0', and not include it in the animation. Again, it's easy here, but when there are more moving parts, which change location, rotation and scale during the animation, It becomes important to have a known starting point, with all the objects correctly set up, and only the required parameters animated. We're lucky in this example, as the rotation occurs around the centre of the paddle. Often, when animating moving parts such as doors, or connecting rods, the pivot point is not the centre of the object. Again, before starting, it's important to establish the pivot point for the object. That's where the option 'set origin to 3D Cursor is useful. For a door, for example, move the 3D cursor to the hinge line of the door, and set the Origin to there. That's where the pivot will rotate around. Lastly, for the timing, one needs to see the Timeline for that. We can display the Timeline by selecting it from the animation menu (just above the key-frames in animation mode...). With Timeline displayed, there's an option in the menu 'View' to have Seconds displayed. It's then easy to select from the animation the key-frames concerned, and drag them to the Seconds desired. In the present case, the animation has to be extended to end at 500. Drag the middle set of key-frames to the 5s spot, then the end key-frames to the 15s spot. The total animation is then 20s. If it is to repeat with no pause, the animation End should be the 20s spot, otherwise, the time till 500 frames will be immobile. By default, the timing is set to be progressive, so a slow start, then speeding up. This is often the desired effect (which is why it's Default...), but if a linear action is required, with constant speed throughout, select the key-frames concerned, and select 'Action Editor' from the animation menu. There, choose ''Key/Interpolation mode/Linear'; the rotation will then be at contant speed throughout. It depends what one considers to be more realistic; the choice is yours. Hoping this helps; post again if more questions arise. Meanwhile... Have a great day. Ich sehe, dass Sie bereits gesehen haben, wie man das Paddel zum Rotieren bringt; gut erledigt..! Dann nur noch ein paar Kommentare... Bevor Sie mit der Animation beginnen, ist es wichtig sicherzustellen, dass alle betroffenen Objekte im Maßstab 1,0 sind. Es ist auch wichtig, die erforderlichen Parameter zu animieren, aber nur die erforderlichen Parameter und nicht mehr. In diesem Fall war die Skala 0,030; Ich setze ihn in jeder Phase der Animation auf 1,0. Hier haben wir nur drei Stufen (Keyframes ...), also ist es einfach. Gar nicht so einfach, wenn es Hunderte oder mehr gibt..! Die einfache Methode besteht darin, die Animation zu öffnen, um die Parameter zu sehen (links neben den Animationsdaten ...) und die 'Scale'-Zeilen zu löschen. Auch die Location wurde in die Animation aufgenommen. Für ein „Solo“-Objekt wie dieses ist es viel besser, die Position auf „0“ zu setzen und es nicht in die Animation aufzunehmen. Auch hier ist es einfach, aber wenn es mehr bewegliche Teile gibt, die Position, Drehung und Skalierung während der Animation ändern, wird es wichtig, einen bekannten Startpunkt zu haben, bei dem alle Objekte korrekt eingerichtet und nur die erforderlichen Parameter animiert sind. In diesem Beispiel haben wir Glück, da die Drehung um die Mitte des Paddels erfolgt. Beim Animieren beweglicher Teile wie Türen oder Verbindungsstangen ist der Drehpunkt häufig nicht der Mittelpunkt des Objekts. Auch hier ist es wichtig, vor dem Start den Drehpunkt für das Objekt festzulegen. Hier ist die Option „Ursprung auf 3D-Cursor setzen“ hilfreich. Bewegen Sie beispielsweise für eine Tür den 3D-Cursor zur Scharnierlinie der Tür und legen Sie dort den Ursprung fest. Das ist, wo der Drehpunkt sich drehen wird. Schließlich muss man für das Timing die Timeline dafür sehen. Wir können die Timeline anzeigen, indem wir sie aus dem Animationsmenü auswählen (direkt über den Schlüsselbildern im Animationsmodus ...). Bei angezeigter Timeline gibt es im Menü „Ansicht“ eine Option, um Sekunden anzuzeigen. Es ist dann einfach, die betreffenden Schlüsselbilder aus der Animation auszuwählen und sie auf die gewünschten Sekunden zu ziehen. Im vorliegenden Fall muss die Animation verlängert werden, um bei 500 zu enden. Ziehen Sie den mittleren Satz von Keyframes auf die 5s-Position, dann die End-Keyframes auf die 15s-Position. Die Gesamtanimation beträgt dann 20s. Wenn es ohne Pause wiederholt werden soll, sollte das Animationsende der 20er-Punkt sein, sonst bleibt die Zeit bis 500 Frames stehen. Standardmäßig ist das Timing auf progressiv eingestellt, also ein langsamer Start und dann eine Beschleunigung. Dies ist oft der gewünschte Effekt (weshalb es Standard ist ...), aber wenn eine lineare Aktion mit durchgehend konstanter Geschwindigkeit erforderlich ist, wählen Sie die betreffenden Schlüsselbilder aus und wählen Sie "Aktionseditor" aus dem Animationsmenü. Wählen Sie dort „Key/Interpolation mode/Linear“; die Drehung erfolgt dann durchgehend mit konstanter Geschwindigkeit. Es kommt darauf an, was man für realistischer hält; Es ist deine Entscheidung. In der Hoffnung, dass dies hilft; poste nochmal falls weitere fragen auftauchen. In der Zwischenzeit... Ich wünsche ihnen einen wunderbaren Tag. Douglas
Klaus... Either or both are possible; I'll show you how once I've done it for these files. Maybe this evening, maybe tomorrow; we'll see... Entweder oder beides ist möglich; Ich zeige Ihnen, wie ich es für diese Dateien getan habe. Vielleicht heute Abend, vielleicht morgen; wir werden sehen... Douglas
Excellent..! If you can 'zip' the Blender files, and attach the zip file here, I can animate it, and show you how it's done so that you may do it yourself. If a 'zip' file is too big, reply here and I'll set up a destination for you in my Google Drive. It looks splendid. Over to you... Exzellent..! Wenn Sie die Blender-Dateien 'zippen' und die ZIP-Datei hier anhängen können, kann ich sie animieren und Ihnen zeigen, wie es gemacht wird, damit Sie es selbst machen können. Wenn eine ZIP-Datei zu groß ist, antworten Sie hier und ich richte ein Ziel für Sie in meinem Google Drive ein. Es sieht großartig aus. Zu dir hinüber... Douglas
I've said it before but I'll repeat it here. My goal is not simply to create perfect models that conform to reality (define 'reality'...), but to create models suitable enough until others come along with better, much better, models, with more accurate details, pertinent animations, interiors etc. Mine are not the most realistic in every respect, and the anomalies will have to be borne (or not...) until better come along. They are what they are, warts and all. I'll be spending my time on producing a similar series of FS coaches (straight roof front and rear...), and further models such as sleeping coaches. These, too, will have their flaws; such is Life. At my age, it's not advisable to go back over things too often, as many would never get finished that way. Sorry. I would add that all of these models have 'Custom' textures, and so will accept Exchange Textures. It's perfectly feasible to download the current texture, modify it at leisure, and reload it back onto the coach. In this way, windows, train numbers, destinations or total repaints are possible. Ich habe es schon einmal gesagt, aber ich werde es hier wiederholen. Mein Ziel ist nicht einfach, perfekte Modelle zu erstellen, die der Realität entsprechen (definieren Sie „Realität“), sondern Modelle zu erstellen, die geeignet genug sind, bis andere mit besseren, viel besseren Modellen daherkommen, mit genaueren Details, relevanten Animationen, Innenräumen usw. Meine sind es nicht in jeder Hinsicht die realistischste, und die Anomalien müssen ertragen werden (oder auch nicht...), bis es besser wird. Sie sind, was sie sind, Warzen und so. Ich werde meine Zeit damit verbringen, eine ähnliche Serie zu produzieren von FS-Wagen (gerades Dach vorne und hinten...), und weitere Modelle wie Schlafwagen. Auch diese werden ihre Tücken haben, so ist das Leben. In meinem Alter ist es nicht ratsam, Dinge zu oft zu wiederholen, wie viele würden auf diese Weise niemals fertig werden. Ich möchte hinzufügen, dass alle diese Modelle "benutzerdefinierte" Texturen haben und daher Austauschtexturen akzeptieren. Es ist durchaus möglich, die aktuelle Textur herunterzuladen, sie nach Belieben zu ändern und wieder auf den Trainer zu laden. Auf diese Weise sind Fenster, Zugnummern, Ziele oder komplette Neulackierungen möglich.
That crane was an experiment in animation, and works as I wanted. I could not, however, resolve the issues of getting to cooperate with the MBS crane functions, so all the movements etc have to be done through manual animations or Event commands. It can't find a target, then take it to a destination as the MBS cranes do. For what I made it for, I call it a success; I don't know if anyone else would have a use for it in their layout. The original model I found on line; I had to take it apart to have extending booms, for instance, or side jacks. That, to me, was the interesting part. The TGV was a similar challenge, created from an original SketchUp model, it was my first experience of modelling with Blender. Now that it's done its job, it just sits there. What to do with them now..? I have no idea. Dieser Kran war ein Animationsexperiment und funktioniert so, wie ich es wollte. Ich konnte jedoch die Probleme der Zusammenarbeit mit den MBS-Kranfunktionen nicht lösen, daher müssen alle Bewegungen usw. durch manuelle Animationen oder Ereignisbefehle ausgeführt werden. Es kann kein Ziel finden und es dann zu einem Ziel bringen, wie es die MBS-Kräne tun. Für das, wofür ich es gemacht habe, nenne ich es einen Erfolg; Ich weiß nicht, ob jemand anderes eine Verwendung dafür in seinem Layout hätte. Das Originalmodell, das ich online gefunden habe; Ich musste es zerlegen, um zum Beispiel Ausleger oder Seitenheber zu haben. Das war für mich der interessante Teil. Der TGV war eine ähnliche Herausforderung, erstellt aus einem originalen SketchUp-Modell, es war meine erste Erfahrung mit dem Modellieren mit Blender. Jetzt, wo es seine Arbeit getan hat, sitzt es einfach da. Was soll man jetzt damit machen..? Ich habe keine Ahnung. Douglas
Whenever you wish... Wann immer Sie möchten... Douglas
Excellent; well done..! Once you have the stirring arm done, and if it interests you, we could make a Project of animating the arm so that it rotates. It's fairly easy with Blender, with a bit of care. If you're making the whole system with Primitives, that, too, could become a Project for seeing how to model with Blender. I'm not an expert (rather a beginner myself...), but it's fascinating, once started. Just a thought. Exzellent; gut erledigt..! Sobald Sie den Rührarm fertig haben und es Sie interessiert, könnten wir ein Projekt zur Animation des Arms erstellen, damit er sich dreht. Mit Blender ist es mit ein wenig Sorgfalt ziemlich einfach. Wenn Sie das ganze System mit Primitives erstellen, könnte das auch ein Projekt werden, um zu sehen, wie man mit Blender modelliert. Ich bin kein Experte (eher selbst Anfänger...), aber es ist faszinierend, wenn man einmal angefangen hat. Nur ein Gedanke. Douglas
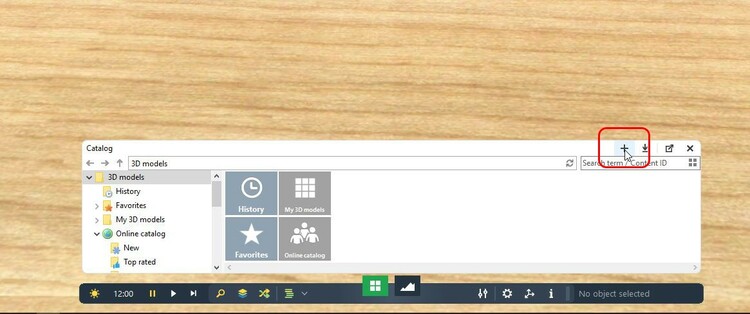
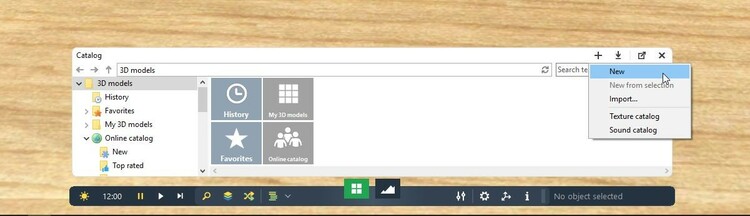
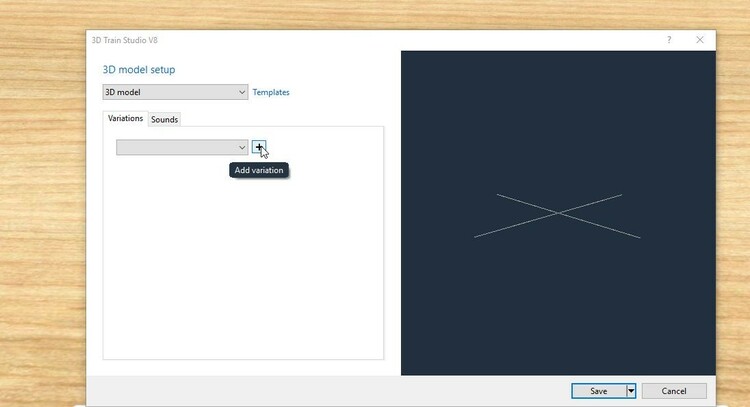
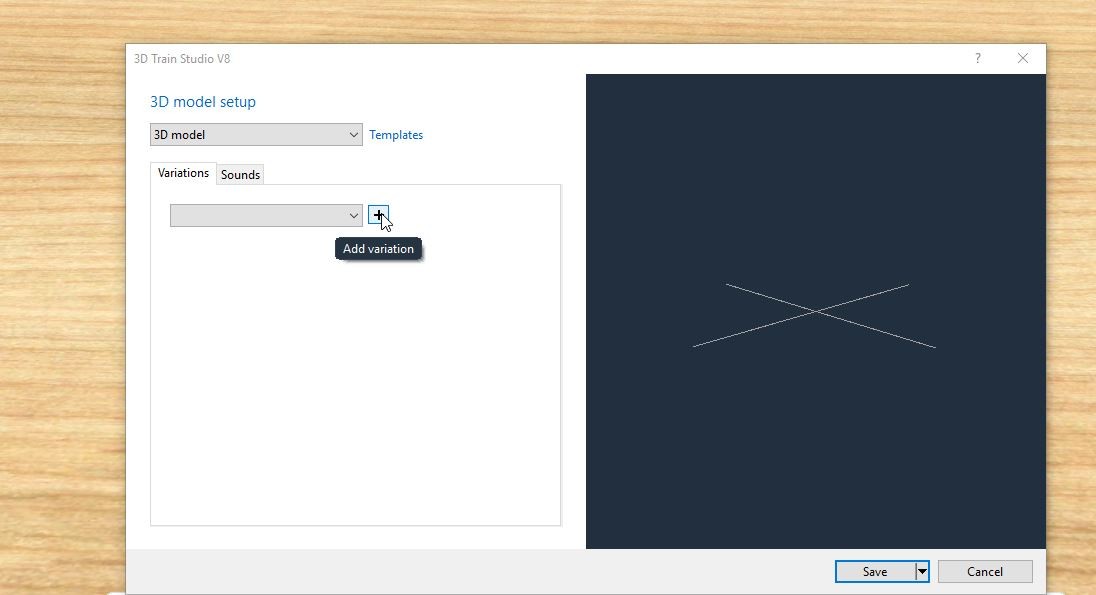
Once you have your Gltf object, in MBS, evoke the Catalogue and use the '+' button to add a new object. See screenshots below... From the '+' button, select 'New'; in the dialogue box that opens, use the '+' button to browse for your Gltf file. Once imported, check that it has the little green 'tick'; if there's a yellow 'warning', read it to see what needs to be done to improve the object. Try it; post here again if more help is needed or if questions remain. Sobald Sie Ihr Gltf-Objekt haben, rufen Sie in MBS den Katalog auf und verwenden Sie die Schaltfläche „+“, um ein neues Objekt hinzuzufügen. Siehe Screenshots unten... Wählen Sie über die Schaltfläche „+“ „Neu“; Verwenden Sie im sich öffnenden Dialogfeld die Schaltfläche „+“, um nach Ihrer GLTF-Datei zu suchen. Überprüfen Sie nach dem Importieren, ob das kleine grüne Häkchen vorhanden ist. Wenn es eine gelbe „Warnung“ gibt, lesen Sie sie, um zu sehen, was getan werden muss, um das Objekt zu verbessern. Versuch es; Posten Sie hier erneut, wenn weitere Hilfe benötigt wird oder Fragen offen bleiben. Douglas
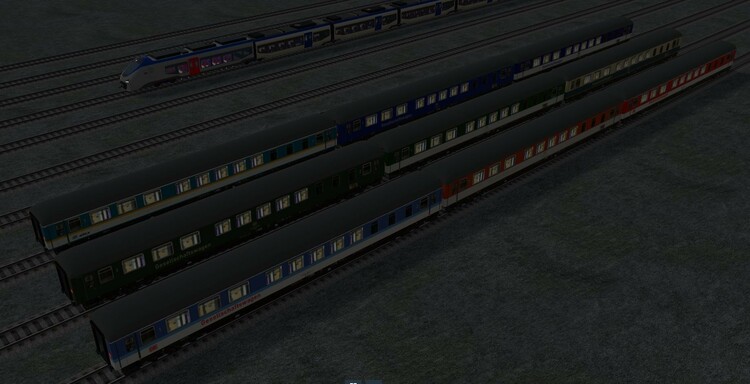
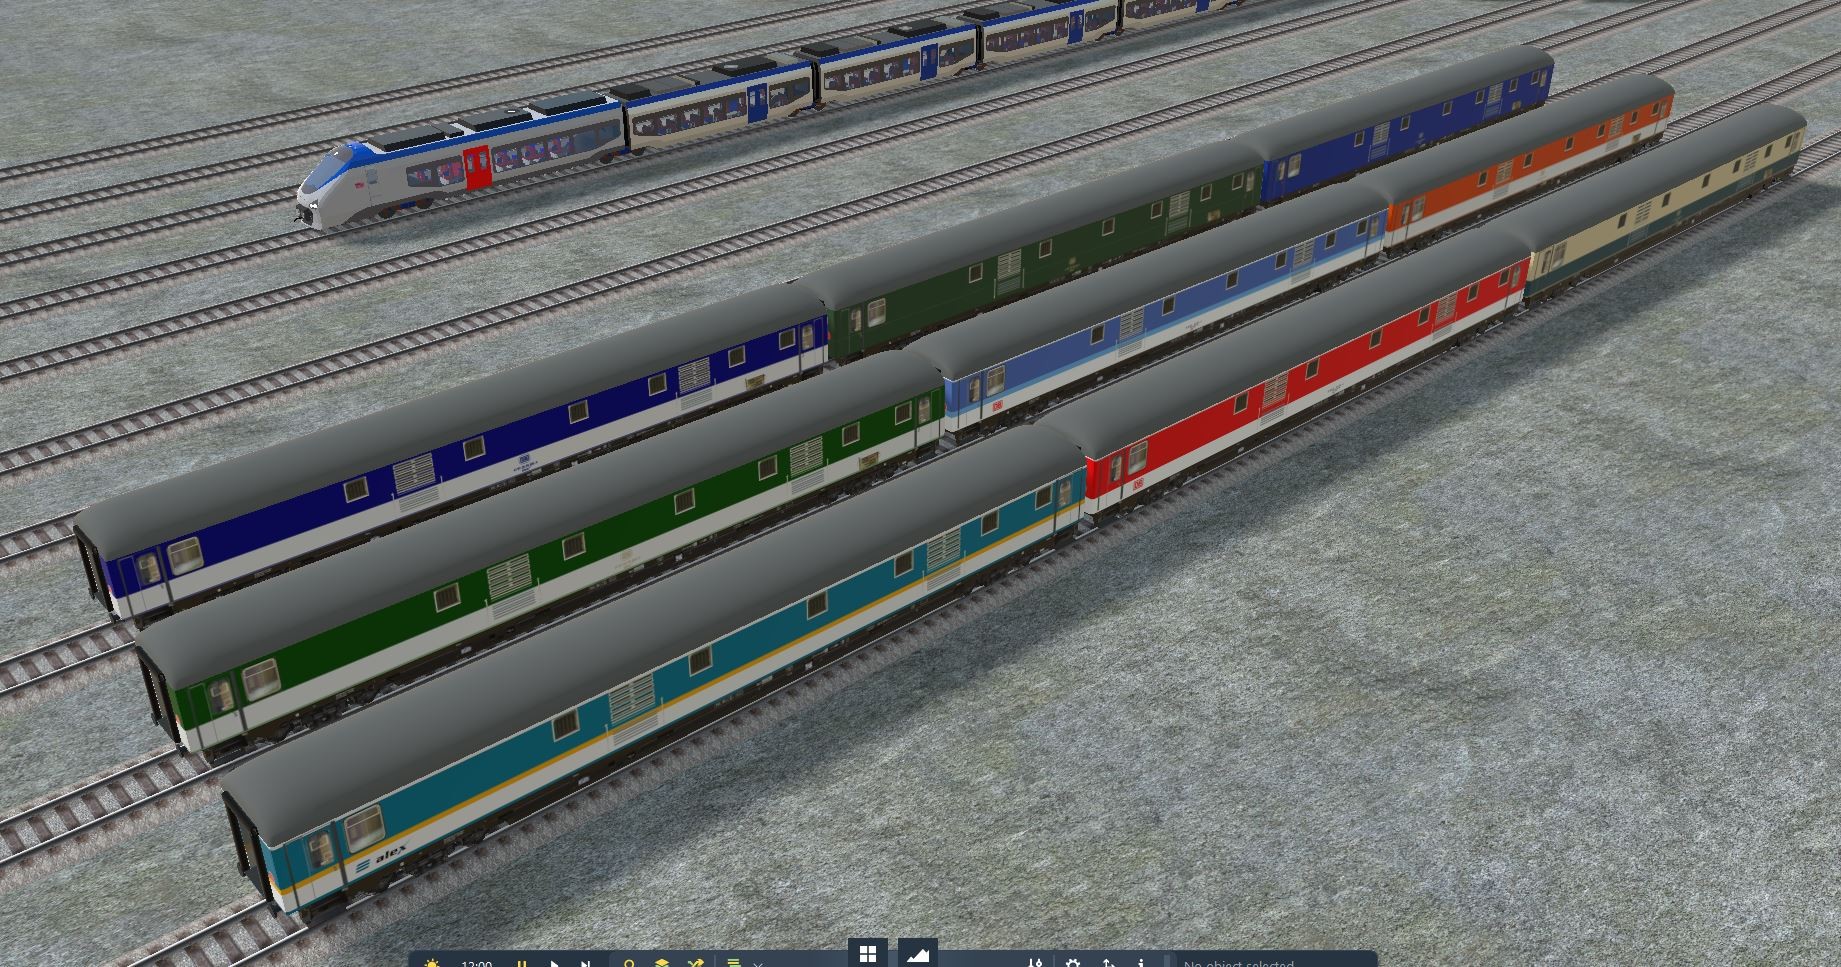
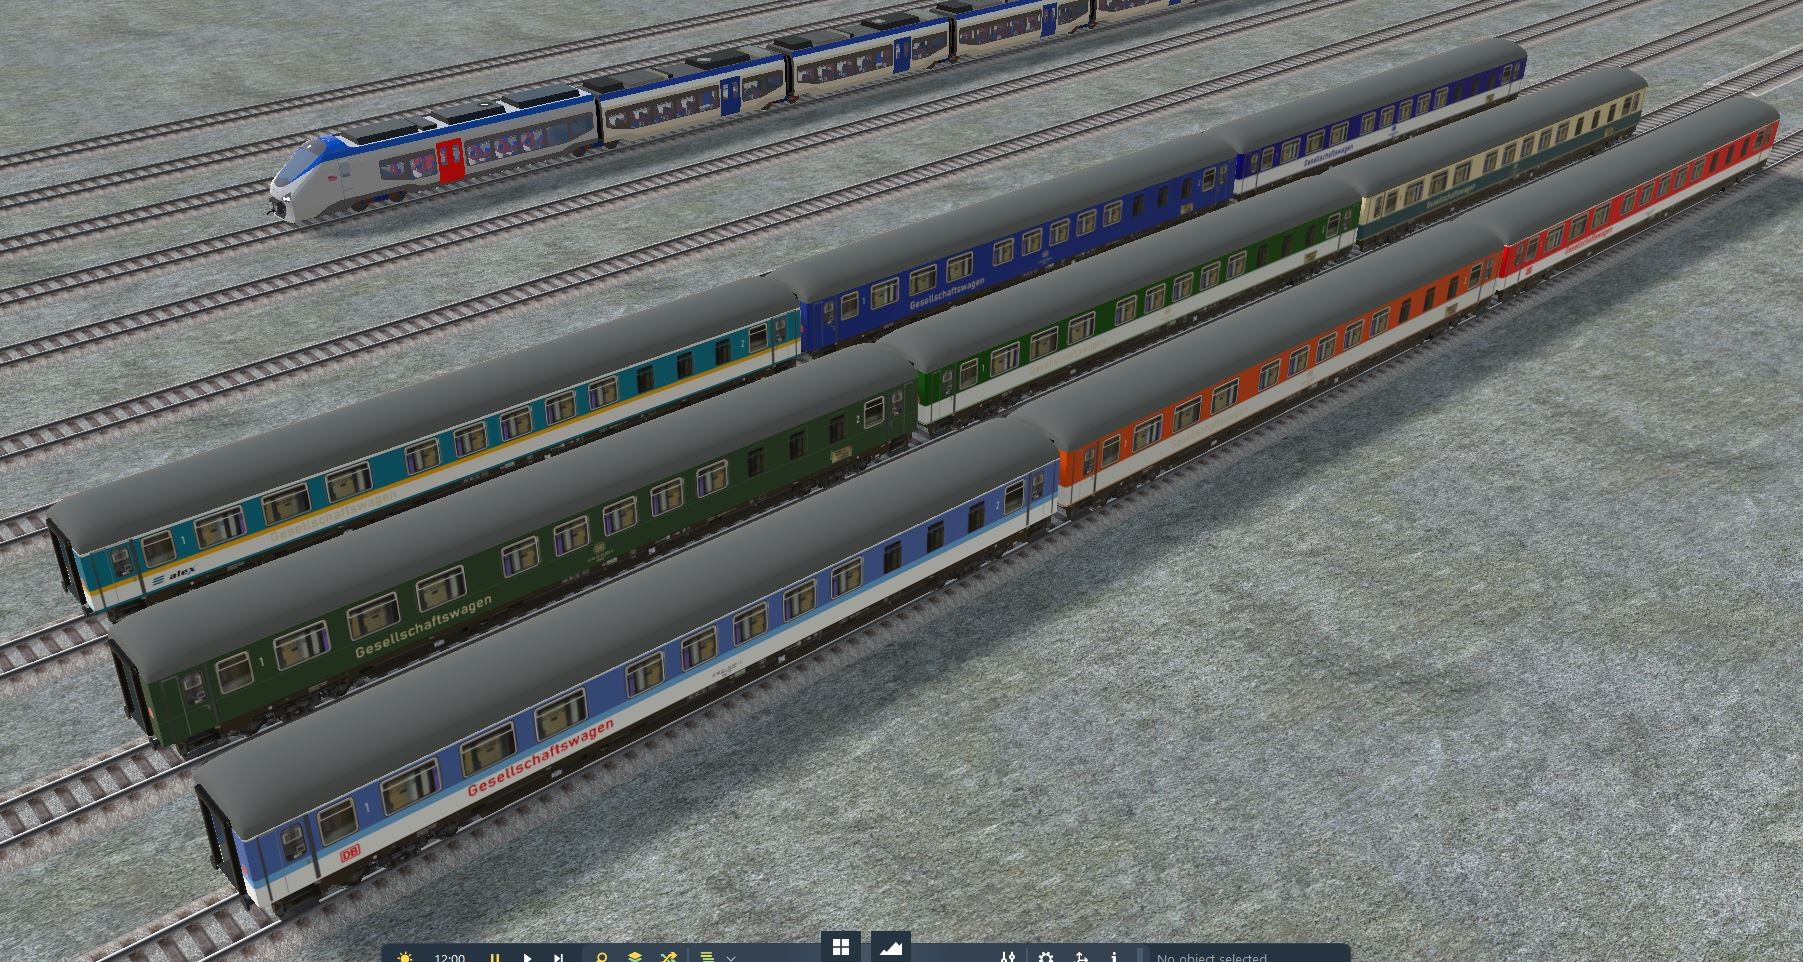
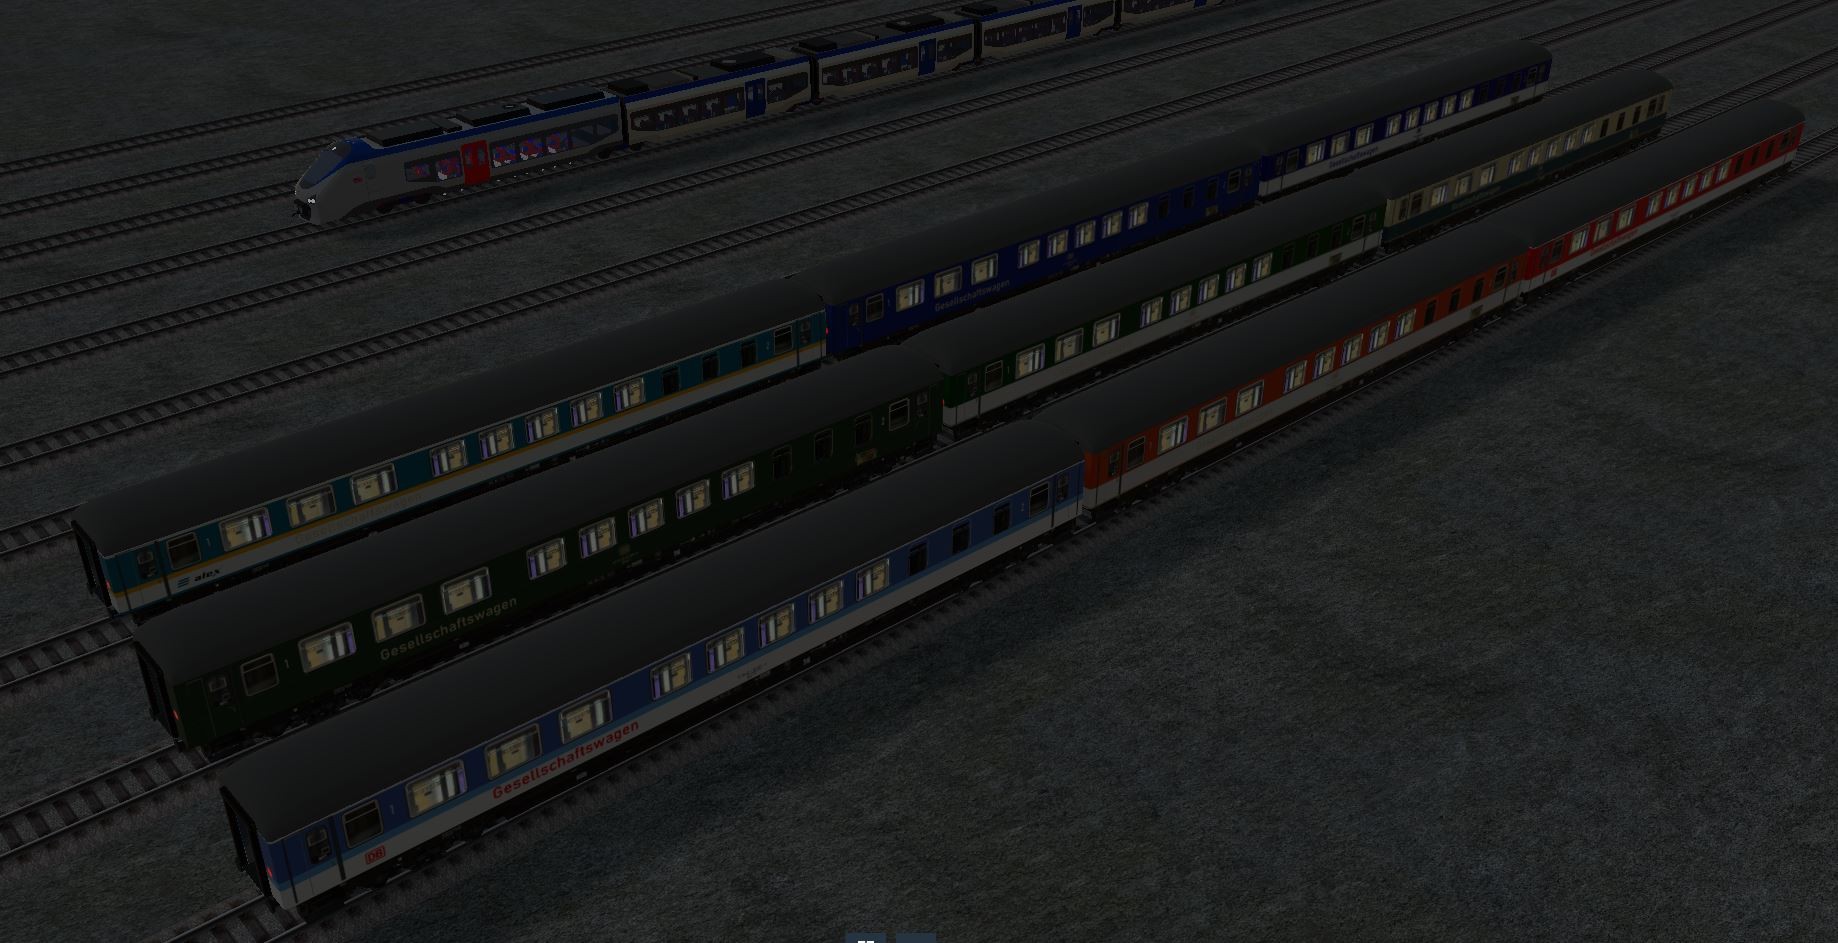
 Here are the last of the current UIC-X FR coaches : a Baggage coach and a Social Event coach, in nine liveries. It's quite possible (indeed, most likely..!) that some of the variants presented have never existed in one or other of the liveries. Just put it down to 'fantasy' in that case; I make no claim as to historical accuracy; they are for fun. Screenshot below, with a night shot to show the illumination. They have been published as 'Draft', then again for inclusion in the Catalogue, if and when approved by Neo, in his own time. Hier sind die letzten der aktuellen UIC-X FR-Wagen: ein Gepäckwagen und ein Gesellschaftswagen in neun Lackierungen. Es ist durchaus möglich (in der Tat sehr wahrscheinlich..!), dass einige der vorgestellten Varianten in der einen oder anderen Lackierung nie existiert haben. Setzen Sie es in diesem Fall einfach auf „Fantasie“; Ich erhebe keinen Anspruch auf historische Genauigkeit; Sie sind zum Spaß. Screenshot unten, mit einer Nachtaufnahme, um die Beleuchtung zu zeigen. Sie wurden als „Entwurf“ veröffentlicht, dann erneut zur Aufnahme in den Katalog, falls und wenn von @Neo genehmigt, in seiner eigenen Zeit. Douglas UIC X FR Baggage UIC X FR Gepäckwagen 91AEAB8F-5FCE-47FF-A835-41F5851674AA UIC X FR Social Event UIC X FR Gesellschaftswagen 1D98DF45-F20A-40F4-BB3F-6DB6D19045BD
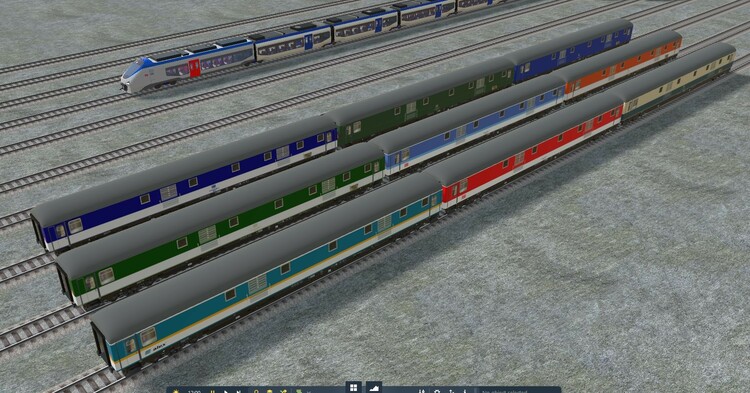

 Here are the last of the current UIC-X FR coaches : a Baggage coach and a Social Event coach, in nine liveries. It's quite possible (indeed, most likely..!) that some of the variants presented have never existed in one or other of the liveries. Just put it down to 'fantasy' in that case; I make no claim as to historical accuracy; they are for fun. Screenshot below, with a night shot to show the illumination. They have been published as 'Draft', then again for inclusion in the Catalogue, if and when approved by @Neo, in his own time. Hier sind die letzten der aktuellen UIC-X FR-Wagen: ein Gepäckwagen und ein Gesellschaftswagen in neun Lackierungen. Es ist durchaus möglich (in der Tat sehr wahrscheinlich..!), dass einige der vorgestellten Varianten in der einen oder anderen Lackierung nie existiert haben. Setzen Sie es in diesem Fall einfach auf „Fantasie“; Ich erhebe keinen Anspruch auf historische Genauigkeit; Sie sind zum Spaß. Screenshot unten, mit einer Nachtaufnahme, um die Beleuchtung zu zeigen. Sie wurden als „Entwurf“ veröffentlicht, dann erneut zur Aufnahme in den Katalog, falls und wenn von @Neo genehmigt, in seiner eigenen Zeit. Douglas UIC X FR Baggage UIC X FR Gepäckwagen 91AEAB8F-5FCE-47FF-A835-41F5851674AA UIC X FR Social Event UIC X FR Gesellschaftswagen 1D98DF45-F20A-40F4-BB3F-6DB6D19045BD


Account
Suche
Push-Benachrichtigungen konfigurieren
Chrome (Android)
- Tap the lock icon next to the address bar.
- Tap Permissions → Notifications.
- Adjust your preference.
Chrome (Desktop)
- Click the padlock icon in the address bar.
- Select Site settings.
- Find Notifications and adjust your preference.
Safari (iOS 16.4+)
- Ensure the site is installed via Add to Home Screen.
- Open Settings App → Notifications.
- Find your app name and adjust your preference.
Safari (macOS)
- Go to Safari → Preferences.
- Click the Websites tab.
- Select Notifications in the sidebar.
- Find this website and adjust your preference.
Edge (Android)
- Tap the lock icon next to the address bar.
- Tap Permissions.
- Find Notifications and adjust your preference.
Edge (Desktop)
- Click the padlock icon in the address bar.
- Click Permissions for this site.
- Find Notifications and adjust your preference.
Firefox (Android)
- Go to Settings → Site permissions.
- Tap Notifications.
- Find this site in the list and adjust your preference.
Firefox (Desktop)
- Open Firefox Settings.
- Search for Notifications.
- Find this site in the list and adjust your preference.