Dad3353
Mitglieder
-
Benutzer seit
-
Letzter Besuch
Alle erstellten Inhalte von Dad3353
-
 A year or two ago, a Windows 10 update walked all over some drivers my stuff uses. It could a while to sort it out, and I reverted to an older Windows 10 version, from 2016, and laboriously turned off the Windows update system. Only the Defender gets updated, the rest stays as I want it, stable. I don't need nor want the new functionalities. I'm old, and don't do 'smart' stuff, or multi-apparatus synchronising, so I see no advantage, to me, of moving to any other system now, at my age. This hasn't prevented the loss, the other day, of a 3Tb USB drive, from which I'm recovering painfully (yes, I have back-ups, but it's still a pain in the wotsit, just the same...). Stability and familiarity are by far the most important criteria for me, so, once I have a system running as I want it, I'm very loath to change. If, one day, I upgrade the PC (maybe a bigger SSD System drive, or better video card..?), I'd still install this same OS. I have an old car, too, that doesn't break down. 'If it ain't broken, don't fix it' works for me. Just sayin'. Vor ein oder zwei Jahren ging ein Windows 10-Update über einige Treiber, die meine Sachen verwenden. Es konnte eine Weile dauern, das zu klären, und ich habe auf eine ältere Windows 10-Version von 2016 zurückgegriffen und das Windows-Update-System mühsam ausgeschaltet. Nur der Defender wird aktualisiert, der Rest bleibt so, wie ich es möchte, stabil. Ich brauche und will die neuen Funktionalitäten nicht. Ich bin alt und mache keine "intelligenten" Dinge oder Synchronisierung mit mehreren Geräten, daher sehe ich für mich keinen Vorteil darin, jetzt in meinem Alter zu einem anderen System zu wechseln. Dies hat den Verlust eines 3 TB USB-Laufwerks vor kurzem nicht verhindert, von dem ich mich mühsam erhole (ja, ich habe Backups, aber es ist immer noch eine Qual, trotzdem...) . Stabilität und Vertrautheit sind für mich mit Abstand die wichtigsten Kriterien. Wenn ich also einmal ein System habe, das so läuft, wie ich es möchte, ändere ich mich sehr ungern. Wenn ich eines Tages den PC aufrüste (vielleicht ein größeres SSD-Systemlaufwerk oder eine bessere Grafikkarte...?), würde ich immer noch dasselbe Betriebssystem installieren. Ich habe auch ein altes Auto, das nicht kaputt geht. "Wenn es nicht kaputt ist, repariere es nicht" funktioniert für mich. Ich sag bloß'.
 -
One day I'll get it right first time (but today is not that day...). Here you go for the Semaphore Textures ... One day I'll get it right the first time (but today is not that day ...). Click here for the semaphore textures ... Sema_Sign.zip The four 'UK_Sign_Sema_xxxx' files are 'layered' by Blender (and hence MBS...), and are to be interpreted one on top of the other. The 'Colo' file is the main one; it has the colours, much like a paint-box. I drag the UV maps, suitable adjusted for size, to whichever colour I want to apply to that map. For the signal arm, there is an arm shape, pre-coloured; I only have to form the Arm UV map over that to apply that texture. Up to now, it's pretty standard 'paint by numbers' way of doing it. Beneath the Colo file is the 'Meta' file, which carries the 'Metallic' information, and will be mixed, by Blender, to the same UV map as the 'Colo' file. Anything coloured with a square with an associated 'Meta' square will have its 'Metallic' characteristic taken from that file. If it's black: Metallic is zero. The lighter it gets, the more Metallic becomes the material. Similarly, the 'Roug' file contains the Roughness to be applied to that square. This, in combination with the Meta file, gives the total metallic effect. The darker the Roughness, the more mirror-like the Metallic. The last layer, 'Emis' is the Emissive information. Any square copied onto this file will take on Emissive qualities, dictated by the Emissive Strength cursor in Blender. You will see that the Red and Green have been thus copied, so that the two lens of the Signal take on, not just the Colour, but also the Emissive quality. They glow; not noticeable in daylight, but excellent when night falls. No switching is needed; they are permanently Emissive. The signal Arm is animated, as are the two lens. When the Arm is lowered, the Red lens is to the fore; when the arm raises, this lens is animated to go back, through the Arm, and is then invisible. At the same time, the Green lens, hidden until now by the Arm (but always Emissive; just masked, is all...) is brought forward to just in front of the Arm, to become visible. Naturally the process is reversed when the Arm is lowered, hiding once again the Green and showing again the Red. It's all trickery, really; just smoke ad mirrors. Have a play around with the 'paint-box', changing the light and dark regions of the Meta and Roug files, to see what the effect is (on a Blender Cube, for instance...). Then see how you fare with making a face Emissive, in a colour of your choice. That's how to better get a grip on how it all works. It's easy, really; I give as proof that even I manage it..! Oh, yes, and the Ladder is a cheat, too. I didn't want to have a stack of polygons for such a detail, so I apply a texture with an Alpha (transparent...) mode, so that only the uprights and rungs are visible, despite the 'ladder' being a solid cube. Cheating..? Yes, I know; shameful, isn't it..? Let me know if more is needed; hoping this helps; meanwhile... Keep well, stay safe. Die vier 'UK_Sign_Sema_xxxx'-Dateien werden von Blender (und damit MBS...) 'geschichtet' und sind übereinander zu interpretieren. Die 'Colo'-Datei ist die wichtigste; es hat die Farben, ähnlich wie ein Malkasten. Ich ziehe die UV-Maps, passend zur Größe angepasst, auf die Farbe, die ich auf diese Map anwenden möchte. Für den Signalarm gibt es eine vorgefärbte Armform; Ich muss nur die Arm-UV-Map darüber bilden, um diese Textur anzuwenden. Bis jetzt ist dies eine ziemlich übliche Methode zum Malen nach Zahlen. Unterhalb der Colo-Datei befindet sich die 'Meta'-Datei, die die 'Metallic'-Information enthält und von Blender auf dieselbe UV-Map wie die 'Colo'-Datei gemischt wird. Alles, was mit einem Quadrat mit einem zugehörigen 'Meta'-Quadrat gefärbt ist, erhält seine 'Metallic'-Eigenschaft aus dieser Datei. Wenn es schwarz ist: Metallic ist null. Je heller es wird, desto metallischer wird das Material. In ähnlicher Weise enthält die Datei 'Roug' die Rauheit, die auf dieses Quadrat angewendet werden soll. Dies ergibt in Kombination mit der Meta-Datei den totalen Metallic-Effekt. Je dunkler die Rauheit, desto spiegelähnlicher das Metallic. Die letzte Schicht, 'Emis', ist die Emissionsinformation. Jedes Quadrat, das in diese Datei kopiert wird, nimmt Emissionsqualitäten an, die durch den Emissionsstärke-Cursor in Blender vorgegeben werden. Sie werden sehen, dass Rot und Grün so kopiert wurden, sodass die beiden Linsen des Signals nicht nur die Farbe, sondern auch die Emissionsqualität übernehmen. Sie leuchten; bei Tageslicht nicht wahrnehmbar, aber ausgezeichnet, wenn die Nacht hereinbricht. Es ist kein Umschalten erforderlich; sie sind dauerhaft emittierend. Der Signalarm ist animiert, ebenso die beiden Objektive. Wenn der Arm abgesenkt wird, ist die rote Linse im Vordergrund; Wenn sich der Arm hebt, wird diese Linse animiert, durch den Arm zurückzugehen und ist dann unsichtbar. Gleichzeitig wird die bisher vom Arm verdeckte grüne Linse (aber immer Emissiv; nur maskiert, ist alles...) nach vorne vor den Arm geschoben, um sichtbar zu werden. Natürlich kehrt sich der Vorgang beim Absenken des Arms um, verbirgt wieder das Grün und zeigt wieder das Rot. Es ist wirklich alles Tricks; nur Werbung Spiegel rauchen. Spielen Sie mit dem 'Malkasten' herum, ändern Sie die hellen und dunklen Bereiche der Meta- und Roug-Dateien, um zu sehen, was der Effekt ist (zum Beispiel auf einem Blender Cube...). Dann sehen Sie, wie es Ihnen ergeht, ein Gesicht Emissive in einer Farbe Ihrer Wahl zu machen. So bekommt man die Funktionsweise besser in den Griff. Es ist wirklich einfach; Ich gebe als Beweis, dass sogar ich es schaffe..! Oh ja, und die Leiter ist auch ein Betrüger. Ich wollte keinen Stapel von Polygonen für ein solches Detail haben, also wende ich eine Textur mit einem Alpha-Modus (transparent...) an, sodass nur die Pfosten und Sprossen sichtbar sind, obwohl die 'Leiter' ein Feststoff ist Würfel. Schummeln..? Ja, ich weiß; peinlich, nicht wahr..? Lassen Sie mich wissen, wenn mehr benötigt wird; in der Hoffnung, dass dies hilft; inzwischen... Stay healthy, stay healthy. Douglas
-
Better if I attach them properly, eh..? Sorry; here they are... Besser, wenn ich sie richtig anbring, oder? Es tut uns leid; hier sind sie... Blen_Sign.zip
-
I made UK signals, using Blender 2.93, and they work well enough. Find attached a 'zip' file with two Blender files and textures; maybe they'll help..? Ask if explanation is required. Ich habe UK-Signale mit Blender 2.93 erstellt und sie funktionieren gut genug. Finden Sie eine angehängte 'Zip'-Datei mit zwei Blender-Dateien und Texturen; vielleicht helfen sie..? Fragen Sie, ob eine Erklärung erforderlich ist.
-
The important thing with UV Textures is not so much the size, but rather the proportions. After the Texture has been applied to the model, the Texture can be re-sized (respecting the rule of 'power of two, for MBS...), but the proportions must remain the same. As an example, changing from 2048 x 2048 to 256 x 256 would work (although some detail may be lost, the UV maps will still fit the Item...), as would changing 512 x 1024 to 256 x 512, but changing from 2048 x 2048 to 2048 x 1024 will imply adjusting the Texture to the model, as the UV map will no longer fit. It's wise, then, to leave space on a Texture file if there's any chance of further additions to it, and keep the proportions intact, once the Texture has been applied. It's one of the main features that brought me to Blender: the relative ease of manipulating UV maps fitted to image files. I do it a lot to make multi-texture images from basic graphics, but I would not change the proportions, once established. Hope this helps. Wichtig bei UV-Texturen ist nicht so sehr die Größe, sondern die Proportionen. Nachdem die Textur auf das Modell angewendet wurde, kann die Größe der Textur geändert werden (unter Beachtung der Regel der "Potenz von zwei, für MBS ...), aber die Proportionen müssen gleich bleiben. Als Beispiel würde das Ändern von 2048 x 2048 auf 256 x 256 funktionieren (obwohl einige Details verloren gehen können, passen die UV-Maps immer noch zum Artikel ...), ebenso wie das Ändern von 512 x 1024 auf 256 x 512, aber das Ändern von 2048 x 2048 bis 2048 x 1024 bedeutet, dass die Textur an das Modell angepasst wird, da die UV-Map nicht mehr passt. Es ist daher ratsam, Platz in einer Texturdatei zu lassen, wenn die Möglichkeit weiterer Ergänzungen besteht, und die Proportionen intakt zu halten, nachdem die Textur angewendet wurde. Es ist eines der Hauptmerkmale, das mich zu Blender geführt hat: die relativ einfache Handhabung von UV-Maps, die an Bilddateien angepasst sind. Ich mache es viel, um aus einfachen Grafiken Bilder mit mehreren Texturen zu erstellen, aber ich würde die Proportionen nicht ändern, wenn sie einmal festgelegt sind. Hoffe das hilft.
-
The 'Horse' files, and the beer/fish wagons, can be downloaded from my Google drive, using the link below ... These are the Blender files, with Textures, and the resulting .glb files, for those without Blender. Hope this helps; tell me if anything more is required. Die 'Horse'-Dateien und die Bier-/Fischwagen können über den folgenden Link von meinem Google-Laufwerk heruntergeladen werden ... Dies sind die Blender-Dateien mit Texturen und die resultierenden .glb-Dateien für diejenigen ohne Blender. Hoffe das hilft; Sagen Sie mir, wenn noch etwas benötigt wird. Horse -Wagon files ...
-
Understood (I think...), but I'm afraid that my stuff will just have to lapse, as I am very unlikely to think of such management. Potentially they could stick in there for years, unknown to any and everyone that didn't keep the original ID notification. Goodness knows how others do this, but it'll just be my stuff in my little corner, I think. Harsh, maybe (but not intended to be...). It's easily solved if no-one uses any of the ID's I publish (and how would I know if they were used or not..?). I repeat my offer; if anyone wants a permanent version of any of my stuff, just let me know and I'll provide '.glb' files. That way, there's no dead weight on the Catalogue. Verstanden (glaube ich...), aber ich befürchte, dass meine Sachen einfach hinfällig werden müssen, da ich sehr unwahrscheinlich an ein solches Management denken werde. Möglicherweise könnten sie dort jahrelang bleiben, unbekannt für jeden, der die ursprüngliche ID-Benachrichtigung nicht aufbewahrt hat. Gott weiß, wie andere das machen, aber es wird nur mein Zeug in meiner kleinen Ecke sein, denke ich. Hart vielleicht (aber nicht beabsichtigt...). Es ist leicht zu lösen, wenn niemand eine der von mir veröffentlichten IDs verwendet (und woher soll ich wissen, ob sie verwendet wurden oder nicht?). Ich wiederhole mein Angebot; Wenn jemand eine permanente Version meiner Sachen haben möchte, lass es mich wissen und ich werde '.glb'-Dateien bereitstellen. Auf diese Weise hat der Katalog kein Eigengewicht.
-
I've published, again, as 'Draft' my Dray Horses, under the ID ... 7FF880A6-83A3-422B-BEF4-22514CC7AB75 I still don't understand (Old age..? Culture..? Translation..?) how all of this is supposed to work. On the one hand, I learn that all 'drafts' are deleted after 30days, on the other hand I've read that the latest versions are always available. In my pretty little head, confusion reigns. Meanwhile, maybe the ID above will work for someone. For how long..? Dunno... Ich habe meine Dray Horses wieder als 'Draft' veröffentlicht, unter der ID ... 7FF880A6-83A3-422B-BEF4-22514CC7AB75 Ich verstehe immer noch nicht (Alter..? Kultur..? Übersetzung..?), wie das alles funktionieren soll. Einerseits erfahre ich, dass alle 'Entwürfe' nach 30 Tagen gelöscht werden, andererseits habe ich gelesen, dass immer die neuesten Versionen verfügbar sind. In meinem hübschen kleinen Kopf herrscht Verwirrung. In der Zwischenzeit funktioniert die obige ID vielleicht für jemanden. Für wie lange..? Keine Ahnung... Edit : I've added the Idling Horse, too, with the ID ... CA3B1542-15F7-4D21-A6F6-80C7C3B05B5E Edit: Ich habe auch das Idling Horse mit der ID hinzugefügt ... CA3B1542-15F7-4D21-A6F6-80C7C3B05B5E
-
Currently, all my models are 'private' models, and are thus 'lost' for the Community. The stuff I do is mostly far from the high standards of quality seen in the Catalogue, and mostly count, for me, as experiments rather than serious modelling. If any are deemed acceptable for wider diffusion, that's fine by me, but I'm also pleased if anyone, anyone at all, wants to use what I've produced. With the stipulation that I infringe the rights of no-one, I don't see the harm in offering any as directly-importable models for the few that would like them. This does not preclude their inclusion in the future in the official Catalogue, but there are far more important and much finer models already awaiting this status. I'll prepare a 'zip' file with the horses I have; if folks think they're worth something to them I'm happy enough to allow them access, and explain how to import them. If, at a later date, this becomes redundant with a Catalogue entry, all well and good, but in the meantime, they'll be being enjoyed, which is the point, for me. Derzeit sind alle meine Modelle 'private' Modelle und somit für die Community 'verloren'. Die Sachen, die ich mache, sind meistens weit entfernt von den hohen Qualitätsstandards, die im Katalog zu sehen sind, und zählen für mich eher als Experimente und nicht als ernsthaftes Modellieren. Wenn sie für eine breitere Verbreitung als akzeptabel erachtet werden, ist das für mich in Ordnung, aber ich freue mich auch, wenn irgendjemand, überhaupt irgendjemand, das verwenden möchte, was ich produziert habe. Mit der Bedingung, dass ich die Rechte von niemandem verletze, sehe ich keinen Schaden darin, Modelle als direkt importierbare Modelle für die wenigen anzubieten, die sie haben möchten. Dies schließt eine zukünftige Aufnahme in den offiziellen Katalog nicht aus, aber es gibt weitaus wichtigere und viel feinere Modelle, die bereits auf diesen Status warten. Ich bereite eine ZIP-Datei mit den Pferden vor, die ich habe. Wenn die Leute denken, dass sie ihnen etwas wert sind, bin ich glücklich genug, ihnen den Zugriff zu gewähren und ihnen zu erklären, wie man sie importiert. Wenn dies später mit einem Katalogeintrag überflüssig wird, schön und gut, aber in der Zwischenzeit werden sie genossen, und das ist für mich der Punkt.
-
The simplest way is for me to send you the '.glb' files, so that you may import them yourself into your own 'catalogue'. It's an easy operation; if you don't yet know how to do that, it's an opportunity to learn (you'll need to, some day, anyway...). Give me a few hours (I'm sorting out my PC right now...) and I'll prepare a pack for you. Is that satisfactory..? Am einfachsten sende ich Ihnen die '.glb'-Dateien, damit Sie diese selbst in Ihren eigenen 'Katalog' importieren können. Es ist eine einfache Operation; Wenn Sie noch nicht wissen, wie das geht, ist es eine Gelegenheit, es zu lernen (Sie werden es eines Tages sowieso tun müssen...). Geben Sie mir ein paar Stunden Zeit (ich sortiere gerade meinen PC aus...) und ich bereite ein Paket für Sie vor. Ist das zufriedenstellend..?
-
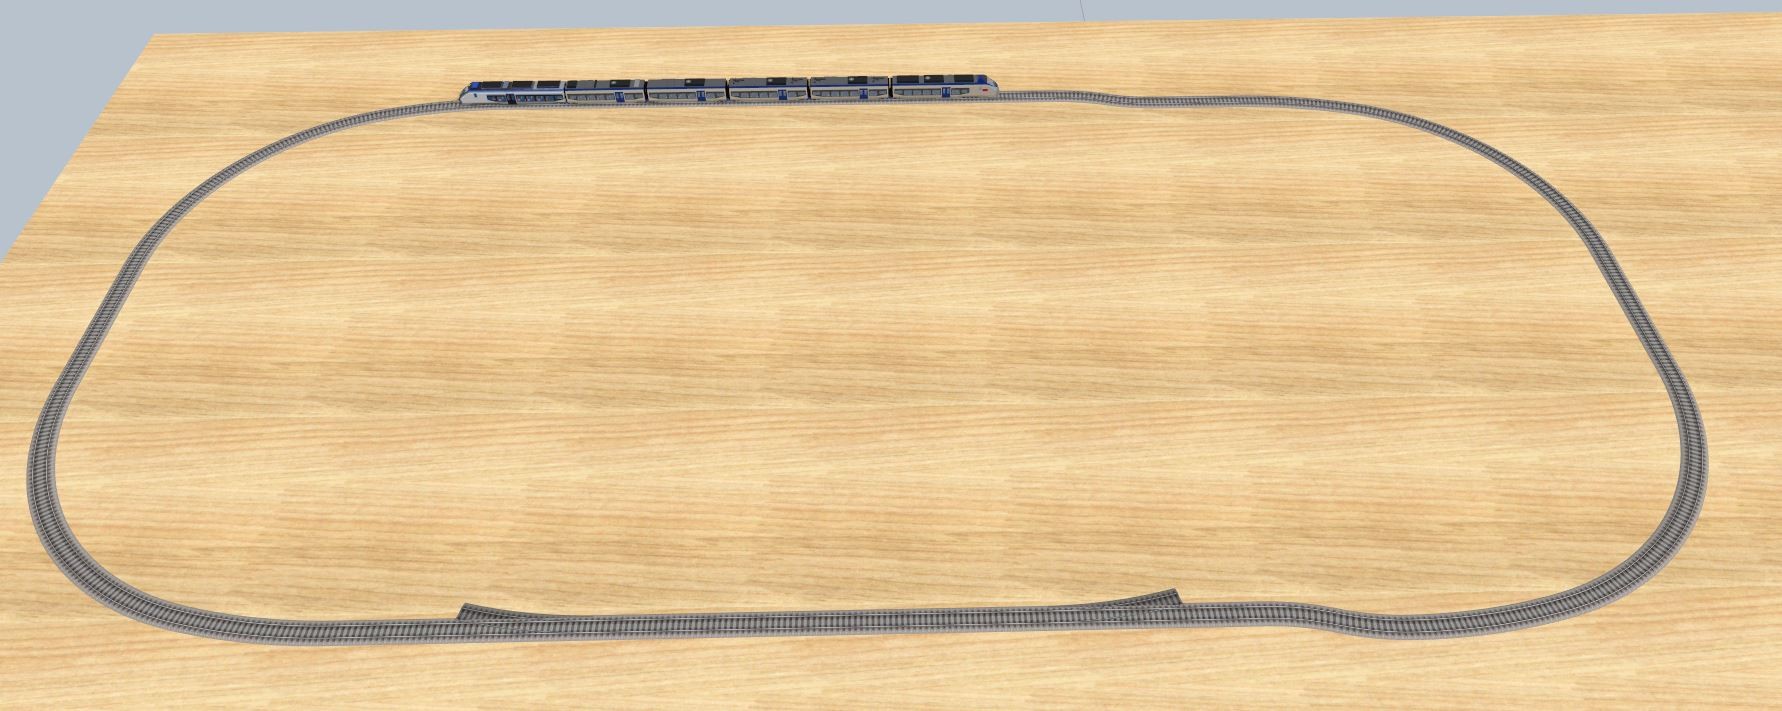
Aha..! Sliding, variable length track sections, eh..? Sneaky..! Thanks for the clarification. The middle section is a pig's ear, too, and requires some fettling. I'm glad I'm doing this with on-screen track, and not buying the 'real' parts needed..! I've finally 'twigged' that there's a raised portion, too, so now to work out how to do inclines, and by how much... Aha..! Verschiebbare, längenvariable Gleisabschnitte, eh..? Hinterhältig..! Danke für die Klarstellung. Der Mittelteil ist ebenfalls ein Schweineohr und erfordert etwas Putzen. Ich bin froh, dass ich dies mit einer Bildschirmspur mache und nicht die "echten" Teile kaufe, die benötigt werden..! Ich habe endlich "verzweigt", dass es auch einen erhöhten Teil gibt, also jetzt, um herauszufinden, wie man Steigungen macht und um wie viel ...
-
Indeed, so did I; I don't know how the track, as printed, could work. An elegant solution, which I've adopted, is to render the right and left North/South straights symmetrical, and have the same 'squiggle' on the lower run. I'm not expert enough to know how else to do it using standard track... Ich auch; Ich weiß nicht, wie der Track in der gedruckten Form funktionieren könnte. Eine elegante Lösung, die ich gewählt habe, besteht darin, die rechte und die linke Nord-/Süd-Gerade symmetrisch zu rendern und auf der unteren Strecke dieselbe 'Knördel' zu haben. Ich bin nicht Experte genug, um zu wissen, wie man es sonst mit Standardspuren macht ...

-
It'll be the first time I try to follow a tack plan (I'm new to this...), but when I compare the above to the plan, I don't see the '9136' points at each corner, and on the plan, the piece of track selected should be a '9110', I think. I may be wrong; others will surely have a complete explanation. Patience, they're on their way... Es wird das erste Mal sein, dass ich versuche, einem Kursplan zu folgen (ich bin neu hier ...), aber wenn ich den obigen mit dem Plan vergleiche, sehe ich nicht die '9136'-Punkte an jeder Ecke. und auf dem Plan sollte das ausgewählte Gleisstück eine '9110' sein, denke ich. Ich kann mich irren; andere werden sicherlich eine vollständige Erklärung haben. Geduld, sie sind unterwegs... Edit : You're right, of course. The culprit is the 'squiggle' in the top run, with the two '9122' curves. If these are replaced by a straight, the offset disappears. If they are kept, I don't know how a 'real' layout would work, but it's easy to correct in MBS by extending the right-side 9104 until the offset is gone, then using an extended 9103 to join the lower run. I've chosen the latter option. I also now understand that what I thought were 9136 'points' are just curves. I'll work that out later... Edit: Du hast natürlich recht. Schuld daran ist der „Knördel“ im obersten Run mit den beiden „9122“-Kurven. Werden diese durch eine Gerade ersetzt, verschwindet der Versatz. Wenn sie beibehalten werden, weiß ich nicht, wie ein "echtes" Layout funktionieren würde, aber es ist in MBS leicht zu korrigieren, indem man die rechte Seite 9104 verlängert, bis der Versatz weg ist, und dann eine verlängerte 9103 verwendet, um den unteren Lauf zu verbinden. Ich habe die letztere Möglichkeit gewählt. Ich verstehe jetzt auch, dass das, was ich für 9136 "Punkte" hielt, nur Kurven sind. Das werde ich später klären...
-
If you mean 'export' from the 3D Train Studio (MBS...) : there is an Export feature, but only in the MBS format, which cannot be used by other software. It's used for exchanging models between Users. Wenn Sie "Exportieren" aus dem 3D Train Studio (MBS...) meinen: Es gibt eine Exportfunktion, jedoch nur im MBS-Format, die von anderer Software nicht verwendet werden kann. Es wird für den Austausch von Modellen zwischen Benutzern verwendet.
-
Not strictly true, I find, in my (admittedly limited...) experience. There are several 'source' files which may serve as a basis for one use or another (notably 'Obj', but also 'Fbx', 'Stl' and others...). They may need some work to optimise for 3D modelling or 3D printing, but I've done both from 'Pdf' files destined for cut-out 3D paper models, so much is possible..! I've had a quick look on t'web, though, and seen nothing for this particular building. Are there any other buildings that are similar, to serve as a base for re-work..? Depending upon realism and detail required, even decent photos could be useful, to someone adept in the use of 3D tools. Good luck with the hunt. Nicht ganz richtig, finde ich nach meiner (zugegebenermaßen begrenzten...) Erfahrung. Es gibt mehrere 'Quelldateien', die als Grundlage für die eine oder andere Verwendung dienen können (insbesondere 'Obj', aber auch 'Fbx', 'Stl' und andere...). Sie benötigen möglicherweise etwas Arbeit, um sie für die 3D-Modellierung oder den 3D-Druck zu optimieren, aber ich habe beides aus 'Pdf'-Dateien gemacht, die für ausgeschnittene 3D-Papiermodelle bestimmt sind, so viel ist möglich..! Ich habe jedoch kurz im t'web nachgesehen und nichts für dieses spezielle Gebäude gefunden. Gibt es noch andere ähnliche Gebäude, die als Basis für die Überarbeitung dienen könnten? Je nach Realismus und erforderlicher Detailtreue können sogar anständige Fotos für jemanden nützlich sein, der sich mit 3D-Werkzeugen auskennt. Viel Glück bei der Jagd.
-
The AO works very well, and adds a lot, with subtlety to the overall aspect. A success. Die AO funktioniert sehr gut und fügt dem Gesamtaspekt viel Subtilität hinzu. Ein Erfolg.
-
I would suggest selecting the item, then using the 'Pin' in the Properties box to lock the item. For a GBS panel, it might be useful to firstly select all of the items, and 'group' them; then pin (lock...) the group. A double-click on a pinned item gives access, if it's needed later. Hope this helps; I hope it right, too..! Ich würde vorschlagen, das Element auszuwählen und dann die 'Pin' im Eigenschaftenfeld zu verwenden, um das Element zu sperren. Für ein GBS-Panel kann es sinnvoll sein, zunächst alle Elemente auszuwählen und sie zu „gruppieren“. dann pinnen (sperren...) Sie die Gruppe. Ein Doppelklick auf ein angeheftetes Element ermöglicht den Zugriff, falls dieser später benötigt wird. Hoffe das hilft; Ich hoffe es stimmt auch..!
-
Ah, that's a question for the Experts, but, before that, can you try re-installing MBS (Make a back-up first, of course...)..? Just a thought... Ah, das ist eine Frage an die Experten, aber können Sie vorher versuchen, MBS neu zu installieren (Natürlich zuerst ein Backup erstellen...)..? Nur ein Gedanke...
-
Works for me, too... Funktioniert bei mir auch...
-
I don't understand. I use 'drag'n'drop to get stuff from 'My Favourites' to the layout, in exactly the same way as from the catalogue. Doesn't everyone do that..? I never use the ID, except when using one posted on the Forum. Ich verstehe nicht. Ich benutze 'Drag'n'Drop' um Sachen aus 'Meine Favoriten' ins Layout zu bringen, genauso wie aus dem Katalog. Macht das nicht jeder..? Ich verwende die ID nie, außer wenn ich eine im Forum gepostet verwende.
-
It rather depends on how many 'favourites' you have. I have created sub-folders in 'My Favourites', and can easily find anything in there. If you have that much more, then just create more detailed sub-folders. Don't over-crowd any folder. Physiologically, humans are unable to choose quickly from a list of more than seven items. If you have a category of more than seven, create another folder. Es hängt vielmehr davon ab, wie viele „Favoriten“ Sie haben. Ich habe Unterordner in 'Meine Favoriten' erstellt und kann dort leicht alles finden. Wenn Sie so viel mehr haben, erstellen Sie einfach detailliertere Unterordner. Überfüllen Sie keinen Ordner. Physiologisch gesehen ist der Mensch nicht in der Lage, schnell aus einer Liste von mehr als sieben Punkten auszuwählen. Wenn Sie eine Kategorie von mehr als sieben haben, erstellen Sie einen anderen Ordner.
-
It's the '.anim' file itself which gives the names to MBS. Blender doesn't have these names; it doesn't work in the same way. Here's a sample '.anim' file; the names, followed by the frame range for each one, and a couple of parameters... Es ist die '.anim'-Datei selbst, die MBS die Namen gibt. Blender hat diese Namen nicht; es funktioniert nicht auf die gleiche Weise. Hier ist eine Beispieldatei '.anim'; die Namen, gefolgt vom Rahmenbereich für jeden und ein paar Parametern... Door_L;0;99;noloop;noautoplay Door_R;100;199;noloop;noautoplay Pant_F;200;299;noloop;noautoplay Pant_R;300;399;noloop;noautoplay
-
Why stop there..? I can imagine a train pulling into a station, triggering a mad rush of passengers, all keen to disembark and hurry to the exits. This lady seems to be nervous, or looking for something... Warum hier aufhören..? Ich kann mir vorstellen, wie ein Zug in einen Bahnhof einfährt, was einen wahnsinnigen Ansturm von Passagieren auslöst, die alle darauf aus sind auszusteigen und zu den Ausgängen zu eilen. Diese Dame scheint nervös zu sein oder etwas zu suchen...
The same applies to buildings, and it's an excellent system when there's no intention of visiting the inside with a roving camera. Here's the same system used on my Japanese station building... Dasselbe gilt für Gebäude, und es ist ein ausgezeichnetes System, wenn man nicht mit einer umherziehenden Kamera das Innere besuchen möchte. Hier ist das gleiche System, das in meinem japanischen Bahnhofsgebäude verwendet wird...