Andy
Mitglieder
-
Benutzer seit
-
Letzter Besuch
Alle erstellten Inhalte von Andy
-
 Hallo Timba, für die Unterscheidung hat das Modul doch einen Namen. Unterschiedliche Modulnamen sind wichtig. Das Problem ist nur - wenn du einen Modulnamen nachträglich änderst, ändert er die Verweise mit? Also, da wäre ich vorsichtig. Gruß Andy
 -
Das müssen wir sowieso einrahmen, so oft zeigt er seinen Humor ja nicht.
-
Hallo Roland, da mußt Du Lua einsetzen, weil Du einen Text mit einer Zahl verbinden willst. Es reicht aber, wenn Du die Aktion 'Skript ausführen' einsetzt und dann einen Einzeiler einsetzt. Nur mußt Du Dir trotzdem mal die Stringfunktionen der Lua-Bibliothek ansehen, da Du je nachdem, wie's werden soll, eventuell unterschiedliche Kommandos brauchst. Wenn Dir englisch nichts ausmacht, schau mal hier Gruß Andy p.s.: wie Du die MBS-Variablen dann adressieren mußt, da machst Du Dir am besten ein 'Variable setzen'-Beispiel in der 'normalen' EV und wandelst es dann in Lua um (<>).
-
Hallo Max, hast aber gleich richtig viele verschiedene Blümekens gepflanzt. Sehr schön adaptiert! Und der Holzstamm im Sägewerk ist auch angepaßt. Prima! Ich finde da nichts mehr was auffällig fragwürdig wäre. Supertolles Modell! Gruß Andy
-
Hey, glad you made it Eric! Oh man, I launched a chain reaction! Two eggs to go!
-
Im Gimp gibt's eine Funktion namens 'Heilen'. Vielleicht hilft die. Ansonsten - Mesh gehabt. Gruß Andy
-
I know. Important is to have a curve at all. And it's all about the will to have the result. @Timba, ja wat nu? Ich hab' gedacht da kriege ich morgen schon die Content-ID von dem Modellentwurf des Tests. Du willst doch was zum Nikolaus. Grüße Andy
-
Hallo Christian, in Halt.Wagen 1 ist vom Typ Objekt und darin steht nix, deswegen geht der Wagenzähler an etwas, das nicht existiert. Klar, dass er meckert. In V5 kannst Du Äpfel nicht mehr mit Birnen vermischen. Wenn Du also einen Wagen mit dem Objektnamen 200 hast, dann kannst Du da nicht mehr einfach 1 draufaddieren. 200 ist keine Zahl mehr und auch kein Text mehr, sondern ein Objektname. Da mußt Du Dich vermutlich erstmal drauf einstellen. Gruß Andy
-
Hallo Markus, zuerst das mit dem Häkchen: das schaltet MBS 'frühmorgens' wenn's dämmert selbst aus und 'frühabends' wenn's dämmert selbst ein. 'Mond'==ein, 'Sonne'==aus. Wechsel: 6:00 und 18:00. Dann das mit der Tabelle: ja - genau das ist mit Lua machbar. Da habe ich auch schon Beispiele eingestellt. Schau mal ungefähr hier LINK Also, ich freue mich jede Animation und trage sie genüßlich in meine Riesentabelle an, die dann Minute für Minute (virtuell) nacheinander Lichtergruppen umschaltet. Das sieht schon schön aus, wenn da ein Stadtteil so nach und nach morgens aufwacht. Gruß Andy p.s.: mittlerweile habe ich diese Zeittabelle nicht nur für Animationen, sondern auch für andere Schalter und Sichtbarkeiten erweitert.
-
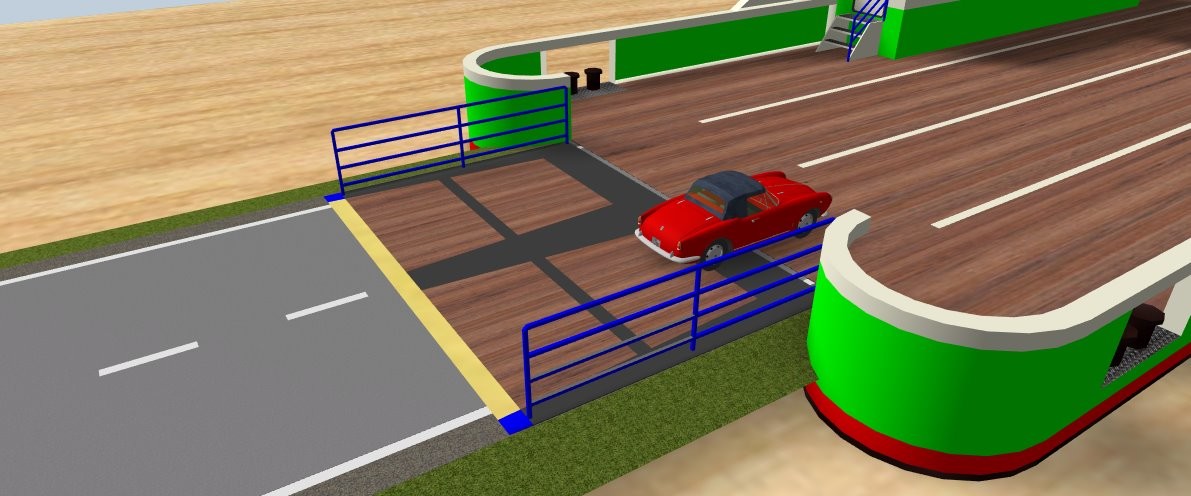
Wenn man die Fähre zweispurig an eine normale Straße anlegen lassen will, muß man sie doch mit Faktor 1,5 skalieren! Damit die Autos beim Einfahren dann nicht zu sehr hoppeln, empfiehlt es sich ein normales Straßenstück unsichtbar mitfahren zu lassen. Bei Auffahrt auf ein virtuelles Gleis hoppelt es doch ganz schön. Die Fähre hat offensichtlich einen Andockpunkt, der aber genau in der Mitte liegt. Die Fahrzeuge sollten aber eher auf einer der Spuren stehen und ich glaube, die Straßenstücke haben ihren Andockpunkt auch nicht in der Mitte, sondern außen. Da müßt ihr mir erklären, wie's gedacht ist. Mir ist er dort eher im Weg. Das Bild zeigt die skalierte Version der Fähre: p.s.: da auf der Fähre die Fahrzeuge vermutlich sowieso immer nur in einer Richtung stehen, ist die unskalierte Fähre sicherlich auch einsatzfähig. Aber es sind dann noch Weichen vor und auf der Fähre nötig. Vielleicht wäre es sinnvoll, als Anlage da noch eine Art Modul zu bauen, das dann an ein normales Straßenstück eingefügt werden kann um Schwierigkeiten an der Anlegestelle einfach zu erschlagen. liebe Grüße Andy

-
Was für 'ne Frage! Ist ein Prachtstück geworden, Gratulation! Opax, ich bin wirklich stolz auf Dich, dass Du da allen Schwierigkeiten getrotzt und durchgehalten hast. Ich bin auch sicher, dass es für Dich nun ein tolles Gefühl ist. Und ein ganzes Paket von an Axel! Dass Du da trotz Deinen eigenen gewiß nicht einfachen Projekten trotzdem Zeit gefunden und geholfen hast, ist großes Kino! So kann's mit MBS weitergehen. Gruß Andy
-
...und woher weiß MBS welche der Animationen eine Lichtanimation ist? Man könnte vielleicht generell allen _LS- und _LC-Objekten ihre Fähigkeiten nehmen. Dann bleiben Signale aber auch dunkel. 'natürlich' ist in dem Fall aber sehr subjektiv. Gruß Andy
-
tststs, habe noch die Eierschalen hinter den Ohren und muß schon erklären, sowas. Das Leben ist hart! There's one thing missing: Create a file cube.anim with that content: _AnimSignal;0;1;NoAutoPlay;NoLoop That one is needed if you want it to be a 'Signal' in MBS. Also you have to choose that type from the template list. Then give names to position 0 and 1 and all should be fine. Of course, because we still have the center at 0,0,0 with the cubes, just the upper half appears on the board moving it out of the catalog. Doesn't matter - it's just a test.
-
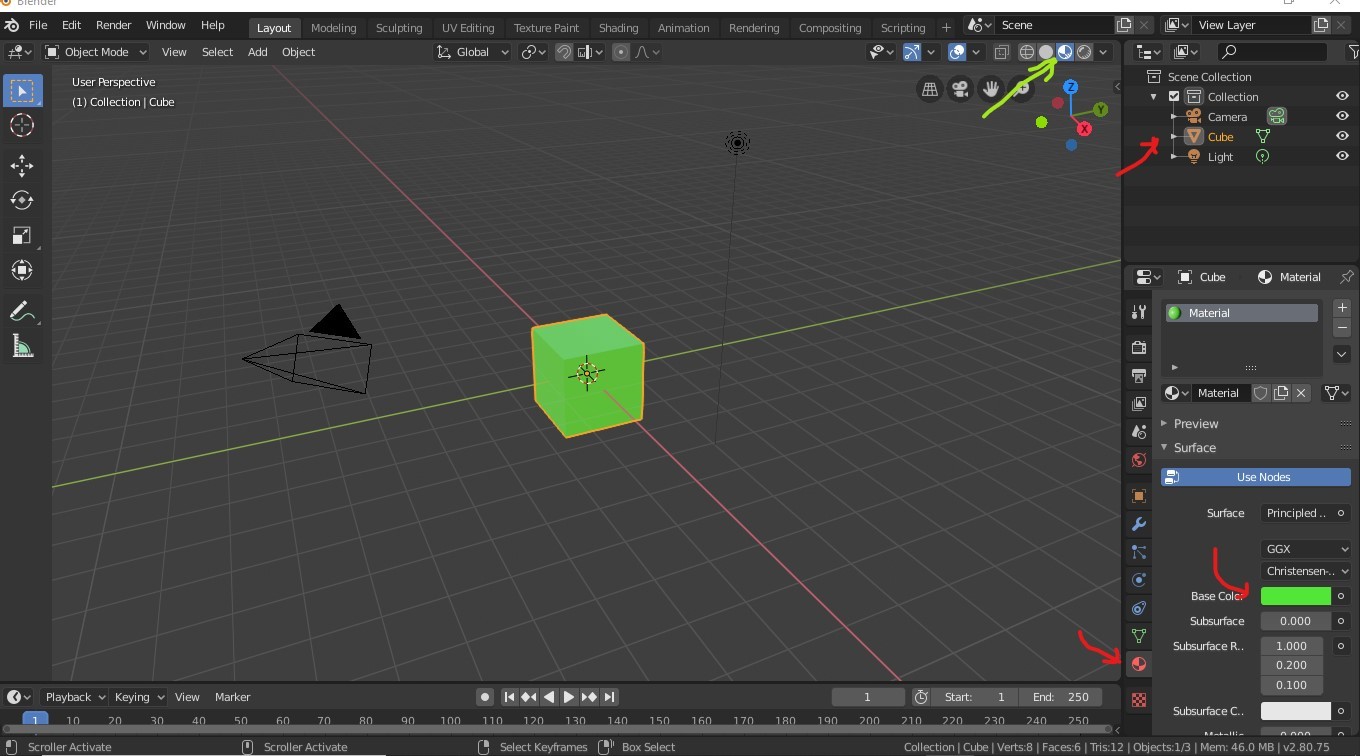
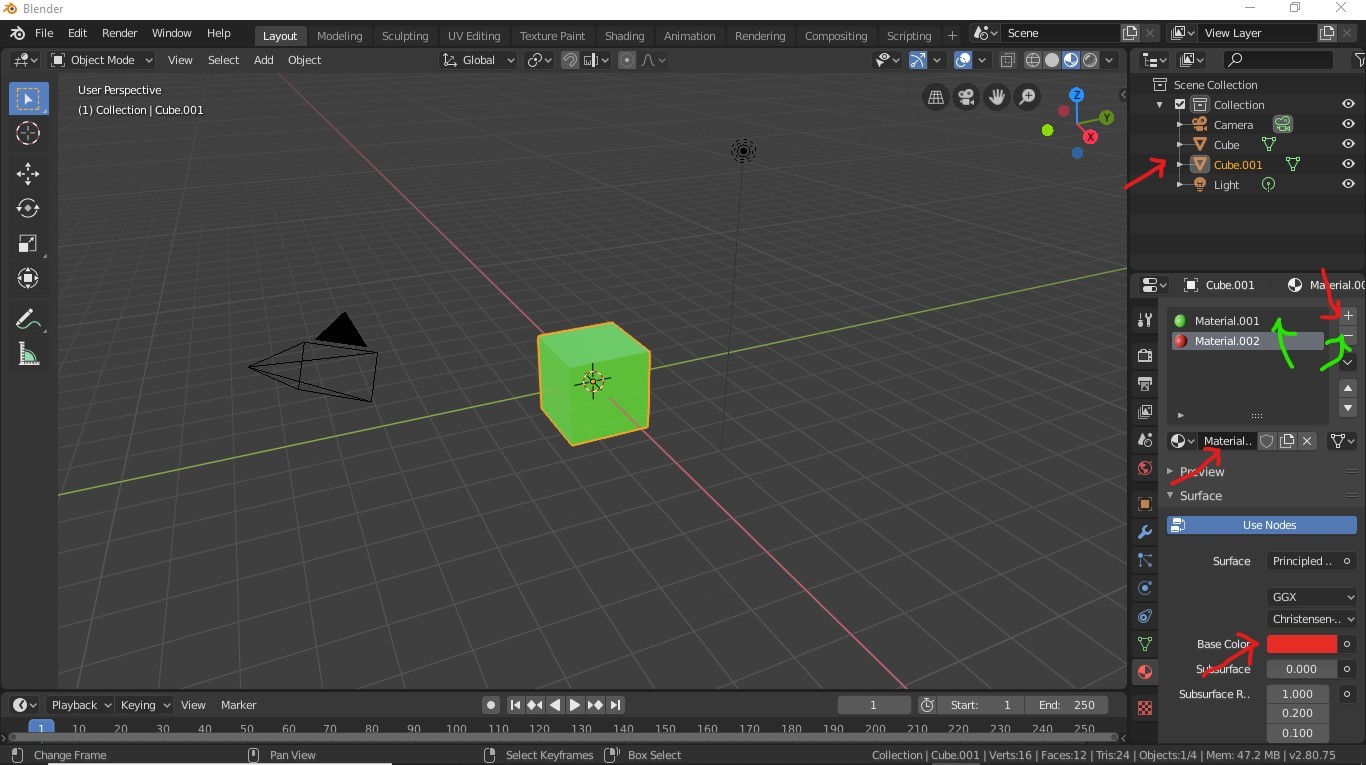
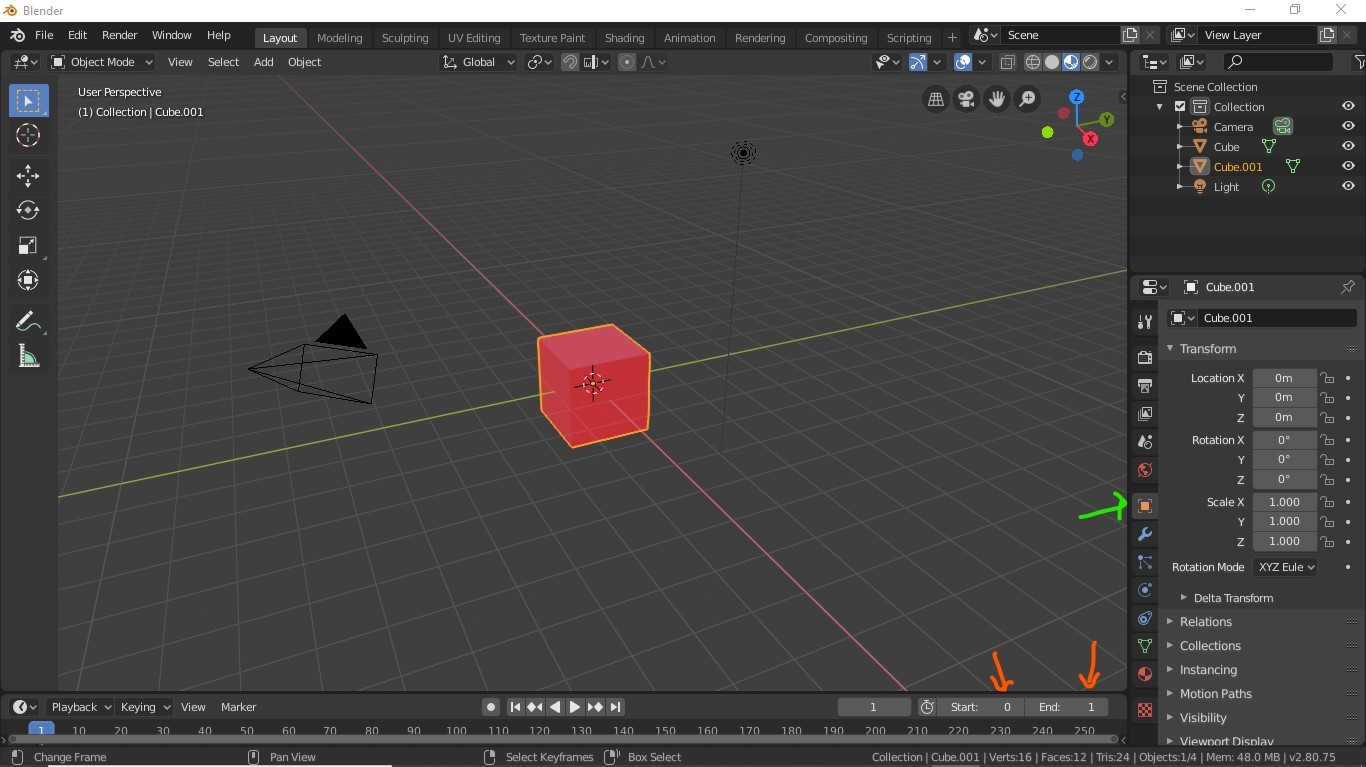
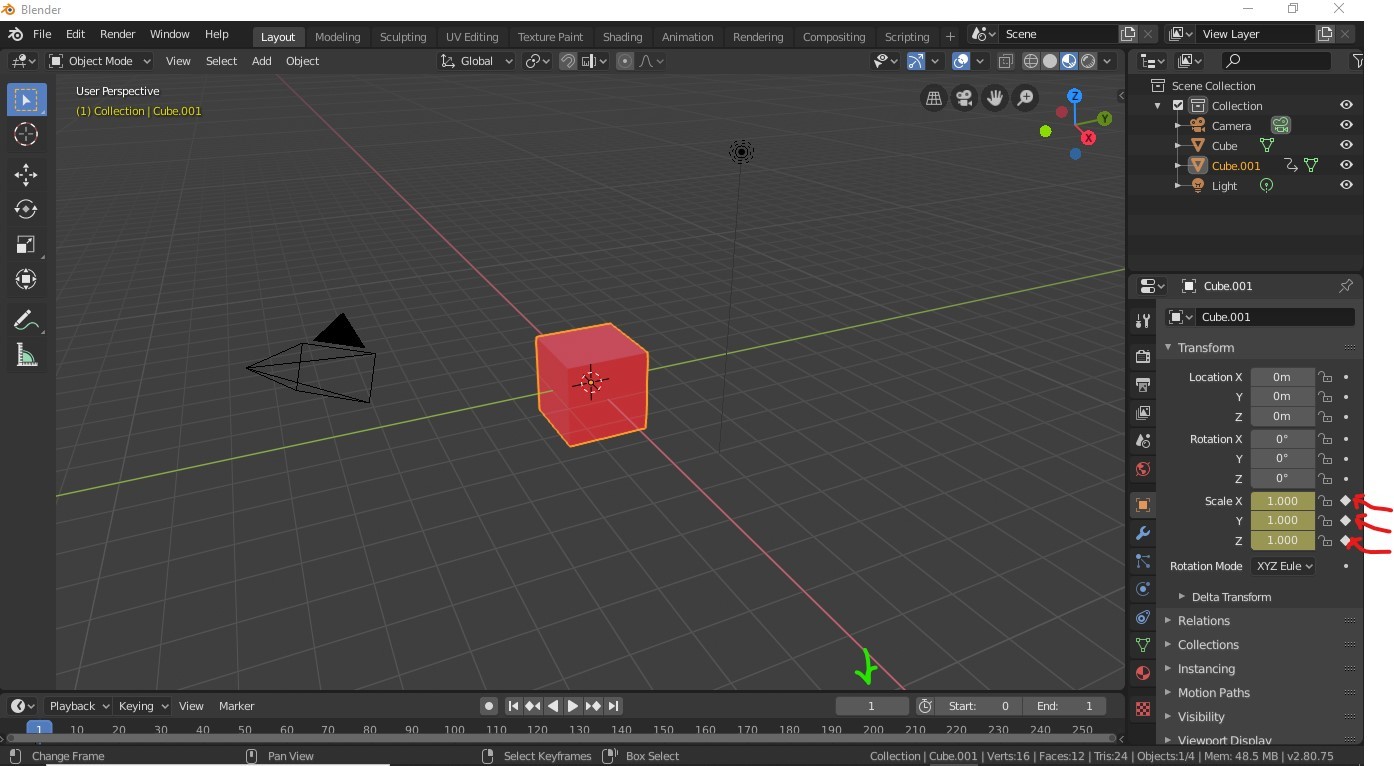
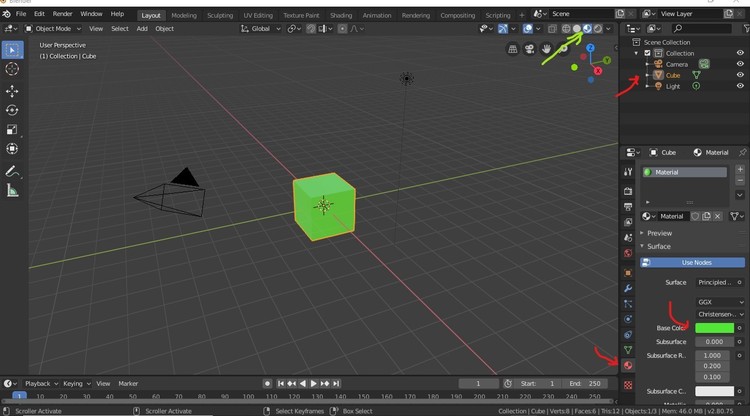
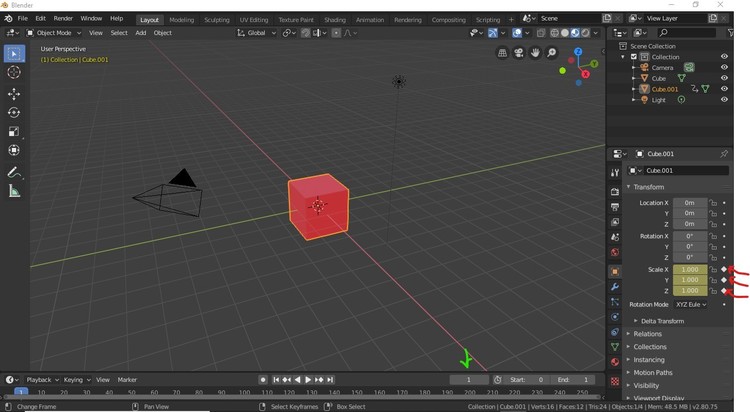
Hi Eric and Timba about 2.) let's do that in the end, that's a thing I've already not done, but it's described in the Wiki and shouldn't be too hard. Timba - not much to do in that first 'lesson'. Do it as well. For this sample we do it with standard colors - no texture yet. Now - 1.) Animation does the trick. When you open Blender, there's the cube. Select it (right-click on it), then scroll down in the object's options in the right lower box (be sure, it's the cube, not 'world') to the material symbol, then select a color. Then watch the green arrow, click there to have the 'material-view'. After this, we need a second cube. In 'Menu Object' there is 'duplicate objects', use that or simply use the key shift-D. press Esc afterwards, or the new one follows you until eternity. It's now exactly in the same position as the first one. Means you hardly can see it, from now on always check which one is selected in the object list. We're now at Cube.001 and we need a new material for that one. (When building the real signal, this will be the same image-based material, but not yet). With the red arrows you will see what to do. Then follow the green arrows and delete material.001 from it. Pretty random which one we see now, maybe even a mix or flickering, both are same size, same position. We are now ready for the animation! And because it's a digital switch, we just need two frames for it. At the bottom there's already an animation window, let's adjust the frame margins. And then choose the transform datas of our red cube. (green arrow) Let's do it the real easy way that time. We don't even need the animation's action sheet, timeline or whatever. The animation goes: Frame 0: the green cube stays at full size, the red cube will be scaled down a bit. Frame 1: vice versa. Building the signal later, you could also use 'position' and shift a dark plane over one of them. Shifting it over the other one in the end frame. Or have a dark plane right after the light and move the light behind it, depends on your personal favorite or dependencies in the project. Okay, now we're at frame 1 with the red one being selected. Red one should be at full size there. Now that's all you have to click: That makes the frame a key frame with those values for the selected object being assigned to the key frame. Really, that's it! For the both of you I just have to say now, that you choose the current frame with the green arrow pointing on it and enter those values for both cubes. Choose, let's say 0.9 for x,y,z for the smaller size. Not much to do and nothing more to be explained, except, that you may open such a value 'lock' (i don't mean the real lock symbol to the next there, but those the red arrows point to), and close it again. color of the value may change, depending on being an overwritten one, or the one being locked. It should end in that color shown above. If you have done that for both cubes and both frames, you already got it. except - you want it to have it lit. surely you will. So rename the both cubes and write _LS before, that will cause MBS to make them lit all time. If you toggle frame 0 and 1 now (green arrows) the cubes should do it! We are done!!! Export that one to a .glb-file, then launch MBS and have a new model. Select switch there, digital switch and that's it! Tell me about! cheers Andy p.s.:


-
Hallo Siejay, ist doch auf jeden Fall katalogwürdig. Warum sollte die Arbeit im Dunklen bleiben? Gruß Andy
-
-
Hi Eric & Tom, just take the beginner's cube as it is. Make a texture picture in paint.net or with the gimp in 512x512 png with alpha-texture. Then just read this one post - Link As soon as you made it to import whatever you've created that way in MBS - and placed it from 'my models' onto the board, success provides the 'familiar feeling'. Nothing else can replace that. From that point on things go their own way. You're not lost anymore and each 'button' more guarantees that this will not be too boring too soon. Andy
-
Hallo ihr, danke erstmal für die Tipparbeit. Wenn mich dann doch noch eins der existierenden Tunnellöcher auf meiner Anlage nervt, werde ich das mal so probieren. Mit der Höhenanpassung bin ich jetzt eigentlich recht zuversichtlich, da wir ja nun die neuen Zusatzfunktionen haben. Die waren sowas von notwendig. Was Bodenplatten angeht, werde ich jetzt erst einmal eine feiner gerasterte Zusatzplatte für die Flußufer einsetzen. Da kann die Rasterung nicht fein genug sein. Gruß Andy
-
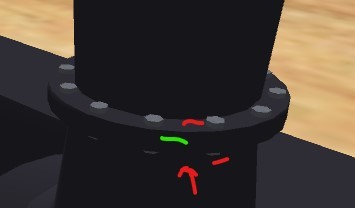
hier auch: grün als Polys lassen, aber rot als teiltransparente Fläche - ist letztlich ein Deckel, ist rund und die Schrauben haben eigentlich keine Höhe. Ein Viereck mit löchriger Textur und Bingo. Aber - ich nur Azubi! p.s.: Die Grafik von dem Teil mußt Du ja nicht pinseln. Neue Blender-Datei: Append-Funktion aus dem Dateimenü, das Objekt aus der IV K-Datei holen, eigenständiges 'Mein-Modell' machen. In MBS richtig vor die Kamera legen und abfotografieren. Ab in den Gimp. Im Gimp eine Kreismaske nehmen und das unerwünschte Holz löschen. Fertig.
-
noch eins: der rote Radanteil mit den Speichen. Hast Du bestimmt viele Polys eingesetzt. Ein Rechteck mit teiltransparenter Textur würde sehr viel einsparen und total ausreichen. Es ist letztlich doch nur eine abdeckende Fläche, oder? Ich habe das Gefühl, die Methode läßt sich da noch öfters einsetzen. Gruß Andy

-
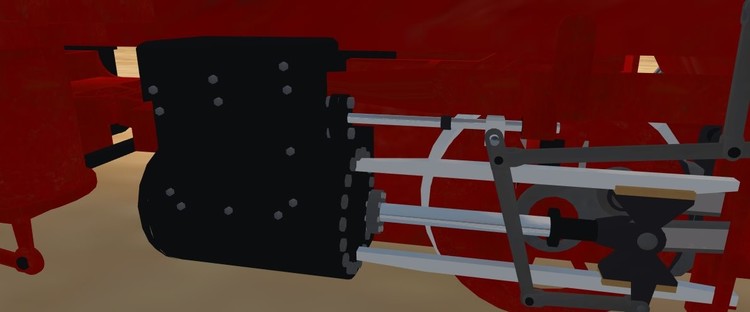
Hallo Frank, ich weiß nicht, ob Du da wirklich unbedingt jede Schraube darstellen mußt. Ich finde, in dem Ausschnitt den ich da zeige, kannst Du einiges einsparen. Ansonsten, bevor Du Dich da richtig quälst und das Modell im Endeffekt verwerfen mußt, frage doch mal um eine Ausnahmegenehmigung nach, dass Fahrwerk und Aufbau in zwei separaten Modellen erschaffen werden. Wenn das Ding eben so komplex ist. Ich habe da beim Vorschlagsphoto schon die Luft angehalten. Und andere Dampfloks brauchen ihren Tender... Gruß Andy
-
Au das tut weh(en) Hoffentlich driftet der wichtige Thread jetzt nicht ab.
-
Hallo Frank, sei so gut und mach doch vielleicht noch eine Variation ohne jedes Gehäuse. Also im Prinzip das Licht alleine. Gruß Andy
-
Klingt auf Anhieb nicht schlecht mit der Extrabodenplatte. Aber wie verschmelzt ihr dann die Höhen? Ich meine, da wo ein Tunnel ist, ist auch ein Berg. Und der reicht gewiß über die kleine Bodenplatte hinaus. Gruß Andy
-
Ich habe neulich schon mal geschrieben, dass ich denke, das Licht ein Hauptthema der V6 sein sollte. Neo hat ja schon angekündigt, dass er da viel Code umschreiben will/muß, damit wir auch wieder ein paar FPS mehr bekommen. Das braucht's für jedwedes Licht mit Sicherheit. Ich bin da sehr zuversichtlich, dass das miteinander einher geht. Ich bin mir nicht ganz sicher, mit welcher Technik der _LC-Typ arbeitet. Wenn ich mir die Effekte so ansehe, denke ich eigentlich, dass er auf dem RGB-Farbraum arbeitet, denn intensiv eingesetzt, matscht er alles in ein Grau hinein. Vielleicht wäre es mal interessant nur dieses Ding mal auf HSV umzustellen und die Sättigung zu betonen. Wenn da tatsächlich was bei rumkommt, könnte man das noch in die V5 mit reinbringen. Wenn es bereits auf HSV arbeitet, weiß ich auf Anhieb auch nicht, wie man's besser hinkriegt. Gruß Andy